Turn on suggestions
Auto-suggest helps you quickly narrow down your search results by suggesting possible matches as you type.
- Home
- Planner
- Planner Blog
- Microsoft Planner: New Year–New Features!
Microsoft Planner: New Year–New Features!
- Subscribe to RSS Feed
- Mark as New
- Mark as Read
- Bookmark
- Subscribe
- Printer Friendly Page
- Report Inappropriate Content
Published
Mar 06 2019 03:30 PM
8,323
Views
Mar 06 2019
03:30 PM
Mar 06 2019
03:30 PM
First published on MSDN on Feb 05, 2018
This year sees an acceleration in the delivery of new features to Planner and I’m taking the opportunity to walk through some of these and show how one might use them. The Plan I am using for my examples is one that featured in some of my earlier Planner blogs – and is the Change Management plan for Office 365 – generated and updated daily by an Azure function that reads my Message Center posts and adds them as categorized and labelled tasks – assigned to the person responsible for that workload. For more information please see Office 365 Message Center to Planner- PowerShell walk-through–Part 2 where I walk through the code.
Groups and Filters
First up are a couple of additions to the ‘Group by’ drop down. I can now group by due date – to see my late tasks, as well as today’s, this week, next week and future tasks in vertical columns.

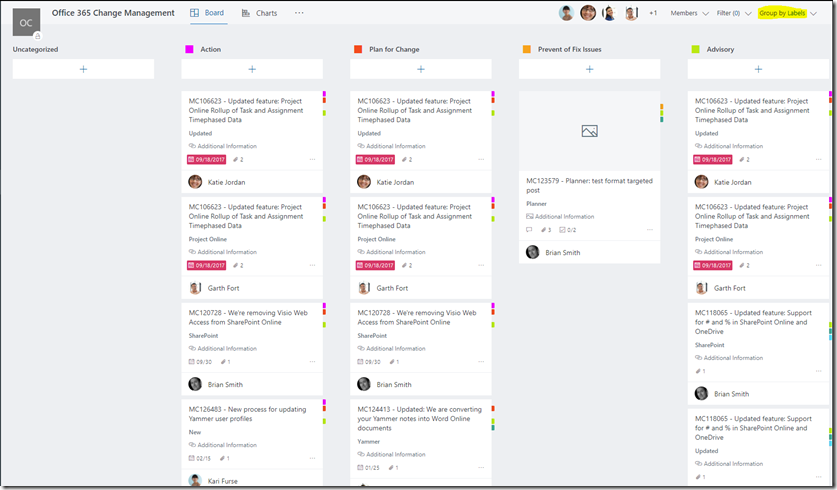
Next is group by labels – the coloured fly-outs that let you categorize the tasks. In my Change Management plan I pulled in the various message center types so I have columns for Action, Plan for Change, Prevent or Fix Issues and a couple of others. As you can see there will be some tasks that appear more than once – as they were tagged with multiple labels.
Probably my favourite new feature is the Filter option. This appears top right next to the Group by options and allows you to filter down to specific tasks – and there are some built in filters of the same due date options seen in the above view, or any of the labels, or the assigned resources of free text. In this next screenshot I have used a combination of these – to show me any tasks that contain the word “New” (entered in the top of the dialog – it says keyword before you type anything) that are also due in the future or have no date, and are labelled as Advisory or Awareness. You can see in the header my filter now has a (5) next to it as a reminder that filters are set – and while the dialog is open I also see counters for the selected options (Due (2) and Label (2)). This works dynamically – filtering as you make new selections.

Schedule View
The Schedule view is really cool and can be found in the Plan header – alongside your Board and Charts tabs. It isn’t in the screenshots above as the feature hadn’t quite hit production as I was writing this – so this example uses a different plan in one of our testing rings. Any plan with a start and end date will display showing the full duration – in red here for ones that have started and in white for ones yet to commence. If the plan just has a due date then it just displays on that day. You can also see unscheduled tasks displayed on the right hand side.

You can also drag and drop – so here I have dragged my iCal Feature task to 2/2 – and it sets the due date for me.

You can also drag the right edge of the task to set a different due date – and have the start date set at the same time. The schedule view also obeys any filter or group settings – so this next shot shows that I have a filter (I just entered the word ‘Data’) and I’ve changed the grouping to Assigned to.

As I was finalizing this posting the Schedule feature went live in my tenant – so I decided to include the following schedule view from my O365 Change Management plan – but keep the ones above too as they show well tasks that have a start and finish date. In the following shot you can see the due dates fro several message center items and you will see that MC124413 shows up twice. This is somewhat intentional as my Azure Function for copying in the messages to my plan will duplicate into multiple buckets if the title hits multiple bucket terms – and in this case it is in my Yammer and Updated buckets.

iCal Integration
The iCal integration will be coming along a little bit later and the option will be under the elipses next to the Schedule option in the plan header. If you select to “Add plan to Outlook calendar” it will pop up a dialog allowing you to choose to publish the plan to an iCalendar feed – and then add to Outlook. The plan then gets added to your Outlook as an additional calendar so you can track your plan deliverables. I’ll add some screenshots once that feature is live in the tenant with my O365 Change Management plan – just for completeness


The sharing of calendars will also be controllable at the tenant level via PowerShell configuration settings - see https://go.microsoft.com/fwlink/?linkid=867418
Be sure to visit the full support documentation for Planner at https://go.microsoft.com/fwlink/p/?LinkId=703808 and specific information for the calendaring features at https://go.microsoft.com/fwlink/?linkid=867416
And finally…
I think this one slipped out a while back – without much of a fanfare – but you can now copy tasks in Planner by clicking the ellipses on the tasks and selecting “Copy task”. This will then allow you to choose which items you want to be in the copy, and to edit the task name – then when you click Copy you will have a new task. It will be in the same bucket from which it was copied – but obviously you can move it wherever you need it in the plan. Don’t forget if this isn’t quite what you need that I posted a blog example of how you might use Graph to clone a whole plan - https://blogs.msdn.microsoft.com/brismith/2017/02/17/microsoft-planner-how-to-clone-a-plan-with-... .


This year sees an acceleration in the delivery of new features to Planner and I’m taking the opportunity to walk through some of these and show how one might use them. The Plan I am using for my examples is one that featured in some of my earlier Planner blogs – and is the Change Management plan for Office 365 – generated and updated daily by an Azure function that reads my Message Center posts and adds them as categorized and labelled tasks – assigned to the person responsible for that workload. For more information please see Office 365 Message Center to Planner- PowerShell walk-through–Part 2 where I walk through the code.
Groups and Filters
First up are a couple of additions to the ‘Group by’ drop down. I can now group by due date – to see my late tasks, as well as today’s, this week, next week and future tasks in vertical columns.
Next is group by labels – the coloured fly-outs that let you categorize the tasks. In my Change Management plan I pulled in the various message center types so I have columns for Action, Plan for Change, Prevent or Fix Issues and a couple of others. As you can see there will be some tasks that appear more than once – as they were tagged with multiple labels.
Probably my favourite new feature is the Filter option. This appears top right next to the Group by options and allows you to filter down to specific tasks – and there are some built in filters of the same due date options seen in the above view, or any of the labels, or the assigned resources of free text. In this next screenshot I have used a combination of these – to show me any tasks that contain the word “New” (entered in the top of the dialog – it says keyword before you type anything) that are also due in the future or have no date, and are labelled as Advisory or Awareness. You can see in the header my filter now has a (5) next to it as a reminder that filters are set – and while the dialog is open I also see counters for the selected options (Due (2) and Label (2)). This works dynamically – filtering as you make new selections.
Schedule View
The Schedule view is really cool and can be found in the Plan header – alongside your Board and Charts tabs. It isn’t in the screenshots above as the feature hadn’t quite hit production as I was writing this – so this example uses a different plan in one of our testing rings. Any plan with a start and end date will display showing the full duration – in red here for ones that have started and in white for ones yet to commence. If the plan just has a due date then it just displays on that day. You can also see unscheduled tasks displayed on the right hand side.
You can also drag and drop – so here I have dragged my iCal Feature task to 2/2 – and it sets the due date for me.
You can also drag the right edge of the task to set a different due date – and have the start date set at the same time. The schedule view also obeys any filter or group settings – so this next shot shows that I have a filter (I just entered the word ‘Data’) and I’ve changed the grouping to Assigned to.
As I was finalizing this posting the Schedule feature went live in my tenant – so I decided to include the following schedule view from my O365 Change Management plan – but keep the ones above too as they show well tasks that have a start and finish date. In the following shot you can see the due dates fro several message center items and you will see that MC124413 shows up twice. This is somewhat intentional as my Azure Function for copying in the messages to my plan will duplicate into multiple buckets if the title hits multiple bucket terms – and in this case it is in my Yammer and Updated buckets.
iCal Integration
The iCal integration will be coming along a little bit later and the option will be under the elipses next to the Schedule option in the plan header. If you select to “Add plan to Outlook calendar” it will pop up a dialog allowing you to choose to publish the plan to an iCalendar feed – and then add to Outlook. The plan then gets added to your Outlook as an additional calendar so you can track your plan deliverables. I’ll add some screenshots once that feature is live in the tenant with my O365 Change Management plan – just for completeness
The sharing of calendars will also be controllable at the tenant level via PowerShell configuration settings - see https://go.microsoft.com/fwlink/?linkid=867418
Be sure to visit the full support documentation for Planner at https://go.microsoft.com/fwlink/p/?LinkId=703808 and specific information for the calendaring features at https://go.microsoft.com/fwlink/?linkid=867416
And finally…
I think this one slipped out a while back – without much of a fanfare – but you can now copy tasks in Planner by clicking the ellipses on the tasks and selecting “Copy task”. This will then allow you to choose which items you want to be in the copy, and to edit the task name – then when you click Copy you will have a new task. It will be in the same bucket from which it was copied – but obviously you can move it wherever you need it in the plan. Don’t forget if this isn’t quite what you need that I posted a blog example of how you might use Graph to clone a whole plan - https://blogs.msdn.microsoft.com/brismith/2017/02/17/microsoft-planner-how-to-clone-a-plan-with-... .
0
Likes
1 Comment
You must be a registered user to add a comment. If you've already registered, sign in. Otherwise, register and sign in.