- Home
- Content Management
- The SharePoint Community blog
- Code Sample: On-Demand fetching of SharePoint list items using JQuery
- Subscribe to RSS Feed
- Mark as New
- Mark as Read
- Bookmark
- Subscribe
- Printer Friendly Page
- Report Inappropriate Content
First published on TECHNET on Jul 27, 2012
This post is a contribution from Charls Tom Jacob, an engineer with the SharePoint Developer Support team.
In this blog, I will describe how to develop a custom web part that dynamically fetches items from a SharePoint list. By “dynamic”, I mean fetch items on-demand and display them, thereby providing a better user experience. It uses a combination of web services, JQuery and SharePoint object model.
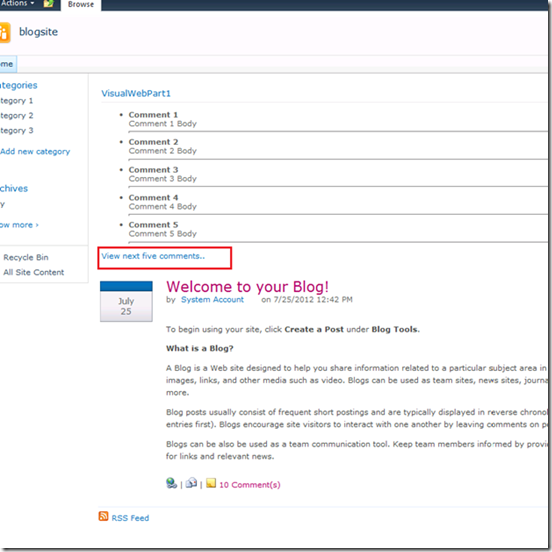
For demonstration purpose, I will be using a SharePoint blog site. Comments for a blog post is stored in a list named “Comments”; Objective is to fetch the comments on-demand (say when the user clicks on a link “view next five comments”) without reloading the entire page.
Following are the components I have developed in order to achieve this:
1. A Visual Web Part to display items.
The web part contains the JQuery logic to invoke the web service to get the required items and to render them on the page. It also provides a hyperlink to allow users to load the next set of data. A hidden field is used to track how many items have been loaded so far. This information is passed on to the web service to get the next set.
2. A web service to fetch items.
Web service reads the list items and returns them in the JSON format. SPListItemCollectionPosition is used to fetch the required set of data on a specific request.
Ok, now let’s see how to implement this:
1. Create a new Visual Web Part project in Visual Studio 2010 and add the following code to VisualWebPart1UserControl.ascx file:
<ul id="resultarea"></ul>
<script type="text/javascript">
$(document).ready(LoadData());
function LoadData() {
GetCommentItems();
}
function GetCommentItems() {
var pageTrack = $("input[id$='pageTrack']").val();
$.ajax({
url: "/_layouts/CommentFetchSvc.asmx/ReadComments",
type: "POST",
data: "{'pagenum':'" + pageTrack + "'}",
contentType: 'application/json;',
dataType: 'json',
success: function (msg) {
AppendItems(msg);
var newPageTrack = $("input[id$='pageTrack']").val();
$("input[id$='pageTrack']").val(parseInt(newPageTrack) + 1);
},
error: function (xhr, msg) {
alert(msg + '\n' + xhr.responseText);
}
});
function AppendItems(data) {
$.each(data.d, function (i, item) {
var title = item.Title;
var body = item.Body;
html = '<li><b>' + title + '</b></li>';
html += body;
html += '<hr/>';
$('#resultarea').append($(html));
});
}
}
</script>
<p>
<asp:HyperLink NavigateUrl='javascript:void(0);' id="lnkMore" onClick="GetCommentItems();" runat="server">View next five comments..</asp:HyperLink>
</p>
2. Build and deploy the Visual Web Part project.
3. Add a class library project named SPBlogCommandLib to the solution. Add reference to: System.Web.dll and System.Web.Services.dll.
4. Add a class file named CommentFetchSvc.cs and add the following code:
public class BlogItem
{
public string Title { get; set; }
public string Body { get; set; }
}
[WebMethod]
[ScriptMethod(ResponseFormat = ResponseFormat.Json)]
public List<BlogItem> ReadComments(string pagenum)
{
List<BlogItem> blogList = new List<BlogItem>();
using (SPSite oSpSite = new SPSite("http://localhost/blogsite"))
{
using (SPWeb oSpWeb = oSpSite.OpenWeb())
{
SPList oList = oSpWeb.Lists["Comments"];
SPQuery oQuery = new SPQuery();
int pageNum = int.Parse(pagenum);
// Number of rows to fetch
oQuery.RowLimit = 5;
// Start reading from 1
int intIndex = 1;
do
{
SPListItemCollection collListItems = oList.GetItems(oQuery);
// Check if this are the records to be returned
if (intIndex == pageNum)
{
// Read items for the specific range
foreach (SPListItem oListItem in collListItems)
{
BlogItem item = new BlogItem();
item.Title = oListItem["Title"].ToString();
item.Body = oListItem["Body"].ToString();
blogList.Add(item);
}
break;
}
oQuery.ListItemCollectionPosition = collListItems.ListItemCollectionPosition;
intIndex++;
}
while (oQuery.ListItemCollectionPosition != null);
}
}
return blogList;
}
5. Strong name the class library project and deploy it to the GAC.
6. Create a .asmx file using Visual Studio or Notepad (I named it CommentFetchSvc.asmx) and add the following markup:
<%@ WebService Language="C#" Class="CommentFetchSvc, SPBlogCommentLib, Version=1.0.0.0, Culture=neutral, PublicKeyToken=064487d45c107d0a" %>
Make sure to modify the class attribute of the ASMX with the appropriate assembly name and public key token.
7. Enable JQuery on your site by following this blog:
http://blogs.msdn.com/b/yojoshi/archive/2010/06/17/using-jquery-with-sharepoint-2010.aspx
8. Place the ASMX file into your 14\TEMPLATE\LAYOUTS folder on your SharePoint server.
9. Add the deployed web part to a page and test the functionality.
Sample screen:
Here's the sample code for download: On-demand Webpart SampleCode
Hope you find this useful! Please share your comments and feedback.
You must be a registered user to add a comment. If you've already registered, sign in. Otherwise, register and sign in.