- Home
- ITOps Talk
- ITOps Talk Blog
- Azure Cloud Shell Tips for SysAdmins: Part II - Using the Cloud Shell tools to Migrate
- Subscribe to RSS Feed
- Mark as New
- Mark as Read
- Bookmark
- Subscribe
- Printer Friendly Page
- Report Inappropriate Content
As an Azure Advocate, one of the things I spend my time doing is learning the easiest ways for beginners to use Microsoft Azure. Today I want to share with you a few ways to utilize some tools that are built right into Azure.
In my last blog post Azure Cloud Shell Tips for SysAdmins (bash) I discussed some of the tools that the Azure Cloud Shell for bash already has built into it. This time I will go a bit deeper and show you how to utilize a combination of the tools to create an UbuntuLTS Linux server. Once the server is provisioned, I will demonstrate how to use Ansible to deploy Node.js from the nodesource binary repository.
Requirements for tutorial:
- Azure Account
- Azure Cloud Shell (bash)
- Some SSH and text editing
What’s the point of all this?
Good question. From my travels as a Cloud Advocate, I really have noticed that many users who’ve come from the world of System Administration need the tools and tutorials to walk before they can run. It’s great to use Kubernetes to orchestrate a complex distributed system. But if that’s not quite where you are in the steps of moving to the cloud, I can start with some “lift and shift” methodology.
Migration Strategies
I brought up “lift and shift” and should really go into a bit more because it’s used a lot when you discuss your migration strategy. For some companies, completely refactoring an application to a microservices or service mesh is not feasible. Setting a pace for your migration as an organization is a long term plan that requires learning for many roles in your IT organization.

If you want to migrate the right way you need to understand the resources that are available to you. In the example of Microsoft Azure, there are nearly 600 different services being offered to the user. When determining how your apps are eventually going to run in the cloud it’s ideal to understand exactly how you’ll get them there. The idea of “Migrating and Modernizing” your applications has a few key strategies as noted in this document by Azure:
Rehost - Often referred to as “lift and shift” migration, this no-code option lets you migrate your existing applications to Azure quickly. Each application is migrated as-is, which provides the benefits of the cloud without the risks or costs of making code changes.
Refactor - Often referred to as repackage, this cloud migration strategy involves some change to the application design but no wholesale changes to the application code. Your application can take advantage of infrastructure as a service (IaaS) and platform as a service (PaaS) products, such as Azure App Service, Azure SQL Database Managed Instance, and containers.
Rearchitect - Modify or extend your application's code base to scale and optimize it for the cloud. Modernize your app into a resilient, highly scalable, independently deployable architecture and use Azure to accelerate the process, scale applications with confidence, and manage your apps with ease…
Rebuild - Rebuild an application from scratch using cloud-native technologies. Azure platform as a service (PaaS) provides a complete development and deployment environment in the cloud, without the expense and complexity of software licenses, the need for underlying application infrastructure, or middleware and other resources. With this cloud migration strategy, you manage the applications and services you develop, and Azure manages everything else.
First Steps
So here are a list of different ways of looking at how to migrate applications into the cloud. For this situation I’ve leaned into some tools in Cloud Shell that are going to help me essentially “Rehost” or “lift and shift” an application. This will be a basic step into the cloud that many SysAdmins can use to begin the process of building more cloud native applications.
First, open a cloud shell, this can be done by going to the cloud shell logo in the portal, right of the search bar or navigate directly by going to https://shell.azure.com/.

The Azure Cloud Shell contains all the tools used in this tutorial. The steps will be as follows:
- Use git to get the helper script and ansible repo (create-vm-tutorial)
- Review the script, execute it from the cloud shell to create a Ubuntu LTS Server
- Review and execute the Ansible playbook from the cloud shell to install Node.js
- SSH in, deploy demo-app
For this example we’ll just use demo-app to show it’s all working.
I’ve logged into my shell and now I will grab the create-vm-tutorial repo that contains the bash script and Ansible playbook I need.
git clone [git@github.com](mailto:git@github.com):jaydestro/create-vm-tutorial.git

cd create-vm-tutorial/

jay@Azure:~/create-vm-tutorial$ ls -al

total 24

drwxr-xr-x  4 jay jay 4096 Jun 25 17:30 .

drwxr-xr-x 34 jay jay 4096 Jun 25 17:30 ..

drwxr-xr-x  2 jay jay 4096 Jun 25 17:30 ansible

-rw-r--r--  1 jay jay 2478 Jun 25 17:30 create-simple-vm.sh

drwxr-xr-x  8 jay jay 4096 Jun 25 17:30 .git

-rw-r--r--  1 jay jay  838 Jun 25 17:30 README.md
Now looking at the create-simple-vm.sh helper script, you can examine it’s basic tasks that create a resource group, create a VM and then open a few ports for you to ssh and bind the app to port 80.
There are a few variables the script will ask you for upon execution. It’s best to get the subscription ID first before running the script, for my security I have modified some of the output:
az account show --out json
{
  "environmentName": "AzureCloud",
  "id": "fffffff-0000-42d3-a58b-fake",
  "isDefault": true,
  "name": "ca-jagord-demo-test",
  "state": "Enabled",
  "tenantId": "fffffff-0000-41af-91ab-fake",
  "user": {
    "cloudShellID": true,
    "name": "email@microsoft.com",
    "type": "user"
  }
Let's execute our script!
bash create-simple-vm.sh

Your subscription ID can be looked up with the CLI using: az account show --out json
Enter the subscription ID we just got before.
Enter your subscription ID:

Fffffff-0000-42d3-a58b-fake
Give this a resource group, put everything into a box so we can delete it all at once!
Enter a name for a resource group. This script will create a new group
jgdemo
Pick one of the Azure regions, in this case I use eastus:
Enter the location for this deployment
List of available regions is 'centralus,eastasia,southeastasia,eastus,eastus2,westus,westus2,northcentralus,southcentralus,westcentralus,northeurope,westeurope,japaneast,japanwest,brazilsouth,australiasoutheast,australiaeast,westindia,southindia,centralindia,canadacentral,canadaeast,uksouth,ukwest,koreacentral,koreasouth,francecentral,southafricanorth,uaenorth
eastus
Give the server a name!
Enter front end VM name:
jgdemoserver
After these variables are entered, you’ll begin the process of provisioning the resource group and VM. You should see some output similar to this for each step:

After only about sixty seconds I get the output info for my new UbuntuLTS Server:

As you can see the VM is provided a fully qualified domain name and a public IP address upon deployment. I have specified that ssh keys be created for me and that the user ‘azureuser’ is created with sudo rights.
The script will go on to open port 80 for our demo-app that will eventually be served from for http access. When completed the script will provide you with “destroy” commands:
Youre done, when youre ready to delete this, execute this command in Cloud Shell
az group delete -g jgdemo
Hang on to that command, it becomes useful when you want to throw that box of resources away.
Use the VM’s public IP address, to get that you can run this command in the cloud shell with your resource group (I’ve just modified the IP address for the example):
az vm list-ip-addresses -g $RESOURCEGROUP | grep ipAddress

            "ipAddress": "1.2.3.4",
Now that I have my IP address, I am ready to create an inventory host file for ansible to run. Let’s create a simple one with this command into my shell:
mkdir ~/.ansible/
code  ~/.ansible/hosts
the contents of the ~/.ansible/hosts inventory file:
[hosts]
1.2.3.4
Save the file and close the code editor. Now let’s go into the ansible directory in the repo:
cd ansible
The install_node.yaml ansible playbook contains directions to install a gpg key to permit new packages on the Operating System to be installed. Then it will install the LTS version of Node.js:
ansible-playbook --inventory-file=~/.ansible/hosts -u azureuser install_node.yaml

Let’s ssh in and take a look!
 ssh -l azureuser 40.117.152.205

azureuser@jgdemoserver:~$ npm -v
6.4.1
azureuser@jgdemoserver:~$ node -v
v8.16.0
Pretty cool, let’s do the last step. App deploy time!
Get the demo-app repo and clone it to your home directory:
git clone https://github.com/jaydestro/demo-app.git
cd demo-app
npm install
sudo npm start
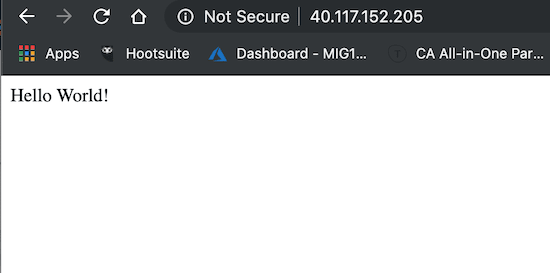
Now let’s check 40.117.152.205 in a browser:
Done and Demolition
That’s everything! The whole kit-and-kaboodle of getting a basic application on with the tools already built into the Azure Cloud Shell. You can store everything you create for your repository on your Cloud Shell and then create an ssh key to sync your repos with your Github or Azure DevOps repositories.
Destroying it all! Remember back when I said to “keep that command” Let’s blow it all up and destroy our demo infrastructure:
az group delete -g jgdemo
Are you sure you want to perform this operation? (y/n): y
You’ll then see “Running…” until the group deletion process is completed.
There’s a ton of information in this tutorial. It’s meant to give the user who may be really not certain how to do some of these “lift and shift” tasks a first start in their world in the Cloud. Migrating to the cloud can be a huge undertaking, so having beginners info can really help. If you run into any issues, feel free to reach out to me on Twitter @jaydestro or here in the comments.
You must be a registered user to add a comment. If you've already registered, sign in. Otherwise, register and sign in.