- Home
- Exchange
- Exchange Team Blog
- ISA 2006 SP1 Configuration with Exchange 2010
- Subscribe to RSS Feed
- Mark as New
- Mark as Read
- Bookmark
- Subscribe
- Printer Friendly Page
- Report Inappropriate Content
While ISA 2006 SP1 includes a Client Access Web Publishing Wizard for both Exchange 2003 and Exchange 2007, the wizard does not have any knowledge of Exchange 2010. Exchange 2010 includes the following changes with respect to its URLs and virtual directories:
- Exchange 2010 Client Access Servers (CAS) no longer utilize the /exchweb virtual directory.
- Exchange 2010 CAS no longer utilizes the /unifiedmessaging virtual directory.
- Exchange 2010 CAS provides a new solution for managing end user configuration (e.g. Unified Messaging settings), end user self-service (e.g. message tracking), and organization-specific activities (e.g. records discovery), known as the Exchange Control Panel. This service is provided via the /ecp virtual directory and is accessible directly or through Outlook Web App.
- Exchange 2010 CAS does not render data from legacy mailboxes. Instead, depending on the protocol and/or client, Exchange 2010 CAS will either proxy, redirect, or provide direct access to the appropriate version of Exchange (Exchange 2003 Front-End, Exchange 2007 CAS, or Exchange 2003/2007 Mailbox). Redirected clients access their information via a new namespace, legacy.contoso.com. For more information, please see the post entitled, Transitioning Client Access to Exchange 2010.
As a result of these changes, certain modifications must be made to the rules created by the Client Access Web Publishing Wizard to support Exchange 2010. This article, the final one in my upgrade series, will discuss how to configure ISA 2006 SP1 as part of your deployment of Exchange 2010 in your existing Exchange 2003 or Exchange 2007 environments so that you may successfully allow your clients to connect to both Exchange versions.
Note: For more information on the detailed steps required to support coexistence process see my first blog article in the series, TechNet, or within the Deployment Assistant.
While this article will not cover every scenario possible (e.g. specifics on each authentication solution), it will provide basic steps that you can follow to ensure you have a successful deployment.
Enabling External Access when Upgrading an Exchange 2003 Environment to Exchange 2010 via ISA
Prior to implementing Exchange 2010, it is assumed that you have two ISA2006 web publishing rules for your Exchange 2003 environment that allow OWA, Outlook Anywhere, and ActiveSync. ISA is configured as follows:
1. A web listener configured as follows:
- On the Authentication tab:
- For ISA Pre-Authentication, the Client Authentication Method is configured as "HTML Form Authentication" and the authentication validation method is configured either with Windows (if ISA is domain-joined), LDAP, or RADIUS.
- For scenarios without ISA Pre-Authentication, the Client Authentication Method is set to "No Authentication".
- On the certificates tab, a certificate is selected that has a principal name of mail.contoso.com
2. A web farm configured for the Exchange 2003 Front-End server exists.
3. The Exchange 2003 OWA web publishing rule (henceforth known as E2003 OWA) is configured through the ISA Server Exchange Web Client Access Publishing wizard with the following settings:
- On the Web Farm tab, requests are forwarded to the "Exchange 2003 Front-End Web Farm" and the internal site name is "mail.contoso.com", utilizing cookie-based load balancing affinity.
- The Public name is defined as "mail.contoso.com", which must resolve to a valid internal IP address.
- The Authentication Delegation is set to
- For scenarios leveraging ISA Pre-Authentication, one of the following is set: "Basic Authentication", "Negotiate (Kerberos/NTLM)", or "Kerberos Constrained Delegation". Please note that the authentication method you select may require additional configuration; please see your ISA documentation for more information.
- For scenarios without ISA Pre-Authentication: "No delegation, but client may authenticate directly".
- The Paths are defined as:
- /public/*
- /exchange/*
- /exchweb/*
4. The Exchange 2003 Outlook Anywhere (OA) / ActiveSync web publishing rule(henceforth known as E2003 OA-EAS) is configured through the ISA Server Exchange Web Client Access Publishing wizard with the following settings:
- On the Web Farm tab, requests are forwarded to the "Exchange 2003 Front-End Web Farm" and the internal site name is "mail.contoso.com", utilizing IP-based load balancing affinity.
- The Public name is defined as "mail.contoso.com", which must resolve to a valid internal IP address.
- The Authentication Delegation is set to
- For scenarios leveraging ISA Pre-Authentication, one of the following is set: "Basic Authentication", "Negotiate (Kerberos/NTLM)", or "Kerberos Constrained Delegation". Please note that the authentication method you select may require additional configuration; please see your ISA documentation for more information.
- For scenarios without ISA Pre-Authentication: "No delegation, but client may authenticate directly".
- The Paths are defined as:
- /rpc/*
- /Microsoft-Server-ActiveSync/*
In addition if utilizing ISA Pre-Authentication, the Exchange 2003 Front-End Servers are configured as follows:
- The /exchange OWA virtual directory has been configured with Basic Authentication and/or Windows Integrated Authentication and not Forms Based Authentication.
- SSL is required.
For the purposes of this discussion, assume that you deploy Exchange 2010 into an Exchange 2003 environment that resembles the following:
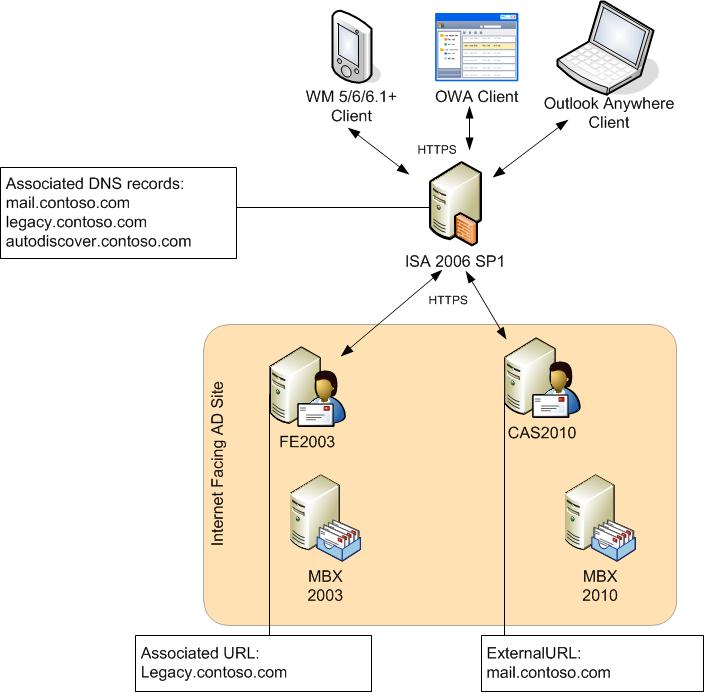
Note: The environment depicted above assumes that a split-brain DNS infrastructure has been implemented. This is also known as split-horizon DNS, split-view DNS or split DNS. In short, split-brain DNS is about setting up separate "DNS Zones" so that DNS requests which come from intranet clients will get different DNS hostname->IP lookup answers than requests coming from Internet clients. In other words, if a client within the internal network attempts to resolve mail.contoso.com, the client will get the IP address associated with the CAS2010 array or the internal interface of ISA; whereas, if an external client attempts to resolve mail.contoso.com, the client will get the IP address associated with external interface of the ISA2006 server.
The following steps need to be performed in order to allow clients to connect either to legacy.contoso.com or mail.contoso.com:
Note: The below steps correspond with the Exchange 2003 Upgrade Steps 8-12 in the article http://msexchangeteam.com/archive/2009/11/20/453272.aspx.
1. Either export the certificate that is installed on CAS2010 or obtain a new certificate from a commercial certificate authority for ISA2006.
- To export the certificate from CAS2010, execute the following cmdlet (note: In order to export the certificate, during the certificate creation, the must have been set to $true): Export-ExchangeCertificate <thumbprint> -path c:\cascert.pfx -password (Get-Credential).password
- If you are obtaining a new commercial certificate for ISA2006, as a best practice, Microsoft recommends utilizing a certificate that supports Subject Alternative Names; however, you can utilize a wildcard certificate as well. If you choose to use a wildcard certificate there are some additional complexities to consider: For example, Windows Mobile 5.0 devices do not support wildcard certificates, and Outlook Anywhere requires special additional configuration as detailed in http://technet.microsoft.com/en-us/library/cc535023.aspx.
This commercial certificate that will be leveraged by external clients will contain at a minimum three SAN values (note that other scenarios may require you to add additional values):
-
- mail.contoso.com (your primary OWA/EAS/OA access URL)
- autodiscover.contoso.com
- legacy.contoso.com (your OWA/EAS namespace for legacy mailbox access)
Prior to Windows Vista SP1, the Windows RPC/HTTP client-side component required that the Subject Name (aka Common Name) on the certificate match the "Certificate Principal Name" configured for the Outlook Anywhere connection in the Outlook profile. Therefore, as a best practice, you should ensure that mail.contoso.com is listed as the Subject Name in your certificate unless you plan on changing the configuration which can be achieved by using the Set-OutlookProvider cmdlet with the EXPR parameter as described in http://msexchangeteam.com/archive/2008/09/29/449921.aspx.
2. Import the certificate into the ISA2006 by following the steps at http://technet.microsoft.com/en-us/library/bb794751.aspx#import.
3. Update the web listener (henceforth known as the CAS web listener) that is used to publish your Exchange 2003 Front-End infrastructure to utilize the new certificate:
- Open the ISA 2006 Management Console.
- Navigate to your Firewall Policy settings.
- From within the Toolbox pane, expand Web Listeners and double-click on the listener responsible for your Exchange 2003 Front-End infrastructure.
- Click on the Certificates tab and click Select Certificates.
- Verify the certificate you recently imported is listed and its validity is "Valid". Select it and click Select.
- If leveraging ISA Pre-Authentication, click on the SSO tab.
- Click on the check box to "Enable Single Sign On".
- Click Add and enter ".contoso.com" (please note the leading period).
- Click OK.
- Click on the Certificates tab and click Select Certificates.
- Apply the changes to ISA2006.
4. Create the legacy host record (legacy.contoso.com) in your external DNS infrastructure and assign it an IP address that is bound to the ISA2006 external NIC.
5. Create the Autodiscover host record (autodiscover.contoso.com) in your external DNS infrastructure and assign it an IP address that is bound to the ISA2006 external NIC.
6. On ISA2006, you will create the CAS2010 web farm.
- Open the ISA 2006 Management Console.
- Navigate to your Firewall Policy settings.
- From within the Toolbox pane, click New and select Server Farm.
- Label the server farm accordingly and click Next.
- Add the CAS2010 servers either by server FQDN (if name resolution is available) or by IP address (cannot be used with Kerberos Constrained Delegation) and click Next.
- For server farm connectivity monitoring, utilize the preferred default method, or choose a method that is appropriate for your environment and click Next.
- Click Finish.
7. If leveraging ISA Pre-Authentication, on Exchange 2010 CAS within the "Internet Facing AD Site", you will disable forms-based authentication by executing the following cmdlets:
- Set-OWAVirtualDirectory cas2010\OWA* -BasicAuthentication $true -WindowsAuthentication $true
- Set-ECPVirtualDirectory cas2010\ECP* -BasicAuthentication $true -WindowsAuthentication $true
8. On ISA2006, you will create the OWA and Autodiscover web publishing rules that will be leveraged by Outlook Anywhere, ActiveSync and Web Services clients utilizing the mail.contoso.com namespace.
- Open the ISA 2006 Management Console.
- Navigate to your Firewall Policy settings.
- From within the Tasks pane, click Publish Exchange Web Client Access.
- Enter a name like "E2010 OWA" and click Next.
- For Exchange version, select "Exchange Server 2007" and select "Outlook Web Access" and click Next.
- Select "Publish a server farm of load balanced Web servers" and click Next.
- Select "Use SSL to connect to the published Web server or server farm" and click Next.
- For internal site name, enter "mail.contoso.com" and click Next.
- Select the Exchange 2010 server farm and click Next.
- For the public name, enter "mail.contoso.com" and click Next.
- Select the CAS web listener and click Next.
- For authentication delegation:
- For scenarios leveraging ISA Pre-Authentication select one of the following: "Basic Authentication", "Negotiate (Kerberos/NTLM)", or "Kerberos Constrained Delegation". Please note that the authentication method you select may require additional configuration; please see your ISA documentation for more information.
- For scenarios without ISA Pre-Authentication select, "No delegation, but client may authenticate directly" and click Next.
- Choose the appropriate users and click Next.
- Click Finish.
- From within the Tasks pane, click Publish Exchange Web Client Access.
- Enter a name like "E2010 EAS" and click Next.
- For Exchange version, select "Exchange Server 2007" and select "Exchange ActiveSync" and click Next.
- Select "Publish a server farm of load balanced Web servers" and click Next.
- Select "Use SSL to connect to the published Web server or server farm" and click Next.
- For internal site name, enter "mail.contoso.com" and click Next.
- Select the Exchange 2010 server farm and click Next.
- For the public name, enter "mail.contoso.com" and click Next.
- Select the CAS web listener and click Next.
- For authentication delegation:
- For scenarios leveraging ISA Pre-Authentication select one of the following: "Basic Authentication", "Negotiate (Kerberos/NTLM)", or "Kerberos Constrained Delegation". Please note that the authentication method you select may require additional configuration; please see your ISA documentation for more information.
- For scenarios without ISA Pre-Authentication select, "No delegation, but client may authenticate directly" and click Next.
- Choose the appropriate users and click Next.
- Click Finish.
- From within the Tasks pane, click Publish Exchange Web Client Access.
- Enter a name like "Autodiscover-OA" and click Next.
- For Exchange version, select "Exchange Server 2007" and select "Outlook Anywhere (RPC/HTTP(s))" and select "Publish additional folders on the Exchange Server for Outlook 2007 clients" and click Next.
- Select "Publish a server farm of load balanced Web servers" and click Next.
- Select "Use SSL to connect to the published Web server or server farm" and click Next.
- For internal site name, enter "mail.contoso.com" and click Next.
- Select the Exchange 2010 server farm and click Next.
- For the public name, enter "Autodiscover.contoso.com" and click Next.
- Select the CAS web listener and click Next.
- For authentication delegation:
- For scenarios leveraging ISA Pre-Authentication select one of the following: "Basic Authentication", "Negotiate (Kerberos/NTLM)", or "Kerberos Constrained Delegation". Please note that the authentication method you select may require additional configuration; please see your ISA documentation for more information.
- For scenarios without ISA Pre-Authentication select, "No delegation, but client may authenticate directly" and click Next.
- Choose the appropriate users and click Next.
- Click Finish.
- Open the Autodiscover-OA web publishing rule you just created.
- On the General tab, uncheck the "Enable" setting. That way this rule will not go into effect until you change the external DNS mappings.
- Click on the Public Name tab and add "mail.contoso.com" as another web site entry.
- Click on the Paths tab and add the following:
- /ecp/*
- Click OK.
- Open the E2010 EAS web publishing rule you just created.
- On the General tab, uncheck the "Enable" setting. That way this rule will not go into effect until you change the external DNS mappings.
- Open the E2010 OWA web publishing rule you just created.
- On the General tab, uncheck the "Enable" setting. That way this rule will not go into effect until you change the external DNS mappings.
- Click on the Paths tab:
- Add: /ecp/*
- Remove: /exchweb/*
- Click OK.
- Click on the Paths tab:
- Apply the changes to ISA.
9. On ISA2006, you will create the legacy web publishing rules that will be leveraged by Outlook Web Access, Outlook Anywhere, and ActiveSync clients utilizing the legacy.contoso.com namespace.
- Open the ISA 2006 Management Console.
- Navigate to your Firewall Policy settings.
- From within the Tasks pane, click Publish Exchange Web Client Access.
- Enter a name like "Legacy OWA" and click Next.
- For Exchange version, select "Exchange Server 2003" and select "Outlook Web Access" and click Next.
- Select "Publish a server farm of load balanced Web servers" and click Next.
- Select "Use SSL to connect to the published Web server or server farm" and click Next.
- For internal site name, enter "legacy.contoso.com" and click Next.
- Select the Exchange 2003 server farm and click Next.
- For the public name, enter "legacy.contoso.com" and click Next.
- Select the CAS web listener and click Next.
- For authentication delegation:
- For scenarios leveraging ISA Pre-Authentication select one of the following: "Basic Authentication", "Negotiate (Kerberos/NTLM)", or "Kerberos Constrained Delegation". Please note that the authentication method you select may require additional configuration; please see your ISA documentation for more information.
- For scenarios without ISA Pre-Authentication select, "No delegation, but client may authenticate directly" and click Next.
- Choose the appropriate users and click Next.
- Click Finish.
- From within the Tasks pane, click Publish Exchange Web Client Access.
- Enter a name like "Legacy OA-EAS" and click Next.
- For Exchange version, select "Exchange Server 2003" and select "Outlook RPC/HTTP(s)" and "Exchange ActiveSync" and click Next.
- Select "Publish a server farm of load balanced Web servers" and click Next.
- Select "Use SSL to connect to the published Web server or server farm" and click Next.
- For internal site name, enter "legacy.contoso.com" and click Next.
- Select the Exchange 2003 server farm and click Next.
- For the public name, enter "legacy.contoso.com" and click Next.
- Select the CAS web listener and click Next.
- For authentication delegation:
- For scenarios leveraging ISA Pre-Authentication select one of the following: "Basic Authentication", "Negotiate (Kerberos/NTLM)", or "Kerberos Constrained Delegation". Please note that the authentication method you select may require additional configuration; please see your ISA documentation for more information.
- For scenarios without ISA Pre-Authentication select, "No delegation, but client may authenticate directly" and click Next.
- Choose the appropriate users and click Next.
- Click Finish.
- Open the web publishing rules you just created and uncheck the "Enable" setting on the General tab. That way these rules will not go into effect until you change the external DNS mappings.
- Apply the changes to ISA.
10. Schedule downtime for your Internet clients (this will be a small outage window).
- Open the ISA 2006 Management Console.
- Navigate to your Firewall Policy settings.
- For the following web publishing rules, enable them by checking the "Enable" setting on the General tab:
- Legacy OA-EAS
- Legacy OWA
- E2010 Autodiscover-OA
- E2010 OWA
- E2010 EAS
- For the following web publishing rules, disable them by un-checking the "Enable" setting on the General tab:
- E2003 OWA
- E2003 OA-EAS
- Apply the changes to ISA (note: might want to restart the Microsoft Firewall service so that the changes are immediate and potentially flush the DNS cache).
- Test with Internet clients and ensure they can still access their mailboxes.
Enabling External Access when Upgrading an Exchange 2007 Environment to Exchange 2010 via ISA
Prior to implementing Exchange 2010, it is assumed that you have two ISA2006 web publishing rules for your Exchange 2007 environment that allow OWA, Outlook Anywhere, and ActiveSync. ISA is configured as follows:
1. A web listener configured as follows:
- On the Authentication tab:
- For ISA Pre-Authentication, the Client Authentication Method is configured as "HTML Form Authentication" and the authentication validation method is configured either with Windows (if ISA is domain-joined), LDAP, or RADIUS.
- For scenarios without ISA Pre-Authentication, the Client Authentication Method is set to "No Authentication".
- On the certificates tab, a certificate is selected that has a principal name of mail.contoso.com.
2. A web farm configured for the Exchange 2007 CAS exists.
3. The Exchange 2007 OWA web publishing rule (henceforth known as E2007 OWA) is configured through the ISA Server Exchange Web Client Access Publishing wizard with the following settings:
- On the Web Farm tab, requests are forwarded to the "Exchange 2007 CAS Web Farm" and the internal site name is "mail.contoso.com", utilizing cookie-based load balancing affinity.
- The Public name is defined as "mail.contoso.com", which must resolve to a valid internal IP address.
- The Authentication Delegation is set to:
- For scenarios leveraging ISA Pre-Authentication, one of the following is set: "Basic Authentication", "Negotiate (Kerberos/NTLM)", or "Kerberos Constrained Delegation". Please note that the authentication method you select may require additional configuration; please see your ISA documentation for more information.
- For scenarios without ISA Pre-Authentication: "No delegation, but client may authenticate directly".
- The Paths are defined as:
- /public/*
- /exchange/*
- /exchweb/*
- /owa/*
4. The Exchange 2007 EAS web publishing rule (henceforth known as E2007 EAS) is configured through the ISA Server Exchange Web Client Access Publishing wizard with the following settings:
- On the Web Farm tab, requests are forwarded to the "Exchange 2007 CAS Web Farm" and the internal site name is "mail.contoso.com", utilizing IP-bsaed load balancing affinity.
- The Public name is defined as "mail.contoso.com", which must resolve to a valid internal IP address.
- The Authentication Delegation is set to:
- For scenarios leveraging ISA Pre-Authentication, one of the following is set: "Basic Authentication", "Negotiate (Kerberos/NTLM)", or "Kerberos Constrained Delegation". Please note that the authentication method you select may require additional configuration; please see your ISA documentation for more information.
- For scenarios without ISA Pre-Authentication: "No delegation, but client may authenticate directly".
- The Paths are defined as:
- /Microsoft-Server-Activesync/*
5. The Exchange 2007 Outlook Anywhere (OA web publishing rule (henceforth known as E2007 OA) is configured through the ISA Server Exchange Web Client Access Publishing wizard with the following settings:
- On the Web Farm tab, requests are forwarded to the "Exchange 2007 CAS Web Farm" and the internal site name is "mail.contoso.com", utilizing IP-based load balancing affinity.
- The Public name is defined with "Autodiscover.contoso.com" and "mail.contoso.com
- The Authentication Delegation is set to:
- For scenarios leveraging ISA Pre-Authentication, one of the following is set: "Basic Authentication", "Negotiate (Kerberos/NTLM)", or "Kerberos Constrained Delegation". Please note that the authentication method you select may require additional configuration; please see your ISA documentation for more information.
- For scenarios without ISA Pre-Authentication: "No delegation, but client may authenticate directly".
- The Paths are defined as:
- /rpc/*
- /OAB/*
- /UnifiedMessaging/*
- /Autodiscover/*
- /EWS/*
In addition if utilizing ISA Pre-Authentication, Exchange 2007 CAS array members are configured as follows:
- The /owa virtual directory has been configured with Basic Authentication and not Forms Based Authentication.
- SSL is required.
For the purposes of this discussion, assume that you deploy Exchange 2010 into an Exchange 2007 environment that resembles the following:

Note: The environment depicted above assumes that a split-brain DNS infrastructure has been implemented. This is also known as split-horizon DNS, split-view DNS or split DNS. In short, split-brain DNS is about setting up separate "DNS Zones" so that DNS requests which come from intranet clients will get different DNS hostname->IP lookup answers than requests coming from Internet clients. In other words, if a client within the internal network attempts to resolve mail.contoso.com, the client will get the IP address associated with the CAS2010 array or the internal interface of ISA; whereas, if an external client attempts to resolve mail.contoso.com, the client will get the IP address associated with external interface of the ISA2006 server.
The following steps need to be performed in order to allow clients to connect either to legacy.contoso.com or mail.contoso.com:
Note: The below steps correspond with the Exchange 2007 Upgrade Steps 9-12 in the article http://msexchangeteam.com/archive/2009/11/20/453272.aspx.
1. Either export the certificate that is installed on CAS2010 or obtain a new certificate from a commercial certificate authority for ISA2006.
- To export the certificate from CAS2010, execute the following cmdlet (note: In order to export the certificate, during the certificate creation, the must have been set to $true): Export-ExchangeCertificate <thumbprint> -path c:\cascert.pfx -password (Get-Credential).password
- If you are obtaining a new commercial certificate for ISA2006, as a best practice, Microsoft recommends utilizing a certificate that supports Subject Alternative Names; however, you can utilize a wildcard certificate as well. If you choose to use a wildcard certificate there are some additional complexities to consider: For example, Windows Mobile 5.0 devices do not support wildcard certificates, and Outlook Anywhere requires special additional configuration as detailed in http://technet.microsoft.com/en-us/library/cc535023.aspx.
This commercial certificate that will be leveraged by external clients will contain at a minimum three SAN values (note that other scenarios may require you to add additional values):
-
- mail.contoso.com (your primary OWA/EAS/OA access URL)
- autodiscover.contoso.com
- legacy.contoso.com (your OWA/EAS namespace for legacy mailbox access)
Prior to Windows Vista SP1, the Windows RPC/HTTP client-side component required that the Subject Name (aka Common Name) on the certificate match the "Certificate Principal Name" configured for the Outlook Anywhere connection in the Outlook profile. Therefore, as a best practice, you should ensure that mail.contoso.com is listed as the Subject Name in your certificate unless you plan on changing the configuration which can be achieved by using the Set-OutlookProvider cmdlet with the EXPR parameter as described in http://msexchangeteam.com/archive/2008/09/29/449921.aspx.
2. Import the certificate into the ISA2006 by following the steps at http://technet.microsoft.com/en-us/library/bb794751.aspx#import.
3. Update the web listener (henceforth known as the CAS web listener) that is used to publish your Exchange 2007 CAS infrastructure to utilize the new certificate:
- Open the ISA 2006 Management Console.
- Navigate to your Firewall Policy settings.
- From within the Toolbox pane, expand Web Listeners and double-click on the listener responsible for your Exchange 2007 CAS infrastructure.
- Click on the Certificates tab and click Select Certificates.
- Verify the certificate you recently imported is listed and its validity is "Valid". Select it and click Select.
- If leveraging ISA Pre-Authentication, click on the SSO tab.
- Click on the check box to "Enable Single Sign On".
- Click Add and enter ".contoso.com" (please note the leading period).
- Click OK.
- Click on the Certificates tab and click Select Certificates.
- d. Apply the changes to ISA2006.
4. Create the legacy host record (legacy.contoso.com) in your external DNS infrastructure and assign it an IP address that is bound to the ISA2006 external NIC.
5. On ISA2006, you will create the CAS2010 web farm.
- Open the ISA 2006 Management Console.
- Navigate to your Firewall Policy settings.
- From within the Toolbox pane, click New and select Server Farm.
- Label the server farm accordingly and click Next.
- Add the CAS2010 servers either by server FQDN (if name resolution is available) or by IP address (cannot be used with Kerberos Constrained Delegation) and click Next.
- For server farm connectivity monitoring, utilize the preferred default method, or choose a method that is appropriate for your environment and click Next.
- Click Finish.
6. If leveraging ISA Pre-Authentication, on Exchange 2010 CAS within the "Internet Facing AD Site", you will disable forms-based authentication by executing the following cmdlets:
- Set-OWAVirtualDirectory cas2010\OWA* -BasicAuthentication $true -WindowsAuthentication $true
- Set-ECPVirtualDirectory cas2010\ECP* -BasicAuthentication $true -WindowsAuthentication $true
7. On ISA2006, you will create the Exchange 2010 OWA and Autodiscover web publishing rules that will be leveraged by Outlook Anywhere, ActiveSync and Web Services clients utilizing the mail.contoso.com namespace.
- Open the ISA 2006 Management Console.
- Navigate to your Firewall Policy settings.
- From within the Tasks pane, click Publish Exchange Web Client Access.
- Enter a name like "E2010 OWA" and click Next.
- For Exchange version, select "Exchange Server 2007" and select "Outlook Web Access" and click Next.
- Select "Publish a server farm of load balanced Web servers" and click Next.
- Select "Use SSL to connect to the published Web server or server farm" and click Next.
- For internal site name, enter "mail.contoso.com" and click Next.
- Select the Exchange 2010 server farm and click Next.
- For the public name, enter "mail.contoso.com" and click Next.
- Select the CAS web listener and click Next.
- For authentication delegation:
- For scenarios leveraging ISA Pre-Authentication select one of the following: "Basic Authentication", "Negotiate (Kerberos/NTLM)", or "Kerberos Constrained Delegation". Please note that the authentication method you select may require additional configuration; please see your ISA documentation for more information.
- For scenarios without ISA Pre-Authentication select, "No delegation, but client may authenticate directly" and click Next.
- Choose the appropriate users and click Next.
- Click Finish.
- Click Finish.
- From within the Tasks pane, click Publish Exchange Web Client Access.
- Enter a name like "E2010 EAS" and click Next.
- For Exchange version, select "Exchange Server 2007" and select "Exchange ActiveSync" and click Next.
- Select "Publish a server farm of load balanced Web servers" and click Next.
- Select "Use SSL to connect to the published Web server or server farm" and click Next.
- For internal site name, enter "mail.contoso.com" and click Next.
- Select the Exchange 2010 server farm and click Next.
- For the public name, enter "mail.contoso.com" and click Next.
- Select the CAS web listener and click Next.
- For authentication delegation:
- For scenarios leveraging ISA Pre-Authentication select one of the following: "Basic Authentication", "Negotiate (Kerberos/NTLM)", or "Kerberos Constrained Delegation". Please note that the authentication method you select may require additional configuration; please see your ISA documentation for more information.
- For scenarios without ISA Pre-Authentication select, "No delegation, but client may authenticate directly" and click Next.
- Choose the appropriate users and click Next.
- Click Finish.
- From within the Tasks pane, click Publish Exchange Web Client Access.
- Enter a name like "E2010 Autodiscover-OA" and click Next.
- For Exchange version, select "Exchange Server 2007" and select "Outlook Anywhere (RPC/HTTP(s))" and select "Publish additional folders on the Exchange Server for Outlook 2007 clients" and click Next.
- Select "Publish a server farm of load balanced Web servers" and click Next.
- Select "Use SSL to connect to the published Web server or server farm" and click Next.
- For internal site name, enter "mail.contoso.com" and click Next.
- Select the Exchange 2010 server farm and click Next.
- For the public name, enter "Autodiscover.contoso.com" and click Next.
- Select the CAS web listener and click Next.
- For authentication delegation:
- For scenarios leveraging ISA Pre-Authentication select one of the following: "Basic Authentication", "Negotiate (Kerberos/NTLM)", or "Kerberos Constrained Delegation". Please note that the authentication method you select may require additional configuration; please see your ISA documentation for more information.
- For scenarios without ISA Pre-Authentication select, "No delegation, but client may authenticate directly" and click Next.
- Choose the appropriate users and click Next.
- Click Finish.
- Open the "E2010 Autodiscover-OA" web publishing rule you just created.
- On the General tab, uncheck the "Enable" setting. That way this rule will not go into effect until you change the external DNS mappings.
- Click on the Public Name tab and add "mail.contoso.com" as another web site entry.
- Click on the Paths tab and add the following:
- /ecp/*
- Click OK.
- Open the "E2010 EAS" web publishing rule you just created.
- On the General tab, uncheck the "Enable" setting. That way this rule will not go into effect until you change the external DNS mappings.
- Open the "E2010 OWA" web publishing rule you just created.
- On the General tab, uncheck the "Enable" setting. That way this rule will not go into effect until you change the external DNS mappings.
- Click on the Paths tab:
- Add: /ecp/*
- Remove: /exchweb/*
- Click OK.
- Apply the changes to ISA.
8. On ISA2006, you will create the legacy web publishing rules that will be leveraged by Outlook Web Access, Outlook Anywhere, and ActiveSync clients utilizing the legacy.contoso.com namespace.
- Open the ISA 2006 Management Console.
- Navigate to your Firewall Policy settings.
- From within the Tasks pane, click Publish Exchange Web Client Access.
- Enter a name like "Legacy OWA" and click Next.
- For Exchange version, select "Exchange Server 2007" and select "Outlook Web Access" and click Next.
- Select "Publish a server farm of load balanced Web servers" and click Next.
- Select "Use SSL to connect to the published Web server or server farm" and click Next.
- For internal site name, enter "legacy.contoso.com" and click Next.
- Select the Exchange 2007 CAS server farm and click Next.
- For the public name, enter "legacy.contoso.com" and click Next.
- Select the CAS web listener and click Next.
- For authentication delegation:
- For scenarios leveraging ISA Pre-Authentication select one of the following: "Basic Authentication", "Negotiate (Kerberos/NTLM)", or "Kerberos Constrained Delegation". Please note that the authentication method you select may require additional configuration; please see your ISA documentation for more information.
- For scenarios without ISA Pre-Authentication select, "No delegation, but client may authenticate directly" and click Next.
- Choose the appropriate users and click Next.
- Click Finish.
- From within the Tasks pane, click Publish Exchange Web Client Access.
- Enter a name like "Legacy EAS" and click Next.
- For Exchange version, select "Exchange Server 2007" and select "Exchange ActiveSync" and click Next.
- Select "Publish a server farm of load balanced Web servers" and click Next.
- Select "Use SSL to connect to the published Web server or server farm" and click Next.
- For internal site name, enter "legacy.contoso.com" and click Next.
- Select the Exchange 2007 CAS server farm and click Next.
- For the public name, enter "legacy.contoso.com" and click Next.
- Select the CAS web listener and click Next.
- For authentication delegation:
- For scenarios leveraging ISA Pre-Authentication select one of the following: "Basic Authentication", "Negotiate (Kerberos/NTLM)", or "Kerberos Constrained Delegation". Please note that the authentication method you select may require additional configuration; please see your ISA documentation for more information.
- For scenarios without ISA Pre-Authentication select, "No delegation, but client may authenticate directly" and click Next.
- Choose the appropriate users and click Next.
- Click Finish.
- From within the Tasks pane, click Publish Exchange Web Client Access.
- Enter a name like "Legacy OA" and click Next.
- For Exchange version, select "Exchange Server 2007" and select "Outlook Anywhere (RPC/HTTP(s))" and select "Publish additional folders on the Exchange Server for Outlook 2007 clients" and click Next.
- Select "Publish a server farm of load balanced Web servers" and click Next.
- Select "Use SSL to connect to the published Web server or server farm" and click Next.
- For internal site name, enter "legacy.contoso.com" and click Next.
- Select the Exchange 2007 CAS server farm and click Next.
- For the public name, enter "legacy.contoso.com" and click Next.
- Select the CAS web listener and click Next.
- For authentication delegation:
- For scenarios leveraging ISA Pre-Authentication select one of the following: "Basic Authentication", "Negotiate (Kerberos/NTLM)", or "Kerberos Constrained Delegation". Please note that the authentication method you select may require additional configuration; please see your ISA documentation for more information.
- For scenarios without ISA Pre-Authentication select, "No delegation, but client may authenticate directly" and click Next.
- Choose the appropriate users and click Next.
- Click Finish.
- Open the "Legacy OA" web publishing rule you just created.
- On the General tab, uncheck the "Enable" setting. That way this rule will not go into effect until you change the external DNS mappings.
- Click on the Paths tab:
- Remove: /Autodiscover/*
- Click OK.
- Open the "Legacy OWA" web publishing rule you just created and uncheck the "Enable" setting on the General tab. That way this rule will not go into effect until you change the external DNS mappings.
- Open the "Legacy EAS" web publishing rule you just created and uncheck the "Enable" setting on the General tab. That way this rule will not go into effect until you change the external DNS mappings.
- Apply the changes to ISA.
9. Schedule downtime for your Internet clients (this will be a small outage window).
- Open the ISA 2006 Management Console.
- Navigate to your Firewall Policy settings.
- For the following web publishing rules, enable them by checking the "Enable" setting on the General tab:
- Legacy OA
- Legacy OWA
- Legacy EAS
- E2010 Autodiscover-OA
- E2010 OWA
- E2010 EAS
- For the following web publishing rules, disable them by un-checking the "Enable" setting on the General tab:
- E2007 OWA
- E2007 EAS
- E2007 OA
- Apply the changes to ISA (note: might want to restart the Microsoft Firewall service so that the changes are immediate and potentially flush the DNS cache).
- Test with Internet clients and ensure they can still access their mailboxes.
Q&A
Does the configuration you described above leverage the OWA Single-Sign-On (SSO) redirection experience?
For the scenario where you are not leveraging ISA Pre-Authentication, yes, this configuration supports the OWA single-sign on experience by using a single web listener for all of the web publishing rules.
For the scenario where you are leveraging ISA Pre-Authentication, no, as this configuration utilizes the ISA single-sign on experience for Outlook Web Access. The Outlook Web Access SSO redirection only occurs when you utilize Forms Based Authentication at the Exchange layer on both E2010 and legacy Exchange.
Conclusion
Hopefully this information improves your understanding of external client access coexistence with legacy versions of Exchange while upgrading to Exchange Server 2010 in conjunction with ISA 2006. Please let us know if you have any questions.
You must be a registered user to add a comment. If you've already registered, sign in. Otherwise, register and sign in.