- Home
- Microsoft 365
- Excel
- Excel automatically adding a date to a cell in which I want something else.
Excel automatically adding a date to a cell in which I want something else.
- Subscribe to RSS Feed
- Mark Discussion as New
- Mark Discussion as Read
- Pin this Discussion for Current User
- Bookmark
- Subscribe
- Printer Friendly Page
- Mark as New
- Bookmark
- Subscribe
- Mute
- Subscribe to RSS Feed
- Permalink
- Report Inappropriate Content
Mar 13 2020 11:07 AM
In some of my excel cells where I put 'hours worked' and in the next one 'hours billed' it auto changes to some weird date. When I delete and again try to add my hours it just again changes it to some date.
Also it will not hold the font size to what I want and keeps auto changing it to 14, when I want 12.
I have a MacBook Air using Office Home & Student 2016
- Labels:
-
Excel
- Mark as New
- Bookmark
- Subscribe
- Mute
- Subscribe to RSS Feed
- Permalink
- Report Inappropriate Content
Mar 13 2020 11:24 AM
HI @time2sit
could you please share the screen shot of you date upon entering the data
seems to be formatting issue.
Regards, Faraz Shaikh | MCT, MIE, MOS Master, Excel Expert
If you find the above solution resolved your query don't forget mark as Official Answer.
- Mark as New
- Bookmark
- Subscribe
- Mute
- Subscribe to RSS Feed
- Permalink
- Report Inappropriate Content
Mar 13 2020 12:30 PM
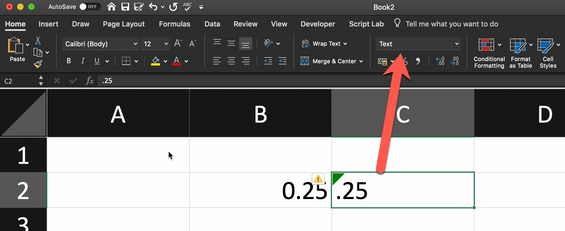
TY, Faraz. I'm also having problems with wrapping text onto the next line as you can see. And my .25 of an hour won't go to the far right of the cell as in the others.
- Mark as New
- Bookmark
- Subscribe
- Mute
- Subscribe to RSS Feed
- Permalink
- Report Inappropriate Content
Mar 13 2020 12:44 PM
Hi @time2sit
It is formatting issue, make sure your columns is not as "Text" format, change it "General" or "Number" format before entering the data 👍🏻=)
Regards, Faraz Shaikh | MCT, MIE, MOS Master, Excel Expert
If you find the above solution resolved your query don't forget mark as Official Answer.
- Mark as New
- Bookmark
- Subscribe
- Mute
- Subscribe to RSS Feed
- Permalink
- Report Inappropriate Content
Mar 13 2020 01:22 PM
It was and is on 'General'. But changes with each new cell. With your feedback I'm changing it now with each tab.
But do I have to do that? Set the format for each and every cell? Cause that'll take forever. Also what do I need to do to get the font size to stay on 12? It changes to 14 with each tab or manually move to a new cell or row.
- Mark as New
- Bookmark
- Subscribe
- Mute
- Subscribe to RSS Feed
- Permalink
- Report Inappropriate Content
Mar 13 2020 01:27 PM
- Mark as New
- Bookmark
- Subscribe
- Mute
- Subscribe to RSS Feed
- Permalink
- Report Inappropriate Content
Mar 14 2020 12:12 AM
@time2sit To wrap text, select FORMAT in the top many, then alignment and then check the box "Wrap text".
Alternatively, find the wrap text icon on the HOME ribbon in the "Alignment" section and press it. It's the one at the top right.
With regard to the justification issue, try this. Select the entire worksheet and make sure that none of the left, center and right icons (the three icons at the bottom-left) are greyed. This turns all cells to have standard justification. I.e. text towards the left, dates and numbers to the right. Only use these buttons if you want to explicitly change this behaviour.
To check your default font, press Excel (next to the Apple sign at the top-left), then "Preferences..." and then the "General" icon in the Authoring section. Make sure that your default font and size are how you want them to be. This will then apply to any new workbook you open. In an existing workbook you may have to do similar steps as described above, i.e. "Select all" and choose the font and size you want for all cells in your sheet. This will get rid of cell formats that may have been set differently.
The above pictures were taken on the latest Excel version, but from what I remember, it looks similar on older versions.


