- Home
- Security, Compliance, and Identity
- Security, Compliance, and Identity Blog
- Launching a Windows Defender Offline Scan with Configuration Manager 2012 OSD
- Subscribe to RSS Feed
- Mark as New
- Mark as Read
- Bookmark
- Subscribe
- Printer Friendly Page
- Report Inappropriate Content
** WIM links updated 10/2/2012
In the System Center 2012 Endpoint Protection Status monitoring dashboard, one possible malware- remediation status is Offline Scan Required . What does this mean, and how can you address this status? First, what this means is that a particular malware could not be fully cleaned, and the computer needs to be scanned and cleaned outside of the full operating system to complete remediation. This requires a restart into the Windows Pre-installation Environment (WinPE), to run the Windows Defender Offline scan tool to clean the unwanted software, including rootkits.
The Windows Defender Offline scan tool is a free tool available for download here as a bootable Windows Imaging Format (WIM) file, which can be put onto media (USB or DVD) and inserted into the infected computer. However, since walking around to machines with media in your hand is so 1991, why not use Configuration Manager’s OSD feature to do this for you? In this blog, I’m going to walk you through the steps of doing exactly that, as an example of yet another way that management and security in the same product is so awesome and convenient.
Building the Windows Defender Offline WIM
The first thing you need to do is download the boot WIM for both 32 bit and 64 bit operating systems from here (NOTE: System Center 2012 SP1 Configuration Manager Beta customers will need to use the new versions of the WIM, which are located at 32 bit and 64 bit ). Once downloaded, you’ll have an imagepackage32.exe and imagepackage64.exe, which when launched, will extract the content, and from there, you’ll want to grab the boot.wim out of the sources folder. Also, you’ll need to download the latest full definition files, which can be found here for 32 Bit , and here for 64 Bit . The file names for both architectures are the same, so save them to different folders. Also, you can refer to my blog on deploying the Endpoint Protection client using an OSD task sequence for details/links to scripts to automate full definition downloads . You can use the same definitions brought down by that process for the Windows Defender Offline definitions. Once you have the requisite files, perform the following steps.
Note: I’m only going to walk through a 64 bit example—the 32 bit steps are the same other than there’s no need to rename the definition file in the 32 bit workflow.
- Put the 64 bit boot.wim file you downloaded for Windows Defender Offline into the source directory from which you’ll import and distribute the completed WIM (after we modify it) using Configuration Manager.
-
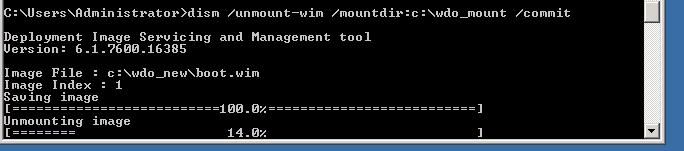
Next, you’ll use the Deployment Image Servicing and Management (DISM) tool, to mount the WIM so that you have access to the file structure. You need to do this so that you can put the latest definition file into the WIM before you un-mount it, and distribute it through Configuration Manager. From the command prompt, run the following command against the source directory of your WIM, and mount it to a separate directory that you’ve pre-created:
DISM /mount-wim /wimfile:%file%boot.wim /mountdir:%file% /index:1
For example, here’s the command on my test system, and the progress indicator you’ll see:
-
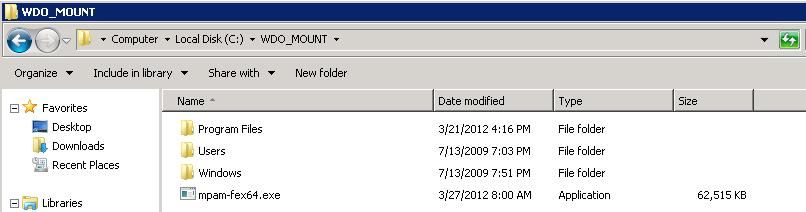
After you’ve mounted the WIM, go to the folder you specified in the above step, which will look like the screenshot below. If you navigate through Program FilesMicrosoft Security Client, you’ll see the files used for scanning, using Windows Defender Offline in WinPE.
-
Next, you want to place the definition file for 64 bit in the root of this directory. Also, you will need to rename this file from
mpam-fe.exe
to
mpam-fex64.exe
. If you don’t rename this file
(only on 64-bit,
leave the name as is on 32-bit, mpam-fe.exe
), the Offline Scan will fail!
-
After that,
make sure
that you close any folders that might be open for your source WIM or your mounted one, or the next step to unmount the WIM and commit changes
will fail.
Go ahead and unmount the WIM and commit changes with the following command:
DISM /unmount-wim /mountdir:%file% /commit
- You now have a reference, bootable WIM for Windows Defender Offline, which includes the latest definitions, so it’s ready to import into Configuration Manager.
- Note: You should repeat this process at least weekly, and distribute the updated WIM files to distribution points to assure you have current definitions for offline scans when the process is needed.


Importing the WIM into Configuration Manager
In this next step, you will create the Boot Image for Windows Defender Offline, by importing it into Configuration Manager.
- Open your Configuration Manager console, and navigate to Software Library | Operating Systems | Boot Images, and choose “Add Boot Image.”
- From the wizard, browse to the path where you saved your boot.wim in the previous step. In the dropdown you should see the single boot image for the right architecture (x64 in this case).
- On the next page, name the boot image something intuitive, like “Windows Defender Offline WIM 64 Bit”
- Finish the wizard (this could take several minutes as the WIM is imported).
- After that completes, go ahead and distribute the WIM to Distribution Points, by choosing Distribute Content, and walking through that simple wizard.
Building the Task Sequence
In our next step, we need to build the task sequence using this boot image. In this task sequence, for which an importable example is provided in this blog, we will add steps in the following order, to disable Bitlocker (if you use Bitlocker in your environment), restart the computer into WinPE, run the Defender Offline Scan as a command line action, restart the computer into the existing operating system, and enable Bitlocker. To create this task sequence, simply download the exported task sequence zip file I’ve provided at the bottom of this blog and import it.
- From Software Library | Operating System | Task Sequences, choose Import Task Sequence.
- Browse to the UNC path where you saved the downloaded task sequence, and then finish the wizard.
- In the created task sequence, choose Properties, and under the advanced tab, select Use a boot image, and browse to the WIM you created in a previous step.
-
On this same tab, choose the appropriate operating systems that this will run on by architecture, so that the end-user only sees one option, as appropriate for their system/OS architecture, in Software Center. Click OK.
-
You can also choose to edit this imported task sequence if you want to enable/disable any of the steps, or add your own.
Note: You can also create your own task sequence from scratch, through the create task sequence wizard. The command line you want to use to execute Defender Offline Scan from WinPE is "%ProgramFiles%Microsoft Security ClientOfflineScannerShell.exe" /autoscan.

Building a dynamic collection for targeting the Offline Scan
Given that clients requiring offline-scans is not likely a frequent event on a large number of clients, you probably want this solution delivered to clients conditionally. So next, we’ll create a dynamic collection for clients in this particular malware state to which we’ll target the task sequence dynamically. This way, only users on clients that require an offline scan will be able to see the deployment in Software Center. This allows you identify exactly what clients are in this state, and then work with the end-user to have them launch this remediation from Software Center, as only clients in this state will see the deployment as available.
- Under Assets and Compliance | Device Collections, choose Create a Device Collection.
- Name the collection something intuitive, like Offline scan required to remediate malware , and choose the limiting collection.
- Select Use incremental updates for this collection , and Schedule a full update of this collection to occur once a day , at whatever time you choose.
- Under membership rules, we need to choose the malware state logic we’ll use to build this collection against dynamically, so within ten minutes or so of a client reporting this state, it will dynamically join this collection and get the task sequence targeted at its next policy polling interval (60 minutes by default, or this can be forced to run ad-hoc on the client, by forcing machine policy refresh through the Configuration Manager control panel applet.)
- For the membership rule, choose Add Rule , and choose Query Rule . Name the query Offline Scan Required, and choose Edit Query Statement.
- In the query statement properties, choose the Criteria tab. From there, click the yellow star to add criteria.
- Keep the default of Simple Value , and choose Select.
- From the Attribute Class dropdown, choose Antimalware Infection Status , and for the attribute choose PendingOfflineScan .
- In Criterion properties, keep the default value of is equal to True , and click OK.
- Click OK on the Query Statement Properties, and Query Rule Properties.
- Complete the wizard. Now you have a collection that will only ever be populated with clients requiring an offline scan. They will be removed from this collection automatically after they complete the offline scan, and that cleaning state is reported back up to the Configuration Manager server.
Deploying the Task Sequence
Now that you have the boot image, task sequence, and target collection created, we are ready to deploy the task sequence. After this step, any client that appears in the collection will have this task sequence deployment made available dynamically. You can also add a direct member to this collection, or target another test collection (with members) with this task sequence if you just want to test the overall process, not dependent on the condition of getting malware that results in this state.
- From Software Library | Operating Systems | Task Sequences, select the Windows Defender Offline 64 bit task sequence, and choose Deploy .
- Specify the collection we created in the previous step.
- Next, choose to make it available or required . If you make it required, then you can configure on the next page how long the user will have to run this before it becomes mandatory. Also, you can specify the conditions that activate this assignment, like user logoff. We’re just going to set this as available, as the occurrence of this remediation type is infrequent enough that our process is to make this available to the user, and then communicate to them in email that they need to run this as soon as they can from Software Center to mitigate a malware risk.
- If you want to make this deployment available to PXE so that users can boot into an Offline Scan without having to launch it from the full operating system, select that option on this page.
- On the scheduling page, set when this will be available to the user, which should just be the current clock time, as any clients that get this in the future will then have it available as soon as policy is processed.
- On the User Experience page, keep the settings as default. This helps users better understand how much time is left in the overall process. If you choose to uncheck show task sequence progress, the user will not see specifics about the task sequence steps, but they will still see an overall progress bar, in the foreground of the Windows Defender Offline scan status UI.
- On the alerts page, these probably aren’t needed given the ad-hoc nature of these types of deployments.
- On the distribution points page, choose to download content locally when needed by running task sequence, and then choose your preferred behavior for clients to retrieve content remotely, and then complete the wizard.
Create Task Sequence Media (Optional Step)
An additional option you have in Configuration Manager, is to create bootable media from the task sequence, so that you can export the boot image and steps onto a share (for remote admins to grab and use), USB or DVD. You can use this to either test the solution offline (independent of Configuration Manager), or you can create media ad-hoc for offline (road warrior) clients, or clients you don’t want to deploy this to using Configuration Manager. From the task sequence list, simply choose the Defender Offline task sequence, and choose to Create Task Sequence Media. Choose standalone, and then your preferred media type and finish the wizard.
Check your work
As you probably want to validate that this works end-to-end without waiting for an offline-scan required malware, go ahead and target this task sequence to a test client by adding the client to the dynamic collection you created (using direct membership) or by creating a new deployment of this task sequence to a test collection. After the task sequence is deployed, go to the test client and refresh policy.
Wait a couple of minutes, and then open Software Center, where you’ll see the deployment for Windows Defender Offline Scan:
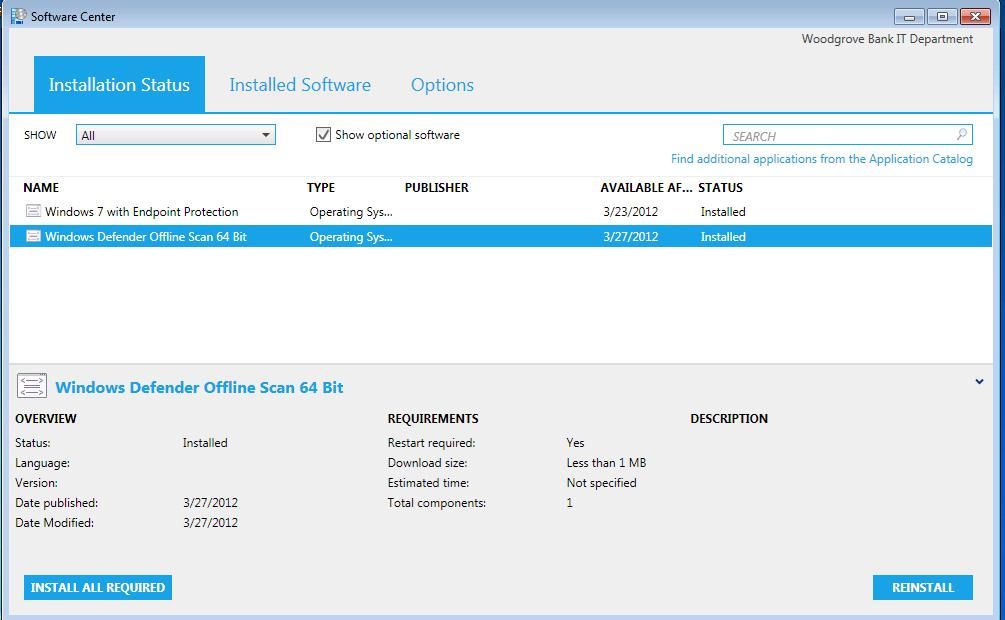
Go ahead and launch install (shows as reinstall in the screenshot, as I’ve already run through this). You’ll get a warning pop-up that you are about to install a new operating system, which isn’t really the case, but that’s a standard pop-up for all deployments with a type of “Operating System.” This is kind of a scary dialogue to end-users, and unfortunately there’s no way to control it. This is why working with end-user directly, or educating them on this process is critical (i.e. avoid panic attacks). After a download progress indicator completes, the system will provide a reboot countdown, and then reboot into WinPE, where the task sequence will kick off the Defender Offline Scan:

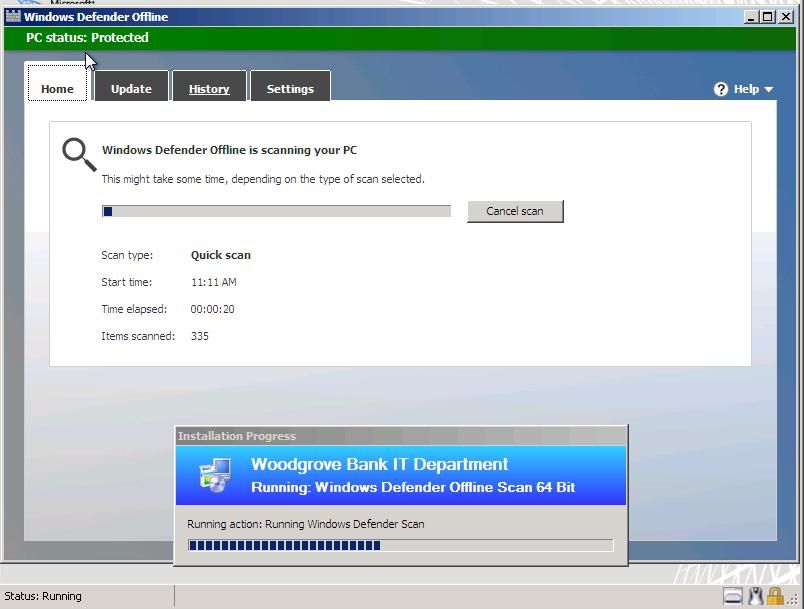
Once the scan completes, the system will restart into the main operating system, and you’re done. Within a few minutes, the state of offline scan required should be cleared from the database and console, the client falls out of the collection, and the issue is remediated! And you didn’t have to walk or send media all over the world to accomplish this. It’s all available using System Center 2012 Configuration Manager and System Center 2012 Endpoint Protection together. Management and security.
This posting is provided "AS IS" with no warranties, and confers no rights.
You must be a registered user to add a comment. If you've already registered, sign in. Otherwise, register and sign in.