Turn on suggestions
Auto-suggest helps you quickly narrow down your search results by suggesting possible matches as you type.
- Home
- Education Sector
- Educator Developer Blog
- Using DSVM Jupyterhub with AAD authentication
Using DSVM Jupyterhub with AAD authentication
- Subscribe to RSS Feed
- Mark as New
- Mark as Read
- Bookmark
- Subscribe
- Printer Friendly Page
- Report Inappropriate Content
Published
Mar 21 2019 05:25 AM
3,428
Views
Mar 21 2019
05:25 AM
Mar 21 2019
05:25 AM
First published on MSDN on Jun 12, 2017
One of the key questions, we have had recently is..
How institutions can improve data science experience utilising the Azure Linux Data Science VM by providing Single Sign on for users to services such a Jupyterhub via AAD accounts and authentication?

Guest blog from Alberto De Marco Technology Solutions Professional – Big Data

Most UK Institutions how have an active directory account due to implementing o365, therefore most academics and students use AAD everyday to logon on their laptops and to access emails. Data science exploration tools like Jupyter notebooks provide a sign on feature, in most circumstances jupyter admins utilise local accounts within Jupyter hub, these accounts are created for this objective of using notebooks. But utilising local accounts places a considerable burden on management and support and result in a number of processes, procedures and checks to manage these additional accounts.
What we are going to cover in the following blog is how to utilise Azure Active Directory to facilitate access to Jupyter Notebooks.
To improve this experience the following blog is going to explain how to set up a Linux Data Science VM and join it to a managed domain and have also Jupyter Hub authentication working with the very same domain.
The things to set up are the following:
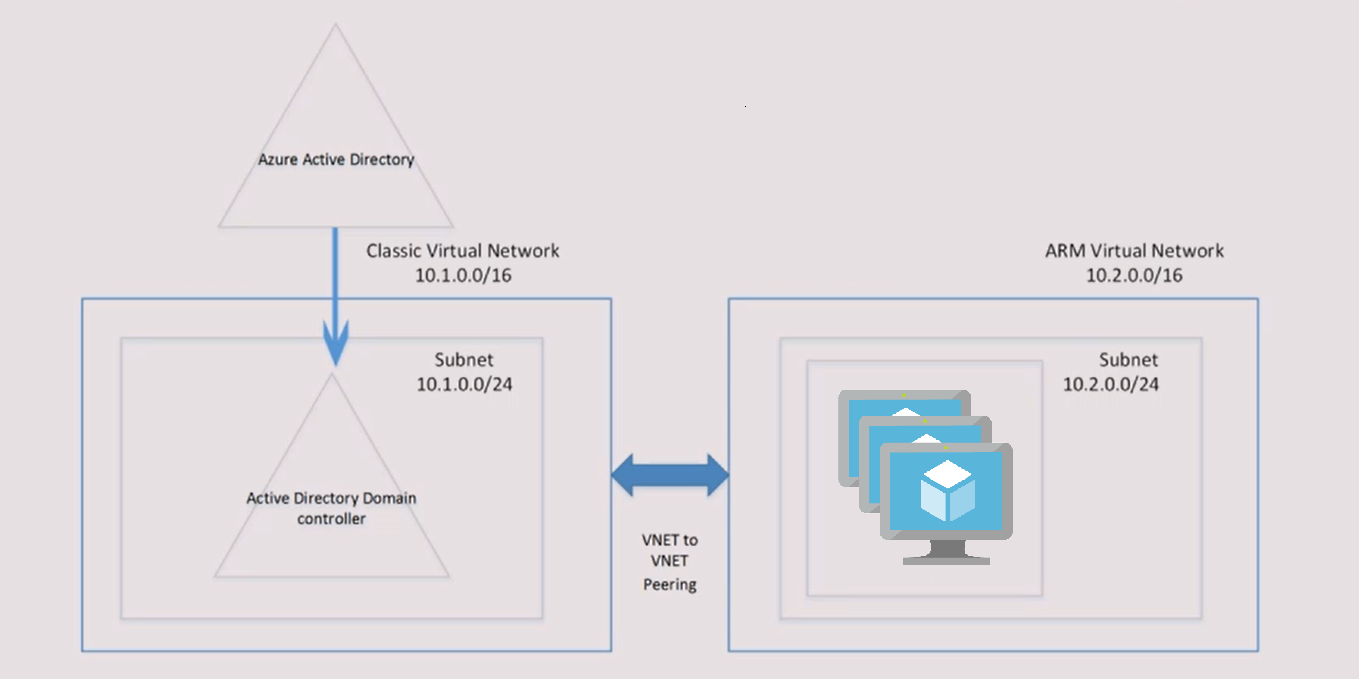
Well Azure Active Directory works mainly with oauth protocol while OS authentication works with Kerberos tickets that requires an “old fashion” managed domain and Domain Services it’s a way to have this completely managed by Azure. In addition Domain Services gives us also LDAP protocol support that is exactly what we need for Jupyter Hub.
The two VNETs are needed because Domain Services still needs a “Classic VNET” while the modern Linux DS VMs are made with Resource Manager template. The peering between the two guarantees that they can see each other even if they are separate.
Step 1 Create an Azure Active Directory
Go to https://manage.windowsazure.com/ and here click on +New button on the left hand bottom corner, go and click on App Services > Active Directory > Directory, finally click on Custom Create , here choose name, domain name and Country .
Pay attention to country choice because it will decide on which datacenter your active directory will be.
Once done you should have something like mytestdomain.onmicrosoft.com .
Step 2 Create Azure Active Directory Domain Services with its own Classic VNET
Here simply follow this great Microsoft step by step tutorial completing all the 5 tasks. Do not forget , if you do not import from on premise AD, to add at least one user , to change the password of this user and to add it to AAD DC Administrators group.
Step 3 Create a Resource Manager based VNET
Here simply go to the new portal.azure.com and create a normal vnet paying attention to choose the addresses in way that are not overlapping with the ones of the previous VNET (so if you have choosen 10.1.0.24 for the classic VNET , pick 10.2.0.24 for the new one).
Step 4 Define the peering between the two VNETs
Go to portal.azure.com, to the new VNET that you have just created and enable the peering :
Step 5 Deploy and Configure Linux DS VM
Again from portal.azure.com , add a new Linux Data Science VM CentOS/Windows or Ubuntu version and during the configuration pay attention to pick as VNET the latest one you created (the ARM based one).
Once the VM is up install the needed packages with this command on the Linux VM:
yum install sssd realmd oddjob oddjob-mkhomedir adcli samba-common samba-common-tools krb5-workstation openldap-clients policycoreutils-python -y
Go now to /etc/resolv.conf and setup the name resolution in the putting the domain name and the ipaddress of the azure domain services (one of the two).
Here is an example
search mytestdomain.onmicrosoft.com
nameserver 10.0.0.4
Now join the domain with this command (change the user to the admin defined at Step 2 or your existing AAD)
realm join –user=administrator mytestdomain.onmicrosoft.com
Check that everything is ok with the command realm list .
Now modify the /etc/sssd/sssd.conf changing these two lines in the following way:
use_fully_qualified_names = False
fallback_homedir = /home/%u
and restart the sssd demon with this command systemctl restart sssd .
Now try to login/ssh with simple domain username (without @mytestdomain.onmicrosoft.com) and password and everything should work.
Step 6 Configure Jupiter Hub
Add the LDAP connector with pip:
pip install jupyterhub-ldapauthenticator
Configure the jupyter hub configuration file in the following way (change Ip Address and other parameters accordingly):
c.JupyterHub.authenticator_class = ‘ldapauthenticator.LDAPAuthenticator’
c.LDAPAuthenticator.server_address = ‘10.0.0.4’
c.LDAPAuthenticator.bind_dn_template = ‘CN={username},OU=AADDC Users,DC=mytestdomain,DC=onmicrosoft,DC=com’
c.LDAPAuthenticator.lookup_dn = True
c.LDAPAuthenticator.user_search_base = ‘DC=mytestdomain,DC=onmicrosoft,DC=com’
c.LDAPAuthenticator.user_attribute = ‘sAMAccountName’
c.LDAPAuthenticator.server_port = 389
c.LDAPAuthenticator.use_ssl = False
c.Spawner.cmd = [‘/anaconda/envs/py35/bin/jupyterhub-singleuser’]
Now to troubleshoot and verify that everything works kill the jupyterhub processes running by default on the Linux DSVM and try the following command (sudo is needed to launch jupyter hub in multiuser mode):
sudo /anaconda/envs/py35/bin/jupyterhub -f /path/toconfigfile/jupyterhub_config.py –no-ssl –log-level=DEBUG
Now try to authenticate going to localhost:8000 with domain username (without @mytestdomain.onmicrosoft.com) and password and you should be able to log on on juypter with your AAD credentials.
JupyterHub LDAP Authenticator https://github.com/jupyterhub/ldapauthenticator
DSVM Forum - send questions, feedback and feature requests on the forum - http://aka.ms/dsvm/forum
DSVM Product Page – http://aka.ms/dsvm
DSVM Introductory DIY workshop – http://aka.ms/dsvm/workshop
DSVM Fact Sheet Handout – http://aka.ms/dsvm/handout
Learn Analytics @ Microsoft – http://learnanalytics.microsoft.com
One of the key questions, we have had recently is..
How institutions can improve data science experience utilising the Azure Linux Data Science VM by providing Single Sign on for users to services such a Jupyterhub via AAD accounts and authentication?
Typical Data Science Workflow
Guest blog from Alberto De Marco Technology Solutions Professional – Big Data
Most UK Institutions how have an active directory account due to implementing o365, therefore most academics and students use AAD everyday to logon on their laptops and to access emails. Data science exploration tools like Jupyter notebooks provide a sign on feature, in most circumstances jupyter admins utilise local accounts within Jupyter hub, these accounts are created for this objective of using notebooks. But utilising local accounts places a considerable burden on management and support and result in a number of processes, procedures and checks to manage these additional accounts.
What we are going to cover in the following blog is how to utilise Azure Active Directory to facilitate access to Jupyter Notebooks.
Joining your DSVM to a Managed Directory
To improve this experience the following blog is going to explain how to set up a Linux Data Science VM and join it to a managed domain and have also Jupyter Hub authentication working with the very same domain.
The things to set up are the following:
- An Azure Active Directory that usually mirrors automatically the on-premise active directory structure and content
- Azure Active Directory Domain Services with its own Classic VNET
- Another Resource Manager VNET where one or more Linux DS VMs will be deployed
- A peering between the two VNETs
- The packages needed for the Linux OS to join a managed domain
- The authentication module for Jupyter Hub that makes authentication happen against the managed domain
Why all these components?
Well Azure Active Directory works mainly with oauth protocol while OS authentication works with Kerberos tickets that requires an “old fashion” managed domain and Domain Services it’s a way to have this completely managed by Azure. In addition Domain Services gives us also LDAP protocol support that is exactly what we need for Jupyter Hub.
The two VNETs are needed because Domain Services still needs a “Classic VNET” while the modern Linux DS VMs are made with Resource Manager template. The peering between the two guarantees that they can see each other even if they are separate.
Step by step how to setup all the necessary components.
Step 1 Create an Azure Active Directory
Go to https://manage.windowsazure.com/ and here click on +New button on the left hand bottom corner, go and click on App Services > Active Directory > Directory, finally click on Custom Create , here choose name, domain name and Country .
Pay attention to country choice because it will decide on which datacenter your active directory will be.
Once done you should have something like mytestdomain.onmicrosoft.com .
Step 2 Create Azure Active Directory Domain Services with its own Classic VNET
Here simply follow this great Microsoft step by step tutorial completing all the 5 tasks. Do not forget , if you do not import from on premise AD, to add at least one user , to change the password of this user and to add it to AAD DC Administrators group.
Step 3 Create a Resource Manager based VNET
Here simply go to the new portal.azure.com and create a normal vnet paying attention to choose the addresses in way that are not overlapping with the ones of the previous VNET (so if you have choosen 10.1.0.24 for the classic VNET , pick 10.2.0.24 for the new one).
Step 4 Define the peering between the two VNETs
Go to portal.azure.com, to the new VNET that you have just created and enable the peering :
Step 5 Deploy and Configure Linux DS VM
Again from portal.azure.com , add a new Linux Data Science VM CentOS/Windows or Ubuntu version and during the configuration pay attention to pick as VNET the latest one you created (the ARM based one).
Once the VM is up install the needed packages with this command on the Linux VM:
yum install sssd realmd oddjob oddjob-mkhomedir adcli samba-common samba-common-tools krb5-workstation openldap-clients policycoreutils-python -y
Go now to /etc/resolv.conf and setup the name resolution in the putting the domain name and the ipaddress of the azure domain services (one of the two).
Here is an example
search mytestdomain.onmicrosoft.com
nameserver 10.0.0.4
Now join the domain with this command (change the user to the admin defined at Step 2 or your existing AAD)
realm join –user=administrator mytestdomain.onmicrosoft.com
Check that everything is ok with the command realm list .
Now modify the /etc/sssd/sssd.conf changing these two lines in the following way:
use_fully_qualified_names = False
fallback_homedir = /home/%u
and restart the sssd demon with this command systemctl restart sssd .
Now try to login/ssh with simple domain username (without @mytestdomain.onmicrosoft.com) and password and everything should work.
Step 6 Configure Jupiter Hub
Add the LDAP connector with pip:
pip install jupyterhub-ldapauthenticator
Configure the jupyter hub configuration file in the following way (change Ip Address and other parameters accordingly):
c.JupyterHub.authenticator_class = ‘ldapauthenticator.LDAPAuthenticator’
c.LDAPAuthenticator.server_address = ‘10.0.0.4’
c.LDAPAuthenticator.bind_dn_template = ‘CN={username},OU=AADDC Users,DC=mytestdomain,DC=onmicrosoft,DC=com’
c.LDAPAuthenticator.lookup_dn = True
c.LDAPAuthenticator.user_search_base = ‘DC=mytestdomain,DC=onmicrosoft,DC=com’
c.LDAPAuthenticator.user_attribute = ‘sAMAccountName’
c.LDAPAuthenticator.server_port = 389
c.LDAPAuthenticator.use_ssl = False
c.Spawner.cmd = [‘/anaconda/envs/py35/bin/jupyterhub-singleuser’]
Confirming it all works
Now to troubleshoot and verify that everything works kill the jupyterhub processes running by default on the Linux DSVM and try the following command (sudo is needed to launch jupyter hub in multiuser mode):
sudo /anaconda/envs/py35/bin/jupyterhub -f /path/toconfigfile/jupyterhub_config.py –no-ssl –log-level=DEBUG
Now try to authenticate going to localhost:8000 with domain username (without @mytestdomain.onmicrosoft.com) and password and you should be able to log on on juypter with your AAD credentials.
Resources
JupyterHub LDAP Authenticator https://github.com/jupyterhub/ldapauthenticator
DSVM Forum - send questions, feedback and feature requests on the forum - http://aka.ms/dsvm/forum
DSVM Product Page – http://aka.ms/dsvm
DSVM Introductory DIY workshop – http://aka.ms/dsvm/workshop
DSVM Fact Sheet Handout – http://aka.ms/dsvm/handout
Learn Analytics @ Microsoft – http://learnanalytics.microsoft.com
0
Likes
You must be a registered user to add a comment. If you've already registered, sign in. Otherwise, register and sign in.