- Home
- Education Sector
- Educator Developer Blog
- Project Prague: Revolutionizing User experiences using Natural User Interfaces
- Subscribe to RSS Feed
- Mark as New
- Mark as Read
- Bookmark
- Subscribe
- Printer Friendly Page
- Report Inappropriate Content
Guest blog by Kiran Gopinathan Microsoft Student Partner at UCL

Hi, I’m Kiran Gopinathan, a Second-Year Undergraduate student at UCL, and today, we’ll be using Project Prague to build an Application on the Windows Presentation Format with a gesture driven interaction model.
About MeAs a developer, I particularly enjoy programming in C due in part to the extensive control and responsibility the language provides to the user. Recently, I’ve been spending my time exploring how C is used in larger scale projects, and how it can integrate with assembly – this has been mainly fuelled by a personal project to try and develop a RTOS on an Arduino.
Alongside this, I’ve also been looking more closely at web development, developing Web Apps using Node.js, and learning how HTML and CSS pre-compilers can allow for faster web development.
You’ll find full write-ups and source code for most of my projects at my GitHub page - link .
My LinkedIn – link .
About Project Prague
User interaction models are a commonly overlooked facet of application design – an easy to use user interface can help an application stand out amongst its competitors and widen it’s demographic. Project Prague, a currently ongoing experimental project at Microsoft, provides an innovative new natural interface for applications by providing an API for interpreting physical user gestures as captured by a camera as inputs to your application.
Note: This tutorial assumes that you have already installed the Project Prague SDK and meet the Project Prague Hardware requirements.
To test out the functionalities provided by Project Prague, we’ll be integrating it into a simple Image viewer application made using the Windows Presentation Format – unfortunately the current SDK for project Prague is only available on the .NET framework, not the .NET Core, and as such, is not compatible with C# applications on the UWP.
The code for the project can be found on GitHub .
If you found the application interesting, check out my Reddit Slideshow UWP application (also on GitHub ) which is a more fully fleshed out version of this application – the initial plan was to use that as the basis for this tutorial – however at the moment Project Prague doesn’t support the UWP.
1. To get started, create a new WPF Application – on Visual Studio, this option can be found under the Visual C# category.

2. Add the following folders to your project (via the solution explorer). This is mainly just to keep the project organised and easy to debug.

3. To enforce a consistent style across the application and utilize separation of concerns, we’ll use resource dictionaries to style the application.


Make 3 Resource dictionaries in the Styles folder – ApplicationStyle, MainWindowStyle and SlideshowStyle.
4. Inside the ApplicationStyle.xaml file, add the following code. We will use this file to store any visual designs required throughout the application, such as the colour scheme and font choices.

5. Next, to allow us to reference the styles described in these files, we’ll need to add them to their respective pages. First add the following to the App.xaml file – this will allow us to reference the styles in ApplicationStyle.xaml throughout the entire application.

6. Similarly, add the following to MainWindow.xaml. The use of the ResourceDictionary’s MergedDictionaries property when defining the styles, allows us to easily extend the styles used in the application if needed in the future by simply adding more resource dictionaries.

7. Create a new window named Slideshow.xaml in the root of the directory. This will be the window in which the application will display the slideshow with which we will eventually integrate the Natural User Interface.


8. We can then add the corresponding SlideshowStyle to the new Slideshow window.

9. Open MainWindow.xaml and add the following. Also, place your cursor over the GenerateSlideshow Click property on the button and the subredditTextBoxLostFocus LostFocus attribute and press F12 to generate the required methods in the codebehind.

10. Open MainWindowStyle.xaml and add the following styles. The {StaticResource Name} tag allows us to reference any styles or objects placed in the Resources of the current context, hence why we can reference the globally set MainTheme_color brushes within these styles. After styling, the application should sport a trendy blue theme.


11. Having set up the initial page’s style, we can then move on to developing the logic for this page. First let’s set up the subredditTextBoxLostFocus to auto sanitize the input to make our lives easier for later on. Add the following code to MainWindow.xaml.cs.

12. Add the following code to display the slideshow slide - for now, ignore the error on the slideshow constructor, we’ll modify the Slideshow constructor to accept two parameters soon. The application will swap between the two windows by hiding the current window and opening the slideshow window.

13. Now add the following to the Slideshow.xaml window – we’ll add the styles for each component next. Press F12 while placing your cursor over each of the Click events to generate the required codebehind methods.

14. Add the following to the SlideshowStyles.xaml – we’re using the Segoe MDL2 Assets font family to add specific icons to the page.

15. Before we implement the Slideshow code behind, we first need to define some Utility classes. First, create two classes in the Models Folder – UtilityModels.cs, and RedditModels.js.


16. Inside the RedditModels.cs, we’ll be placing a set of Classes to represent the data retrieved from the Reddit Api. To do this, open a web browser and navigate to https://www.reddit.com/r/wallpapers.json , copy the JSON there, and then after deleting the class already inside RedditModels.cs, special paste the JSON into the file.


17. Now we’ve set up the JSON model, we’ll need to create some objects to represent the images to be displayed. We will use a MediaList class to encapsulate the list of images we will be displaying in our application. Open UtilityModels.cs, delete the existing class inside the namespace and add the following.

18. To deserialize the JSON from Reddit, we’ll be using Newtonsoft.JSON. We can install the package using the Nuget package manager.


19. Now we’ve installed the required packages, we can work on the Slideshow codebehind. Open Slideshow.xaml.cs and add the following code.

We use the Dispatcher.Invoke function when hiding the Closing the window so as to run the code on the UI thread which is the only thread that has access to the Window instance.
Using this code, when the slideshow window opens, it hides its parent window, and then initializes our MediaList class. Whenever the MediaList changes, it updates the displayed image to be the CurrentImage of the MediaList.
We’ll also have to define the GenerateImages function, which asynchronously parses the retrieved list of Reddit posts for ones pointing to images.

Finally, at the end of the class definition, we can define the button call-back events and the earlier referenced window close callback.

At this point, if you run your application, you should be able to view a slideshow of images from a subreddit of your choosing.
20. Now we’ll begin work on implementing the natural user interface for the application. First, to use the Prague SDK we’ll need to reference the Prague SDK dlls.
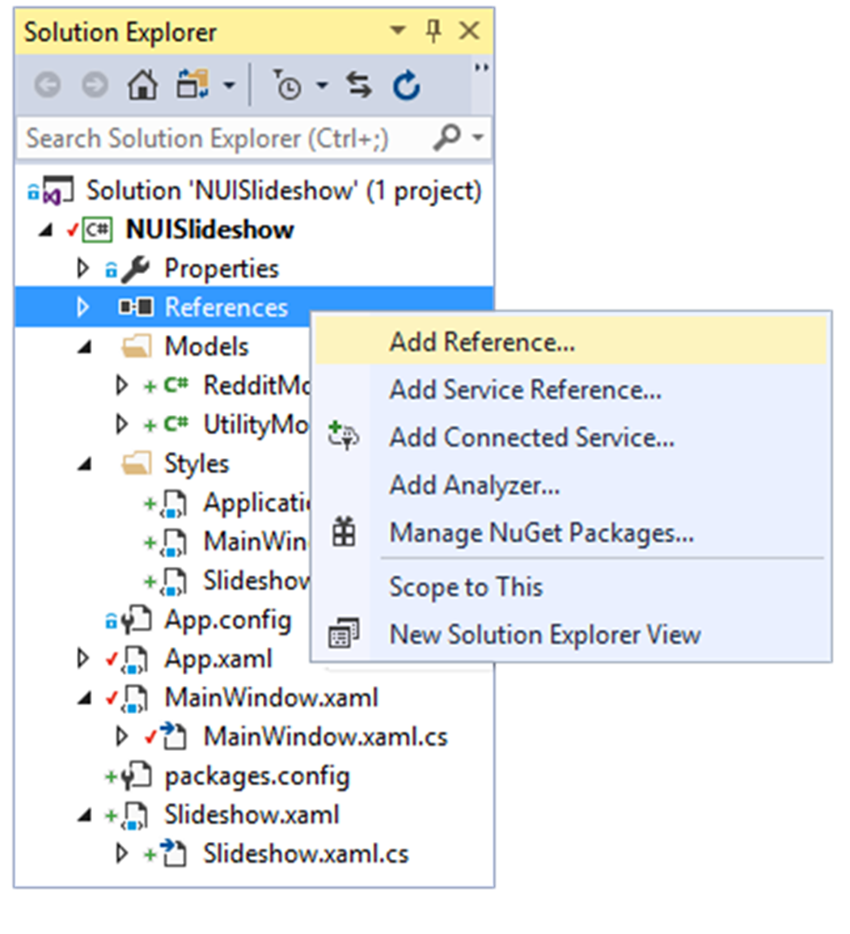

Then Navigate to the Project Prague install directory (found at the MicrosoftGesturesInstallDir environment variable), and add Microsoft.Gestures.dll, Microsoft.Gestures.Endpoint.dll, Microsoft.Gestures.Protocol.dl to the project.
21. Once the required dlls have been included, we can set up the Gestures integration. First, add a GesturesEndpoint service field to the Slideshow class.

The Prague SDK connects to the Gesture Service using a GestureServiceEndpoint – to manage resources appropriately, after connecting to the service in the constructor, we must disconnect from the Endpoint before closing the window. Hence why we add a callback to the Closed event for the slideshow Page.
22. Define the ConnectService and DisconnectService functions as such.

23. Now with the boilerplate implemented, we can work on defining the gestures themselves. As described in the Project Prague page, a Gesture is described by either a Hand Pose or a Hand motion. We can implement a basic swipe left functionality as such.

24. Once we’ve up the commands we can test out the service on the Gestures Service interface. As we can see, while the left swipe motion works most of the time, the right swipe is less effective, as often when bringing the hand back after the motion, the left swipe is triggered.

25. The main issue for both gestures, is that the terminating hand pose for each could also be interpreted as the start pose, hence leading to some uncertainty as to which gestures are being performed. We can fix this by adding a new terminating hand pose for each gesture with the palm facing either toward or away from the camera for the right and left swipes respectively. We can change the code as such.

26. With this asymmetrical Gesture description, the service is able to easily differentiate between the two gestures, and rarely incorrectly interprets the motions. Finally, let’s implement the functionality to rotate images on the screen through the natural user interface. First write a rotate90DegreesRight and rotate90DegreesLeft function as so.

27. With some basic image rotation functions defined, inside the Connect Service, define the following gestures.

With these changes, you should be able to rotate images onscreen with pinch and rotate motion. Notice how in theses gestures, we don’t incorporate any motions explicitly – the gesture is simply defined as the starting hand pose, and the ending hand pose.
Closing Thoughts
Working with the Project Prague SDK was a fun experience, and the simple but descriptive API made describing motions surprisingly quick and hassle free. Furthermore, the Visual overlay provided by the Microsoft Gestures API made the process of debugging the Gestures Service, despite its inner complexities, a simple task.
I found the interpretation of gestures to be relatively responsive, and while slower movements were required for some gestures to register, at no point did it ever feel too unnatural an experience so as to take away from the application itself. Even then, I found that depending on way in which I had described the gesture, it was possible to avoid requiring the use of slower motions.
In general, I found my gestures to have the best performance when developed utilizing both Hand Poses and Motions together, and having clearly defined unique start and end gestures. For example, from the application, the Swipe Left and Swipe Right gestures had near perfect interpretation rates and significantly improved the experience while using the application – mainly in part due to how natural they felt.
While the application developed in the post was relatively simple, even from this simple example, I found it was clear to see how the inclusion of such Gesture driven controls could serve as an invaluable enhancement to currently used interaction models.
You must be a registered user to add a comment. If you've already registered, sign in. Otherwise, register and sign in.