- Home
- Education Sector
- Educator Developer Blog
- Augmented Reality for children at Great Ormond Street Hospital
- Subscribe to RSS Feed
- Mark as New
- Mark as Read
- Bookmark
- Subscribe
- Printer Friendly Page
- Report Inappropriate Content

Guest blog by Ayushmaan Seth Microsoft Student Partner and 1 st Year Computer Science, University College London
About me
I am a 1 st year Computer Science Undergraduate student at University College London. Highly enthusiastic about Machine Learning and Cybersecurity, I enjoy all branches of Computer Science, from Competitive Programming to Game Development. You can find me on LinkedIn .
Introduction
It’s not so surprising for anyone to say that Virtual Reality and Augmented Reality are going to be the future across all technologies. From Special Military Training to games like Pokémon GO, VR and AR are changing the way we feel and perceive things. Complex surgeries are becoming easier and hassle-free, integration of this in our education is taking place at a rapid rate and in near future it will dominate most of the devices we use now.
How are these developed? A small part of this question will be answered in the following tutorial, where we are going to develop an Augmented Reality game (just like Pokémon GO!) using Unity3D, Vuforia SDK and some of the products from Microsoft Stack – Visual Studio and Azure. Azure will help us for building an online leaderboard for this game. After this tutorial you will have a basic understanding of how developers Augment Reality.
The motivation of this tutorial was a project called RewardRush, which is basically an AR game just like Pokémon GO but for inside that hospital for the sick children. (our client, Great Ormond Street Hospital and Microsoft). We did this project in a team of 3 – Me, Martynas Janonis and Granit Mullahasani Dula (my friends and team-mates from UCL).
Prerequisite
You should have a basic understanding of using Unity. Having an experience in an Object-Oriented Programming language like C++ or Java will come handy as we will be scripting in C# - very similar to C/C++ and Java.
What we will use?
- Unity3D along with Vuforia SDK
- Microsoft Visual Studio for scripting
- Microsoft Azure SQL database for online leaderboard
About Microsoft and its Development Software's
Microsoft and its open-source development software enables developers from all around the world, from all backgrounds and any skillset or programming experience, to build out-of-the-box products and come up with efficient solutions. Microsoft Azure is one of the best all-purpose development build host, reaching its services for each service there is in this modern computer era. From software development to Machine Learning to protection from DDoS attacks, it has it all.
How will the gameplay work?
We will be building a very simple game where we have one image target in which we have an image of a whale and some fishes and from that image we will be projecting animated and 3D rendered actual fish and whale, which are collectable and will score points, as well as we will be able to see a working online leaderboard integrated with this game. Overall at last, the final product will amaze you!
Before beginning the tutorial, I would like to explain in brief about Augmented Reality and the Vuforia SDK.
Augmented Reality is basically a technology that helps superimposing a virtually/artificially generated image/model on a user’s physical view of the real world. Many of us have played the game Pokémon GO without even realizing that we are dived deep into the field of AR in that game. It feels like we are actually catching the Pokémon!

Coming to Vuforia, it is a Software Developing Environment for Augmented Reality. Vuforia software is compatible with a wide range of devices and operating systems, making interactive experiences accessible to new audiences, ranging from mobiles and tablets to Digital Eyewear like Microsoft HoloLens and Google Cardboard.
Vuforia has loads of built-in and ready-to-use amazing features such as Object Target Detection and Vuforia Ground Plane Detection which we will be using in this tutorial.
Downloading Unity 2017.x with Vuforia integratedAs of 2017.2 and later editions, Unity integrates the Vuforia Engine, making it even easier to create cutting edge augmented reality experiences for both handheld and head- worn devices. You can learn more about the Vuforia Platform at developer.vuforia.com .
So, to setup Vuforia with Unity, download and run the Unity Download Assistant 2017.2 or later from the Unity website: https://unity3d.com/ . Download the Personal version. Accept Unity’s license agreements.

While installing Unity, click next on Introduction and License and then when the components tab appears, do the following -
In addition to your platform support (iOS, Android, UWP or tvOS), select Vuforia Augmented Reality Support in the Components selection dialog. Then continue with your installation.

After this, open Unity and create a new Unity Project (3D project), feel free to choose any location depending on the storage in your local machine,

After clicking on “Create project”, the Unity Game Editor will appear and will look somewhat like this –

We need to now go to the GameObject bar on the top menu bar and after a drop-down list appears, hover on Vuforia and Click on AR Camera ( NOTE – if Vuforia doesn’t appear in the drop-down menu then you need to manually install Vuforia from this site - https://developer.vuforia.com/downloads/sdk , and import this package into your main Unity game. You will need to create a Vuforia Developer portal account which we will either ways do for the main game as well). It will ask you to import, so click “Import” on the prompt.
As soon as you click on the AR Camera, it will appear in the Hierarchy on the left-side. Now, we don’t need the default Main Camera, so click on it and press Delete key to delete the Main Camera.

Accessing Vuforia features in Unity
You must activate Vuforia in your project before you will be able to build a Vuforia app or use Vuforia in Play Mode. So, click on File –> Build Settings –> Player Settings (on the prompt) and then a prompt will appear on the right-hand side –> Check the box having “Vuforia Augmented Reality Supported”.

(Note – If your platform is set up as “PC, Mac & Linux Standalone” you can Switch it to Android/iOS by clicking on it and then click on “Switch Platform”. If the switch Platform button is disabled, go to https://forum.unity.com/threads/missing-a-module-just-reopen-the-download-assistant.378077/ and follow the instructions to fix it).
Creating Vuforia Developer Account and Database
Now that we have setup the basic Vuforia settings, its time to get the Vuforia Database set up so that we could upload our image targets and place our 3D game models on it.
Fire up any of your browsers and go to https://developer.vuforia.com , click on Register(top-right) to create a new Vuforia account.
After you have created the account, login using those credentials, you will see something like this – (if not, then click on the Develop Tab to open the screen).

Click on “Get Development Key” and then enter the name of your game, check the box for agreements and click “Confirm”.

After confirming, your License Manager account will be setup and then you will be able to see the name of the game you set up on the license manager. Click on that and then you will be shown your license key.

Click on that Link as you game name (“AR Game” for mine’s). You will see a long-scrambled text, which is your Vuforia Key for connecting your account to Unity. Copy this key.

Back to Unity, click on AR Camera in the Hierarchy, and then on the Inspector on the right, first change the World Center Mode to “Device Tracking” and then click “Open Vuforia Configuration” under the “Vuforia Behavior” Tab which will take you to Vuforia Configuration.

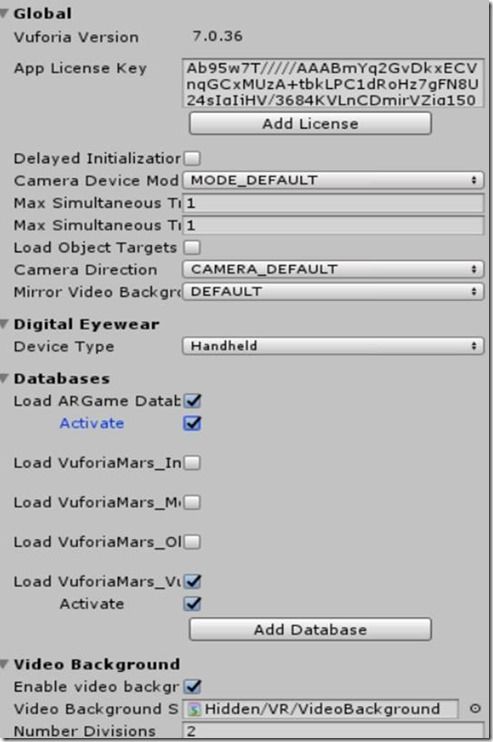
After the Vuforia Configuration Tab opens, you will be able to see various fields on the right side in the inspector. Paste your Vuforia License Key here beside the “App License Key” and change the Device Type to “Handheld”. This will ensure that whenever you are in the game with your phone with your hand, the Augmented Reality rendered models stay at a fixed position”.

So, the Vuforia Developer Account is now integrated with Unity. Now we will integrate the database with Unity.
Go back to your Vuforia Portal and click on “Target Manager” tab beside the License Manager tab.
There, click on “Add Database”. You will be then prompted to add the name of the database. Type any suitable name for that and click “Create”.

After clicking Create, your database will be created. Here, you will be able to add image targets which would be available inside Unity as well because of the same license key you entered. Click on the created database’s name and then click “Add Target”

You will be then prompted to a pop-up window (as shown below), where you will have to upload an image target for your game.
Before moving forward, lets understand what we are doing here.
We are uploading an image target in the database. This image target will act as a Marker for our 3D Game Model.
I am using the following image for uploading as a sample. However, you can use any image for uploading as an image target, just make sure the background isn’t white and the contrast is high on the image.
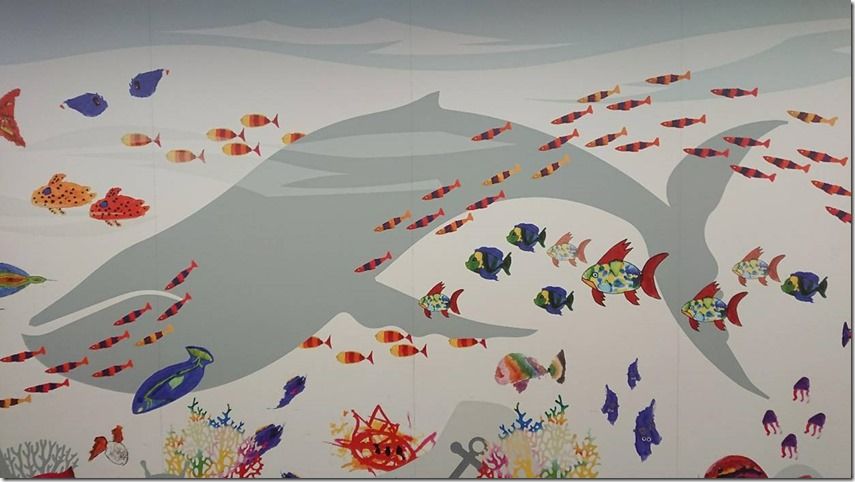
(This image has a lot of bright colors and good clarity, so it would be very easy for Vuforia to detect the image and isolate different detection points on Vuforia to initialize 3D rendered game models).
You can download this picture here –
https://liveuclac-my.sharepoint.com/:i:/g/personal/zcabase_ucl_ac_uk/Eb6vc00d03tFt-7aKMJMW_0B5R...
Now, go back to the same Vuforia Screen that was opened and click on “Add Target”. After that, a prompt box will appear which ask to upload the image/object in the database. Browse the image you downloaded, set the width of it as “60” and set any name of your choice in the dialogue-boxes.

Wait some time after it while it uploads, (“Processing” will be displayed under Status bar if upload has not finished). After the upload has finished, you will be able to see the image on the database and also a rating our of 5 stars.

5-star rating tells us that this image was very well recognized by Vuforia Target detection algorithm and hence will work very well in our game.
Now, we need to download the database to be able to import it in our Unity project. Click on the “Download Database” dialogue-box on top right. This will download a “ . unity ” type Unity package file. The files of these types are very well recognized by Unity and can be imported by Unity with ease.

Coming back to Unity, now we have to import the package we downloaded. Go to Assets –> Import Package –> Custom Package

Browse the package on your machine and import it.
Now, the database has been loaded in your project, you just need to activate it.
Click on the AR Camera on the Hierarchy and go the “Open Vuforia Configuration” (as we did earlier). There, now you will be able to see the new database as “Load <name of your database>”. Check the box in front of it and then check “Activate” as well. This will enable to load your uploaded image targets to be used as a Marker for your AR Game.
Main Game Development Phase
So now comes the interesting part where we will be seeing things actually happening in front of us as Augmented Reality.
Go to the hierarchy, right-click on any open space in hierarchy, hover to Vuforia à Image. A new image target will then be set-up in the hierarchy.

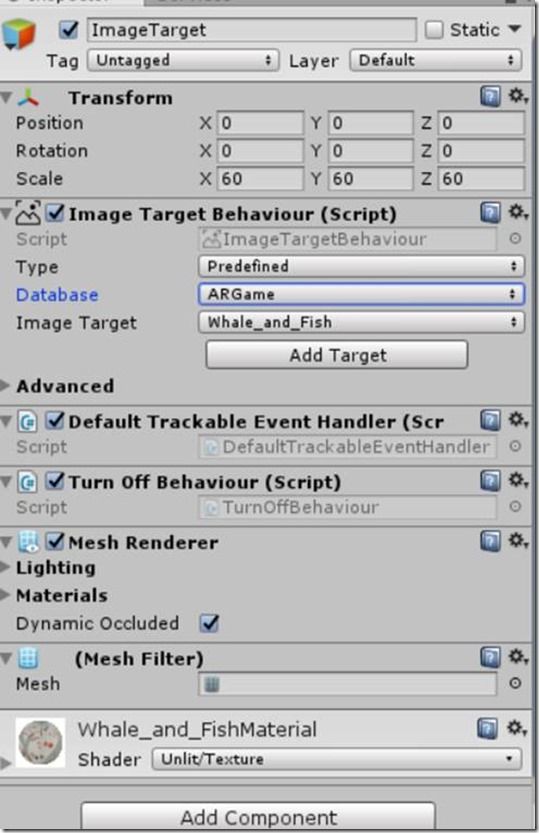
Click on the newly created image target on the Hierarchy, hover over to the Inspector and under the “Image Target Behavior” tab, change the Database as “ARGame” or whatever name you gave to your database on the Vuforia Portal (it should be one of the options in the drop-down).
After this, the image you uploaded will appear in the game scene (it will be very large but not to worry much about it). Zoom out and have a clear view of the image.

Now, its time to place 3D models on this image target. We will be now using Unity Asset Store for this.
Hover over to Unity asset store, just on the right-side of Game on the main menu tab. Unity has loads and loads of built in assets.
We will be using 3D models from the Unity Asset store – Humpback Whale and Crucian fish. Search “whale” in the search bar in asset store, filter the pricing to “Free” and then download the humpback whale model.
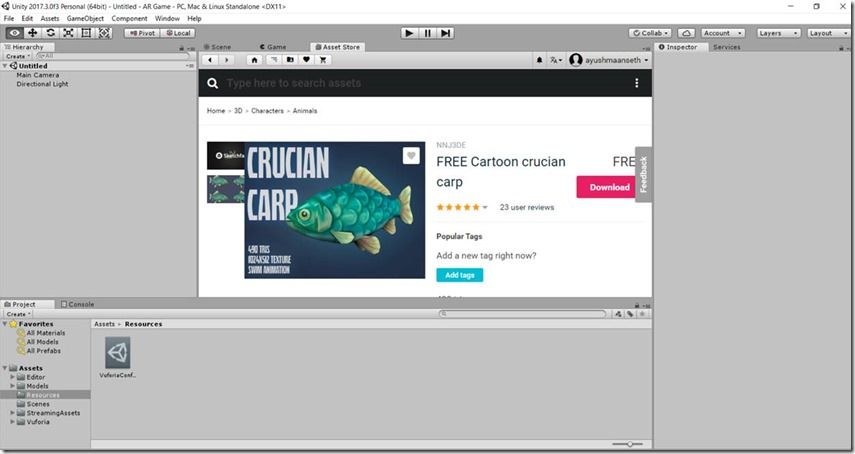
Do same for the Crucian fish and import them as prompted.
These are the 3D models that were available free of cost on Unity Asset Store. Before we proceed, lets save our scene first. Its always a good habit to save the scene (Cntrl + S) at regular intervals so that we don’t lose the stuff we have done till now and it helps in keeping track.
We will now place the 3D game models on the marker. In the projects tab (bottom-left), click on the “Humpback Whale” folder which should have been created after you imported the asset. Or you can also type “whale” in the search bar in the project window.

Now, you can drag these assets over to the scene until they appear on the main development scene. After putting the 3D model, the game scene somewhat looks like this –

Hmm, not good, we need to adjust its alignment so that it faces the user while in play mode. In the inspector, you will be able to see a “Transform” tab under which there will be 3 attributes – Position, Rotation and Scale. These attributes help in relocating, rotating and resizing the asset.
First of all, we need to make this whale a child of the Image Target. Now here child refers to that this asset will be like a branch of the parent under which it is made. One of the features of doing this is that the Transform properties of the Child will be now measured relative to the parent.
To make a game object a child of any folder/canvas/image target, just drag that particular game object (3D model asset here) and bring it over the folder (Image Target in this case) until it highlights and then drop it.

Here, the game model “humpback_whale_model23” is made a child of the Image Target. Let’s rename the names so that it looks better. Renaming can be done by right click à rename.

Back to the Humpback Whale asset, on its inspector, change its position coordinates as (0,0.15,0.02), or you can even drag the whale around the game scene (using the


You can do the same with the crucian fish asset.

Let’s test it out. Save the scene under the “Scenes” folder (Cntrl + S, give it a name of your choice), and then hit Play (

You will be able to see the front-camera of your laptop. Now, for testing, I opened the image target on my phone to test that if the game models are appearing or not. Here’s a small video for the trial –
So, what exactly happened there? The 3D models floating outside the mobile screen are actually rendered models. This is how we Augment Reality. Virtually rendered models on top of the real physical world, which not only you can see, but also interact with, like touch or talk.
You can find the video here - https://youtu.be/e9dzrPNDVUw . You can also test it by yourself.
Also, you saw the whale animating as its tail moved as it were swimming in reality! That was because of the pre-built animation controller which came attached with the game asset when we imported it –

You can also build your own Customized Animations and attach to these game models to interact with you or by touching when playing (on your Android/iOS device). If you want to know more about animations, check out this - https://docs.unity3d.com/540/Documentation/Manual/Playables-Custom.html .
So, we have a basic structure of our AR game. Now we can add as many features on top of this as we want. Maybe introduce a flying dragon asset which comes flying towards you as you play the game? Or maybe Tiger running in the Augmented World.
Now, we will be introducing some customized features, such as collecting the small fish by clicking/tapping on it so that they get destroyed and also you score points for collecting.
Back to the hierarchy, click on the crucian fish asset. On the inspector go to Add Component à Search for “Box Collider” and click on it. A box collider attribute will then appear and will be attached in the inspector to this whale model.

A box collider is a box-shaped primitive collider. Usually they are useful for anything cuboid shaped, but you can use them for any shape provided the dimensions you choose fit the shape.
The main purpose of box collider which we will be using is to make the game objects clickable and destroyable on click. But we need to make sure the box collider covers all of the game object so that clicking on anywhere on the game object initiates its onClick event.
Make the scale of all box-colliders as (0.2,0.2,0.2) and attach it to all of the crucian fish.

Alright, now we need to write a script for making these objects clickable and so that a score is maintained, and it increases after every fish game object is collected.
Scripting customized features
Not all features can be implemented just by drag/drop or by the inbuilt functionalities. Some customized and advanced features require writing code for implementing complex things.
Unity supports scripting in two programming languages – C# and JavaScript. We will be using C# as our programming language for scripting as it is very similar to other imperative and low-level languages like C++ and Java as well as since it was developed by Microsoft as a part of the .NET development procedure, its really very easy and versatile.
We are now going to make a new C# script. On the project window, right click on Assets and Create a new folder called Scripts. Go inside this folder and then right click à Create à C# Script.

You will then be able to see a blue icon inside the project window which is C# script. Name it as “ScoreManager” and then double click it.
Since Unity installation also installs Microsoft Visual Studio 2017, it will open your C# script in Visual Studio and after opening it will look like this –

Here, there are 2 functions – Start and Update. The code you type in Start will only be executed once at the start of the game whereas Update is called once per frame i.e. it updates every time after a particular frame is over (sort of a while loop).
We first declare a 3D vector, which will help us detecting the game object, hitting it and then transforming the position.

The rest of the code I will explain now after giving the full code-

We declared a public static int type variable called “score” to keep track of the total score the user has made.
Inside the update function, the first line has an if statement, asking that whether the user has pressed the Left mouse button (or touched on the screen on phone/tablet).
If the click/touch condition is true, then we declare a “Ray” type object -> ray. Now, this Ray is actually the representation of rays, infinite line starting from the origin and going in the direction we want it to go. So, here we want the ray to go to the direction where the Camera is pointing in the direction of the mouse input i.e. the ray goes into the direction of the input button clicked by the user.

Another new structure called RaycastHit – this is used to get information back stored in Physics.Raycast – which is basically a test that verifies whether some collider (such as the box collider) has been hit by the Ray object in the direction or the mouse clicked or not.
So, in the next line we check if the Ray has hit any collider à here “out hit” means outputting the information retrieved by raycast object into “hit” variable. If it is true, then we assign the vector “colliderPos” as the coordinates where the hit from the ray to the collider was confirmed.

In the last step, we then just declare a Box Collider type object and assign it to hit.collider (type of hit.collider is also the same) and then just perform another check that if the box collider is there, we destroy the game object attached to it and increment the score by one and then just display the score on the Console (for testing and debugging purpose).
This bit of code will be enough for collecting each Crucian fish asset whenever you click on one of those game objects while in the play mode. Save this script and then back to Unity, go to AR Camera on the Hierarchy and attach this ScoreManager script to the inspector of AR Camera (by dragging it to the inspector).

Now, if you run it and again face the image on the laptop front camera, and then in the game if you try to click on any fish, it vanishes! Also, if you see at the console, the score will be increasing and printing on the console.

So, till now we have implemented a basic game where we are able to project 3D rendered models from a database to any image target. Now this image target does not need to be specific, you can take pictures of different walls or environments around you, upload them and then attach any 3D game model asset to it and you will be able to see that particular game model interacting and animating with you!
Further ahead, we are now going to develop one more feature – Keeping track of score and high score and using Microsoft Azure SQL database to build an online leaderboard.
Implementing Online Leaderboard using Azure SQL Database
Microsoft Azure is an ever-expanding set of cloud services, helping organizations like Education Institutions, Companies and Businesses to meet challenges and explore the power of technology.
We will be using Azure SQL Database for setting up an online leaderboard for our game.
Open your Azure Account Portal (if you don’t have an account, you can easily create one and try the trial version for some services).

Go to Create Resource à SQL Database à Create

Then you need to enter the details about the database and then the details about creating a new server.

Make sure to remember the credentials (or write it down somewhere) you entered for both the server and the database as these will be required for authentication when connecting to the database. After that click Select and then Create. After some time, the database will be created and will be on your Azure Dashboard.
We will be now using PHP for querying our Azure SQL Database. Here is the code for creating a table and inserting the score value generated from Unity.

And for inserting into the database –

Back to Unity, we now need to send the score from there to this database using WWW Forms. But for that, we would need to host these PHP files on a web app so that the $_REQEUST(“scorePost”) can be accessed and so that they can we accessed using the WWW form. Luckily, Microsoft Azure offers free web app hosting for small web apps and sites.

Change the pricing tier to F1 (free) and then click Ok à Create. Now, you will be able to upload your .php files using GitHub. Go to your newly created web app –> click on “Deployment Options” and then you will be taken to deployment configuration.

I created a new git repository called ArGame and uploaded both of my PHP files in it so that I will be able to host them on Azure via GitHub.

After setting up this deployment source, we can proceed back to Unity where we implement our last C# script for sending the score over to our database via these PHP files.
Back to Unity, create a new C# script and name it as “DataInserter”. Open it in Visual Studio. We will be using Unity’s built-in “WWWForm” and “UnityWebRequest” under the UnityEngine.Networking library.

Here, we have created a new url – the same url where our .php file is present.

Next, we have created a function of IENumerator type – CreateUser. The return type IENumerator is used for running coroutines. Here, we are making a new WWWForm, which is the helper class to generate form data to post to web servers using the UnityWebRequest or WWW classes.

So now, we posted our Web Request using the “url” and the form we created. We now call this coroutine using “StartCoroutine” in our ScoreManager.cs” script.

(Note – the variables url, score and the function Create User are public static type ).
So basically, now whenever you play the game and make points by collecting fish, at the end of the game your score will be uploaded on the Azure SQL Database as Unity will initiate a web request using the PHP script.
Conclusion
Thank you for sticking to this tutorial until the end. We have created a very small version of our Augmented Reality game, where the user can view the 3D rendered models in front of a marker, can interact with it and add customized features like animations. We also used Microsoft Azure SQL Database along with WWW requests to send the scores over to the database.
Feel free to look at the source code for the scripts at https://github.com/Ayushmaanseth/ArGame .
There were a lot of features that could have made the game more interesting and you can continue implementing them if you like to, some of them are –
- Introducing sound effects while in the gameplay.
- Implementing a MainMenu Scene and a GameOver scene which would make it more user-friendly and display scores, high-score and other have clickable-buttons to Leaderboard.
- Implementing the UI for the online leader-board.
- Introducing more Image targets, or even introducing marker-less AR using Wikitude and SLAM(Simultaneous Location and Mapping).
This project was a very small glimpse of what me and my team developed for Great Ormond Street Hospital, an AR game called Reward Rush for the children of the hospital. Here is a video of our final presentation for the completed game –
Project Assets Credits –
Crucian Carp – nnj3de ( https://assetstore.unity.com/packages/3d/characters/animals/free-cartoon-crucian-carp-46132 )
Humpback Whale - https://assetstore.unity.com/packages/3d/characters/animals/humpback-whale-3547
You must be a registered user to add a comment. If you've already registered, sign in. Otherwise, register and sign in.