- Home
- Security, Compliance, and Identity
- Core Infrastructure and Security Blog
- Comparing Hotfixes across Multiple Node Failover Clusters
- Subscribe to RSS Feed
- Mark as New
- Mark as Read
- Bookmark
- Subscribe
- Printer Friendly Page
- Report Inappropriate Content
First published on TechNet on Oct 15, 2012
Rick Bergman here with a post on gathering hotfixes from multiple node failover clusters ranging in OS version from Windows Server 2003 to Windows Server 2012.
Recently, I reviewed a number of failover clusters for my customer and it was identified that they were struggling with keep the hotfixes the same across all the nodes in their clusters. One of the key management tasks for Failover Cluster is ensuring the hotfixes, drivers, services, etc, are the same across all the nodes of a cluster. The reason for ensuring hotfixes, drivers, services, and other components are the same is that if a failover occurs you want to reduce the risk of high-availability workloads having issues occur during failover.
The customer has Systems Center Configuration Manager 2007 R2 in their environment but it is run by a different team, mainly used for security patching. Getting reports from that team is challenging. When first looking at the problem, it made the most sense to me to figure out a way to use Systems Center Configuration Manager do this type of reporting. I checked with a PFE peer that works on SCCM for our customer and he wasn’t aware of any reports that would show the comparison of the hotfixes for all the nodes in a cluster. After further research it would take a great amount of effort to create a report that would do what we needed it to do. I needed something quick and easy to get them on the right track ASAP. I remembered Doug Symalla’s post where he showed how he could use PowerShell v.2.0 to compare cluster nodes. https://techcommunity.microsoft.com/t5/core-infrastructure-and-security/keep-your-friends-close-but-...
Doug’s blog was a great spot to start, but it became quickly apparent the Compare-Object was going to be challenging for my scenario. This customer has many multi-node failover clusters in their environment ranging from 2 nodes to 8 nodes. This meant the PowerShell Compare-Object was going to be challenging when working with more than two nodes. What was needed was a single report that would show all the nodes in a cluster, and compare all the nodes to make sure the patches were the same on each node. So I did some research to see what others had for comparing hotfixes on systems that compared more than two systems at once. I ran across the following PowerShell script in the TechNet Gallery – Resource for IT Professionals, called “Compare-Hotfixes”, written by Stane Močnik. http://gallery.technet.microsoft.com/178249bf-6d7f-4137-b473-e9351607163f
It gave me a good start and allowed me to customize it further to meet the needs of the customer.
Requirements
The following are the requirements for this script to compare hotfixes
- Script has to gather hotfixes from the Windows Server OS ranging from Server 2003 to Server 2012.
- PowerShell based
- Be able to compare all the hotfixes for all the nodes in a failover cluster that can be up to 8 nodes.
- Create either or both text and html documents for reuse
Determining which Failover Clusters to Compare Hotfixes
There are many options available for the data source to use when determining which failover cluster the tool should be run against. To fully automate the script a data source is going to be needed.
- Active Directory – When creating a Windows Failover Cluster, there are known processes that have to be followed. One requirement is that Active Directory is available for the Failover Cluster to be created and available. Depending on how the clusters are placed and named in AD, it gives many filtering options. You could filter by name or specific OU structure.
- MAP Toolkit DB – If the Microsoft Assessment and Planning (MAP) Toolkit is being used in the environment; there is another data source to go after. By default the MAP Toolkit will install a version of SQL Express LocalDB. It does allow for the use of SQL server for the DB if you have a SQL server available.
- CMDB – If there is a Configuration Management DB in use in the environment it case be used as the data source as well.
- XML, CSV or Txt files can be used as data sources.
For this quick and easy tool, I decided to use a CSV file that had the list of Cluster Names and used WMI to get the names of the cluster nodes.
Prerequisites – The input file
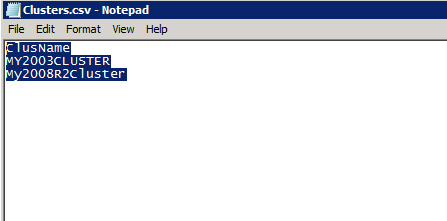
Since I made the decision to use a CSV file as the input, I need to include what is needed to include what makes up and proper formatting of the input file. See Figure (1) below.
- You must create a file called “Clusters.CSV”, and that the file must reside in the same directory from where the script is executed.
- The first row in clusters.csv must contain “ClusName”
- Each subsequent row must contain the name of the cluster(s) you would like to scan
The approach – breaking down the PowerShell script
I am going to walk through the script and approach to help make sense of how the script gathers the data and generates the reports. Don’t worry at the end of the post I will have the complete script available for download.
Open the input file, import the data and set variables
In (Figure 2) below, I am showing the opening steps the script takes. First the file name is defined followed by importing the file into the variable $IFile. The input file needs to be in the same directory as the where the PowerShell script was launched from. If you want to use different locations for the input file, modify the script to your liking. The goal was to make a quick script to help my customer, so I left out many of the nice features such as using parameters when launching the script. For example: “.\myscript.ps1 inputfile.csv”.
Next I use the Get-Date command let and format the date. The reason for doing this is to use the Get-Date data unique file names so they won’t get overwritten. The last steps are to define the Array for computers, hotfixes, and two different types of results.
Looping Through the Cluster Names
Now we start into the fun part of the script. We are going to loop through each one of the Cluster Names that were just imported using a ForEach loop.
In (Figure 3) below, the first section starts defining variables that will be used during the rest of the script. These variables will be over written with each pass of the loop because the cluster changes.
Figure 3 – Cluster Loop and Variables
Connecting to the Cluster and Retrieving the Cluster Node Names
When connecting to the Cluster Name and retrieving the Cluster Node Names I am using Get-WMIObject. Hey Rick, you know there is PowerShell command let called Get-ClusterNode. Yes I do know there is such a command let, but can anyone tell me the issue with using Get-ClusterNode in my scenario? There is no PowerShell support for Windows Server 2003 Failover Clusters. Which means Get-ClusterNode would not work, nor any of the PowerShell Cluster command lets. I needed to use the lowest common denominator, which is WMI.
There is a difference with the connection when connecting to a Windows Server 2003 failover cluster versus a Windows Server 2008 and higher failover cluster.
When connecting to Windows Server 2003 failover cluster the following connection string will work just fine:
$ClusNodeInfo = Get-WmiObject -Namespace root/mscluster -Class MSCluster_Node -ComputerName $ClusName
The string above will not work correctly with Windows Server 2008 and higher. The parameter “-Authentication” needs to be at “PacketPrivacy” to properly communicate.
$ClusNodeInfo = Get-WmiObject -Namespace root/mscluster -Class MSCluster_Node -ComputerName $ClusName -EnableAllPrivileges -Authentication 6
The reason for Windows 2008 and higher needs to have the authentication level set to PacketPrivacy is because the MSCluster namespace requires encryption.
Figure 4 – WMI Connection and retrieving Cluster Nodes
In (Figure 4), once the connection has been made to the Cluster via WMI, the script will loop through the node names and place them in a Array called $Computers.
Collecting Hotfixes and Node Names, placing them in a Array and Creating Unique Computer List
Now the script is at the point of starting to collect the list of hotfixes on each server or node. I am using the Get-Hotfix command let because it works for all supported versions of the Windows Server OS. The script will use each node in the cluster to retrieve the Hotfixes with the computer name and place them into a table called $Hotfixes.
If you remember Doug’s post, he showed the Get-Hotfix output Windows Server 2003 systems with entries that returned a “File 1” versus the normal standard “KB#######” format. Those need to be filtered out so I used a different approach to accomplish the task, an IF statement. The “If” statement will check for anything returned value that has “File 1” in any part of it and not add it to the $Hotfixes Array.
If ($hotfix –notlike “*File 1*”)
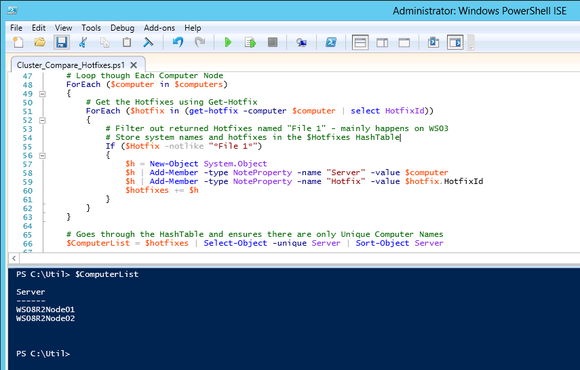
The next step is the creation of unique computer/node names from the $hotfixes Array. The values in the $ComputerList can be seen in (Figure 5).
Figure 5 – Gathering Hotfixes, excluding unneeded data and creating a unique computer name list
Manipulating Collected Data for Reporting
Now that the data has been collected in the $Hotfixes Array, it is time to start identifying the differences of installed Hotfixes between the cluster nodes. This is done by looping through the list of Hotfixes and computer names then adding them to the Array with indicators. The indicators are for present “*” and missing “---“. If they Hotfixes are missing from the Node, then we add them to another Array, $RLog. $RLog will only contain the computer name and missing hotfix.
If there are no hotfixes missing, then the $RLog Array will not contain any information. This is shown in (Figure 6).
I update the $RLog Array with the words “None” for the Server and “None Missing” for the Hotfix to help with displaying information in the reports. See (Figure 6) for the Array values and (Figure 7) for the code used.
Figure 6 – Creating output data and examples of Arrays
Figure 7 – Display of No Hotfixes Missing
Creating the Reports
I wanted my customer to have options on what type of reports they wanted to have. The sample script will create both an HTML and Text files. I put code in to display the HTML files on the machine running the script. The files are also saved in the same folder as where the script is called from. If a different path is needed, the $OutputFile is the variable that would need to changed.
The Arrays native format can be seen in (Figure 8) and is easy to dump out by typing the $<Array>, for example $RLog and $result.
Figure 8 – Gathering Hotfixes, excluding unneeded data and creating a unique computer name list
Sample Reports
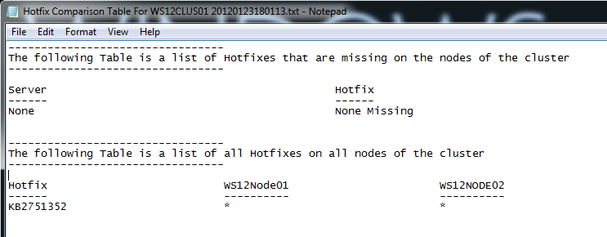
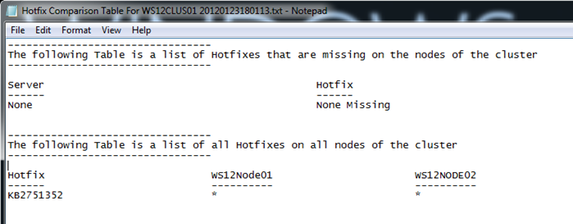
Below are the sample reports that are created. Figure (9) is the HTML file report and Figure (10) is the text file report.
Figure 9 – Sample HTML Report
Figure 10 – Sample Text Report
Final Thoughts
I hope you find this script useful and have envisioned many uses for this script. It can be easily changed to work on groups of systems such as web farms where you want to ensure similar configurations of more than two systems. As always all the usual caveats apply to the script, so use it at your own risk.
Rick Bergman
Update (4.April.2013): To centralize the storage of all AskPFEPlat scripts, we are now storing them on the TechNet Script Center Repository. This specific script can be found at the following location: ,
http://gallery.technet.microsoft.com/scriptcenter/Comparing-Hotfixes-across-c53e3bb6
You must be a registered user to add a comment. If you've already registered, sign in. Otherwise, register and sign in.


