- Home
- Security, Compliance, and Identity
- Core Infrastructure and Security Blog
- An alternative way to connect PowerShell to Azure using an Azure AD account
- Subscribe to RSS Feed
- Mark as New
- Mark as Read
- Bookmark
- Subscribe
- Printer Friendly Page
- Report Inappropriate Content
First published on TechNet on Nov 22, 2015
Hello folks, its Rick here. A while back I had shared with you a way to connect PowerShell to your Azure Subscription via the certificate method using Get-AzurePublishSettingsFile cmdlet. This method works as long as the subscription and certificates are valid, and it has limitations when more than one person is expected to be able to access the subscription. Also, Azure Resource Manager doesn’t accept certificate based authentication. Today, I would like to give you a quick overview on an alternative way using an Azure AD account. Going forward this is a preferred way as it enables mechanism to manage a subscription and is compatible with Azure Resource Manager.
So let’s get started
If you haven’t already installed the Azure PowerShell, head over to manage.windowsazure.com and click on the ‘Downloads’. You will then scroll down to Command-line tools and click on install under 'Windows PowerShell'. This in turn downloads and launches the Web Platform Installer 5.0 which installs Azure PowerShell and all its dependencies. If you want to install only PowerShell you can grab that from https://github.com/Azure/azure-powershell/releases .
1. Click Install under Windows PowerShell

2. The Web Platform Installer launches, click install again.

3. Click finish and you are done.

Installing Azure PowerShell gives you a customized console called “Microsoft Azure PowerShell” which has nice built in help function available to get you started.

But many PowerShell enthusiasts like to use the main Windows PowerShell console for all different modules, customizations, and profiles that they might have. By installing Azure PowerShell, it automagically inserts the PSModule for Azure and unlocks the 671 PowerShell cmdlets for you in your main PowerShell console.

How to add a subscription
This new method for connecting to Azure Subscription to manage your resources is managed by the Add-AzureAD cmdlet. The first time you use it, it asks your permissions about PowerShell Data Collection which helps Microsoft learn about the usage, patterns, and issues. Microsoft Azure PowerShell collects data about how users use PowerShell cmdlets and some problems they encounter. Microsoft uses this information to improve our PowerShell cmdlets. Participation is voluntary and when you choose to participate, your device automatically sends information to Microsoft about how you use Azure PowerShell. Keep in mind that this data collection can be disabled anytime as you choose by using the Disable-AzureDataCollection cmdlet.

Getting past this, you will be prompted to provide the credentials for your AzureAD account that you use to manage your Azure Subscription. I have multiple azure subscriptions i.e MSDN (tied to a Microsoft Account, Outlook) and an internal Microsoft Azure subscription tied to my corp credentials.
First let me add my MSDN subscription.


And it’s that simple. Next I can run the Get-AzureSubscription to look at additional details about that subscription.

And you can see with a couple of examples below the resources I have in Azure under that subscription.

Now let’s add my other internal subscription which in my case mandates MFA (multi-factor authentication).


Now, using the Get-AzureSubscription cmdlet, you can see both of my subscription. Also note that if you had previously setup cert based authentication, the Azure AD based authentication will override it.

Now the question is, how does a cmdlet like Get-AzureVM know which subscription I am intending to run it against? So we have a concept of ‘default’ and ‘current’ subscription. If we run the Get-AzureSubscription –default you will see your default subscription, in my case the MSDN one.

Default status of the subscription stays live across different PowerShell sessions, meaning you can close a PowerShell window and it will stay as your default subscription. The ‘current’ subscription is a temporary way to point your cmdlets against a specific subscription. You do that by using Select-AzureSubscription cmdlet and the name of the subscription you want to choose as current.
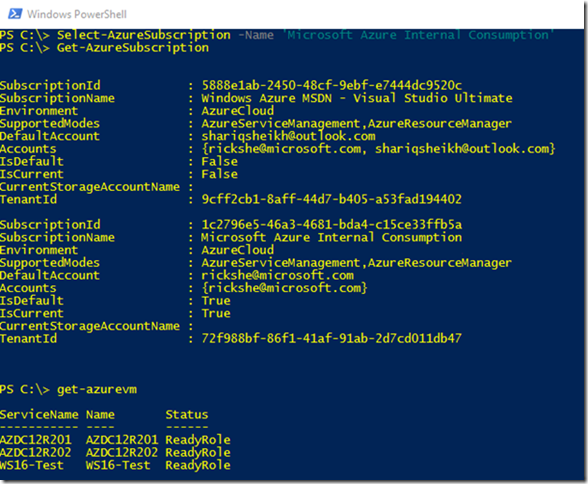
You can see above that now the Get-AzureVM cmdlet returns me my IaaS VM running in my internal Azure subscription. If I wanted to change my default configuration, I could also run Select-AzureSubscription -Name 'Microsoft Azure Internal Consumption' -Default
On another note, if your subscription requires MFA you can’t use the old $cred saving technique.

If at any point you would like to remove an Azure AD based authentication simply run the Remove-AzureAD –name your@email.com
Note that when a user successfully authenticates with Azure AD, they are issued both an Access Token and a Refresh Token . The Access Token is very short-lived valid for around 1 hour. The Refresh Token is longer-lived - in some cases the token may be valid for up to 90 days.
1. Access Token has 1 hour lifetime
2. Refresh Token has 90 day lifetime but expires if
-
a. The user changes their password
-
b. The Refresh Token is not used for 14 consecutive days
-
c. The administrator revokes the user’s refresh tokens
These above timelines may variably define when you might have to re-authenticate to be able to continue using PowerShell against your Azure subscription.
In closing
Using Azure AD based authentication to unlock the Azure PowerShell provides for a simpler, secure and more manageable way to connect to multiple subscriptions.
Till next time Rick “Happy Thanks Giving” Sheikh.
You must be a registered user to add a comment. If you've already registered, sign in. Otherwise, register and sign in.