Turn on suggestions
Auto-suggest helps you quickly narrow down your search results by suggesting possible matches as you type.
- Home
- Windows Server
- Containers
- Use Docker Compose and Service Discovery on Windows to scale-out your multi-service container application
Use Docker Compose and Service Discovery on Windows to scale-out your multi-service container application
- Subscribe to RSS Feed
- Mark as New
- Mark as Read
- Bookmark
- Subscribe
- Printer Friendly Page
- Report Inappropriate Content
By
Published
Mar 21 2019 05:01 PM
6,783
Views
Mar 21 2019
05:01 PM
Mar 21 2019
05:01 PM
First published on TECHNET on Oct 18, 2016
Article by Kallie Bracken and Jason Messer
The containers revolution popularized by Docker has come to Windows so that developers on Windows 10 ( Anniversary Edition ) or IT Pros using Windows Server 2016 can rapidly build, test, and deploy Windows “containerized” applications!
Based on community feedback, we have made several improvements to the Windows containers networking stack to enable multi-container, multi-service application scenarios. Support for Service Discovery and the ability to create (or re-use existing) networks are at the center of the improvements that were made to bring the efficiency of Docker Compose to Windows. Docker Compose enables developers to instantly build, deploy and scale-out their “containerized” applications running in Windows containers with just a few simple commands. Developers define their application using a ‘Compose file’ to specify the services, corresponding container images, and networking infrastructure required to run their application. Service Discovery itself is a key requirement to scale-out multi-service applications using DNS-based load-balancing and we are proud to announce support for Service Discovery in the most recent versions of Windows 10 and Windows Server 2016.
Take your next step in mastering development with Windows Containers, and keep letting us know what great capabilities you would like to see next!
When it comes to using Docker to manage Windows containers, with just a little background it’s easy to get simple container instances up and running . Once you’ve covered the basics, the next step is to build your own custom container images using Dockerfiles to install features, applications and other configuration layers on top of the Windows base container images. From there, the next step is to get your hands dirty building multi-tier applications, composed of multiple services running in multiple container instances. It’s here—in the modularization and scaling-out of your application—that Docker Compose comes in; Compose is the perfect tool for streamlining the specification and deployment of multi-tier, multi-container applications. Docker Compose registers each container instance by service name through the Docker engine thereby allowing containers to ‘discover' each other by name when sending intra-application network traffic. Application services can also be scaled-out to multiple container instances using Compose. Network traffic destined to a multi-container service is then round-robin’d using DNS load-balancing across all container instances implementing that service.
This post walks through the process of creating and deploying a multi-tier blog application using Docker Compose (Compose file and application shown in Figure 1).
[caption id="attachment_8705" align="alignnone" width="1429"]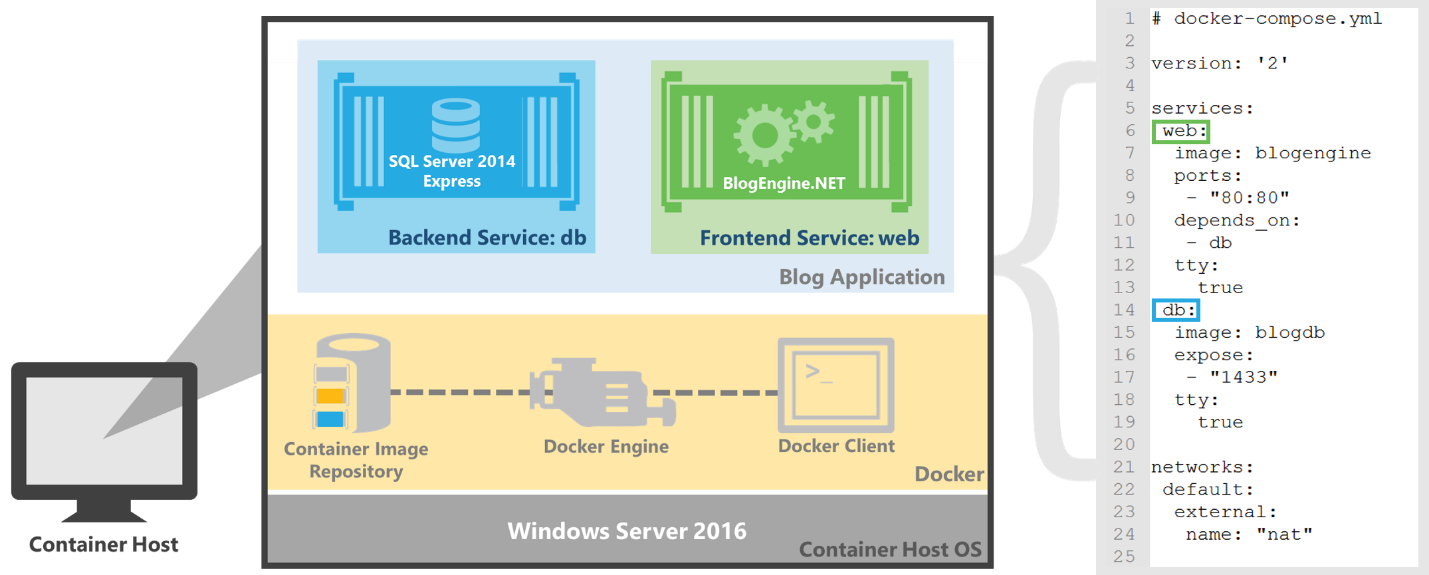 Figure 1: The Compose File used to create the blog application, including its BlogEngine.NET front-end (the ‘web’ service) and SQL Server back-end (the ‘db’ service).[/caption]
Note: Docker Compose can be used to scale-out applications on a single host which is the scope of this post. To scale-out your ‘containerized’ application across multiple hosts, the application should be deployed on a multi-node cluster using a tool such as Docker Swarm. Look for multi-host networking support in Docker Swarm on Windows in the near future.
The first tier of the application is an ASP.NET web app, BlogEngine.NET , and the back-end tier is a database built on SQL Server Express 2014. The database is created to manage and store blog posts from different users which are subsequently displayed through the Blog Engine app.
New to Docker or Windows Containers?
This post assumes familiarity with the basics of Docker, Windows containers and ‘containerized’ ASP.NET applications. Here are some good places to start if you need to brush up on your knowledge:
Before you walk through the steps described in this post, check that your environment meets the following requirements and has the most recent versions of Docker and Windows updates installed:
NOTE : The current version of Docker Compose on Windows requires that the Docker daemon be configured to listen to a TCP socket for new connections. A Pull Request (PR) to fix for this issue is in review and will be merged soon. For now, please ensure that you do the following:
{
…
"hosts":["tcp://0.0.0.0:2375", “npipe:////./pipe/win_engine"]
…
}
This blog application is based on the Blog Engine ASP.NET web app availably publicly here: http://www.dnbe.net/docs/ . To follow this post and build the described application, a complete set of files is available on GitHub. Download the Blog Application files from GitHub and extract them to a location somewhere on your machine, e.g. ‘C:\build’ directory.
The blog application directory includes:
The top-level of the blog application source folder is the main working directory for the directions in this post. Open an elevated PowerShell session and navigate there now - e.g.
PS C:\> cd c:\build\
The database back-end Dockerfile is located in the ‘db’ sub-folder of the blog application source files and can be referenced here: The Blog Database Dockerfile . The main function of this Dockerfile is to run two scripts over the Windows Server Core base OS image to define a new database as well as the tables required by the BlogEngine.NET application.
The SQL scripts referenced by the Dockerfile to construct the blog database are included in the ‘db’ folder, and copied from host to container when the container image is created so that they can be run on the container.
The BlogEngine.NET Dockerfile is in the ‘web’ sub-folder of the blog application source files.
This Dockerfile refers to a PowerShell script (buildapp.ps1) that does the majority of the work required to configure the web service image. The buildapp.ps1 PowerShell Script obtains the BlogEngine.NET project files using a download link from Codeplex , configures the blog application using the default IIS site, grants full permission over the BlogEngine.NET project files (something that is required by the application) and executes the commands necessary to build an IIS web application from the BlogEngine.NET project files.
After running the script to obtain and configure the BlogEngine.NET web application, the Dockerfile finishes by copying the Web.config file included in the ‘web’ sub-folder to the container, to overwrite the file that was downloaded from Codeplex. The config file provided has been altered to point the ‘web’ service to the ‘db’ back-end service.
When dealing with only one or two independent containers, it is simple to use the ‘docker run’ command to create and start a container image. However, as soon as an application begins to gain complexity, perhaps by including several inter-dependent services or by deploying multiple instances of any one service, the notion of configuring and running that app “manually” becomes impractical. To simplify the definition and deployment of an application, we can use Docker Compose.
A Compose file is used to define our “containerized” application using two services—a ‘web’ service and a ‘db’ service. The blog application’s Compose File (available here for reference) defines the ‘web’ service which runs the BlogEngine.NET web front-end tier of the application and the ‘db’ service which runs the SQL Server 2014 Express back-end database tier. The compose file also handles network configuration for the blog application (with both application-level and service-level granularity).
Something to note in the blog application Compose file, is that the ‘expose’ option is used in place of the ‘ports’ option for the ‘db’ service. The ‘ports’ option is analogous to using the ‘-p’ argument in a ‘docker run’ command, and specifies HOST:CONTAINER port mapping for a service. However, this ‘ports’ option specifies a specific container host port to use for the service thereby limiting the service to only one container instance since multiple instances can’t re-use the same host port. The ‘expose’ option, on the other hand, can be used to define the internal container port with a dynamic, external port selected automatically by Docker through the Windows Host Networking Service – HNS. This allows for the creation of multiple container instances to run a single service; where the ‘ports’ option requires that every container instance for a service be mapped as specified, the ‘expose’ option allows Docker Compose to handle port mapping as required for scaled-out scenarios.
The ‘networks’ key in the Compose file specifies the network to which the application services will be connected. In this case, we define the default network for all services to use as external meaning a network will not be created by Docker Compose. The ‘nat’ network referenced is the default NAT network created by the Docker Engine when Docker is originally installed.
In this step, Docker Compose is used to build the blog application. The Compose file references the Dockerfiles for the ‘web’ and ‘db’ services and uses them to build the container image for each service.
From an elevated PowerShell session, navigate to the top level of the Blog Application directory. For example,
cd C:\build\
Now use Docker Compose to build the blog application:
docker-compose build
Now use Docker Compose to run the blog application:
docker-compose up
This will cause a container instance to be run for each application service. Execute the command to see that the blog application is now up and running.
docker-compose ps
You can access the blog application through a browser on your local machine, as described below.
Define Multiple, Custom NAT Networks
In previous Windows Server 2016 technical previews, Windows was limited to a single NAT network per container host. While this is still technically the case, it is possible to define custom NAT networks by segmenting the default NAT network’s large, internal prefix into multiple subnets.
For instance, if the default NAT internal prefix was 172.31.211.0/20, a custom NAT network could be carved out from this prefix. The ‘networks’ section in the Compose file could be replaced with the following:
networks:
default:
driver: nat
ipam:
driver: default
config:
- subnet: 172.31.212.0/24
This would create a user-defined NAT network with a user-defined IP subnet prefix (in this case, 172.31.211.0/24). The ipam option is used to specify this custom IPAM configuration.
Note: Ensure that any custom nat network defined is a subset of the larger nat internal prefix previously created. To obtain your host nat network’s internal prefix, run ‘docker network inspect nat’.
Now that the containers for the ‘web’ and ‘db’ services are running, the blog application can be accessed from the local container host using the internal container IP and port (80). Use the command docker inspect <web container instance> to determine this internal IP address.
To access the application, open an internet browser on the container host and navigate to the following URL: “http://<container ip>/ /BlogEngine/” appended. For instance, you might enter: http://172.16.12.216/BlogEngine
To access the application from an external host that is connected to the container host’s network, you must use the Container Host IP address and mapped port of the web container. The mapped port of the web container endpoint is displayed from docker-compose ps or docker ps commands. For instance, you might enter: http://10.123.174.107:3658/BlogEngine
The blog application may take a moment to load, but soon your browser should present the following page.
[caption id="attachment_8735" align="alignnone" width="1203"] Screenshot of page[/caption]
Built in to Docker is Service Discovery, which offers two key benefits: service registration and service name to IP (DNS) mapping. Service Discovery is especially valuable in the context of scaled-out applications, as it allows multi-container services to be discovered and referenced in the same way as single container services; with Service Discovery, intra-application communication is simple and concise—any service can be referenced by name, regardless of the number of container instances that are being used to run that service.
Service registration is the piece of Service Discovery that makes it possible for containers/services on a given network to discover each other by name. As a result of service registration, every application service is registered with a set of internal IP addresses for the container endpoints that are running that service. With this mapping, DNS resolution in the Docker Engine responds to any application endpoint seeking to communicate with a given service by sending a randomly ordered list of the container IP addresses associated with that service. The DNS client in the requesting container then chooses one of these IPs for container-container communication. This is referred to as DNS load-balancing.
Through DNS mapping Docker abstracts away the added complexity of managing multiple container endpoints; because of this piece of Service Discovery a single service can be treated as an atomic entity, no matter how many container instances it has running behind the scenes.
Note: For further context on Service Discovery, visit this Docker resource . However, note that Windows does not support the “-link” options.

While the service registration benefit of Service Discovery is leveraged by an application even when one container instance is running for each application service, a scaled-out scenario is required for the benefit of DNS load-balancing to truly take effect.
To run a scaled-out version of the blog application, use the following command (either in place of ‘docker-compose up’ or even after the compose application is up and running). This command will run the blog application with one container instance for the ‘web’ service and three container instances for the ‘db’ service.
docker-compose scale web=1 db=3
Recall that the docker-compose.yml file provided with the blog application project files does not allow for scaling multiple instances of the 'web' service. To scale the web service, the 'ports' option for the web service must be replaced with the 'expose' option. However, without a load-balancer in front of the web service, a user would need to reference individual container endpoint IPs and mapped ports for external access into the web front-end of this application. An improvement to this application would be to use volume mapping so that all ‘db’ container instances reference the same SQL database files. Stay tuned for a follow-on post on these topics.
In this step, Service Discovery will be demonstrated through a simple interaction between the ‘web’ and ‘db’ application services. The idea here is to ping different instances of the ‘db’ service to see that Service Discovery allows it to be accessed as a single service, regardless of how many container instances are implementing the service.
Before you begin: Run the blog application using the ‘docker-compose scale’ instruction described above.
Return to your PowerShell session, and run the following command to ping the ‘db’ back-end service from your web service. Notice the IP address from which you receive a reply.
docker run blogengine ping db
Now run the ping command again, and notice whether or not you receive a reply from a different IP address (i.e. a different ‘db’ container instance).*
docker run blogengine ping db
The image below demonstrates the behavior you should see—after pinging 2-3 times, you should receive replied from at least two different ‘db’ container instances:

* There is a chance that Docker will return the set of IPs making up the ‘db’ service in the same order as your first request. In this case, you may not see a different IP address. Repeat the ping command until you receive a reply from a new instance.
Technical Note: Service Discovery implemented in Windows
On Linux, the Docker daemon starts a new thread in each container namespace to catch service name resolution requests. These requests are sent to the Docker engine which implements a DNS resolver and responds back to the thread in the container with the IP address/es of the container instance/s which correspond to the service name.
In Windows, service discovery is implemented differently due to the need to support both Windows Server Containers (shared Windows kernel) and Hyper-V Containers (isolated Windows kernel). Instead of starting a new thread in each container, the primary DNS server for the Container endpoint’s IP interface is set to the default gateway of the (NAT) network. A request to resolve the service name will be sent to the default gateway IP where it is caught by the Windows Host Networking Service (HNS) in the container host. The HNS service then sends the request to the Docker engine which replies with the IP address/es of the container instance/s for the service. HNS then returns the service name (DNS) query to the container.
Article by Kallie Bracken and Jason Messer
The containers revolution popularized by Docker has come to Windows so that developers on Windows 10 ( Anniversary Edition ) or IT Pros using Windows Server 2016 can rapidly build, test, and deploy Windows “containerized” applications!
Based on community feedback, we have made several improvements to the Windows containers networking stack to enable multi-container, multi-service application scenarios. Support for Service Discovery and the ability to create (or re-use existing) networks are at the center of the improvements that were made to bring the efficiency of Docker Compose to Windows. Docker Compose enables developers to instantly build, deploy and scale-out their “containerized” applications running in Windows containers with just a few simple commands. Developers define their application using a ‘Compose file’ to specify the services, corresponding container images, and networking infrastructure required to run their application. Service Discovery itself is a key requirement to scale-out multi-service applications using DNS-based load-balancing and we are proud to announce support for Service Discovery in the most recent versions of Windows 10 and Windows Server 2016.
Take your next step in mastering development with Windows Containers, and keep letting us know what great capabilities you would like to see next!
When it comes to using Docker to manage Windows containers, with just a little background it’s easy to get simple container instances up and running . Once you’ve covered the basics, the next step is to build your own custom container images using Dockerfiles to install features, applications and other configuration layers on top of the Windows base container images. From there, the next step is to get your hands dirty building multi-tier applications, composed of multiple services running in multiple container instances. It’s here—in the modularization and scaling-out of your application—that Docker Compose comes in; Compose is the perfect tool for streamlining the specification and deployment of multi-tier, multi-container applications. Docker Compose registers each container instance by service name through the Docker engine thereby allowing containers to ‘discover' each other by name when sending intra-application network traffic. Application services can also be scaled-out to multiple container instances using Compose. Network traffic destined to a multi-container service is then round-robin’d using DNS load-balancing across all container instances implementing that service.
This post walks through the process of creating and deploying a multi-tier blog application using Docker Compose (Compose file and application shown in Figure 1).
[caption id="attachment_8705" align="alignnone" width="1429"]
Figure 1: The Compose File used to create the blog application, including its BlogEngine.NET front-end (the ‘web’ service) and SQL Server back-end (the ‘db’ service).[/caption]
Note: Docker Compose can be used to scale-out applications on a single host which is the scope of this post. To scale-out your ‘containerized’ application across multiple hosts, the application should be deployed on a multi-node cluster using a tool such as Docker Swarm. Look for multi-host networking support in Docker Swarm on Windows in the near future.
The first tier of the application is an ASP.NET web app, BlogEngine.NET , and the back-end tier is a database built on SQL Server Express 2014. The database is created to manage and store blog posts from different users which are subsequently displayed through the Blog Engine app.
New to Docker or Windows Containers?
This post assumes familiarity with the basics of Docker, Windows containers and ‘containerized’ ASP.NET applications. Here are some good places to start if you need to brush up on your knowledge:
-
Intro to Docker on Windows (i.e. using Docker to run Windows base containers)
- Microsoft MSDN: Windows Containers and Containers 101 on Channel 9
- Building a containerized .NET app on Docker (i.e. using Docker to configure/deploy custom containers): Windows Containers – How to Containerize an ASP.NET Web API Application in Windows using Docke...
Setup
System Prerequisites
Before you walk through the steps described in this post, check that your environment meets the following requirements and has the most recent versions of Docker and Windows updates installed:
-
Windows 10 Anniversary Edition (Professional or Enterprise) or Windows Server 2016
Windows Containers requires your system to have critical updates installed. Check your OS version by running winver.exe , and ensure you have installed the latest KB 3192366 and/or Windows 10 updates.
-
The
Windows Container Feature
and
Docker
must be enabled/installed on your system as described in the Quickstarts below.
Make sure you are running the most recent version of Docker - either Docker v1.13.0-dev or later for Windows 10 clients OR Commercially Supported (CS) Docker v1.12.2 or later for Windows Server 2016
- The latest version of Docker-Compose (available with Docker-for-Windows ) must be installed on your system.
NOTE : The current version of Docker Compose on Windows requires that the Docker daemon be configured to listen to a TCP socket for new connections. A Pull Request (PR) to fix for this issue is in review and will be merged soon. For now, please ensure that you do the following:
Please configure the Docker Engine by adding a “hosts” key to the daemon.json file (example shown below) following the instructions here. Be sure to restart the Docker service after making this change.
{
…
"hosts":["tcp://0.0.0.0:2375", “npipe:////./pipe/win_engine"]
…
}
When running docker-compose, you will either need to explicitly reference the host port by adding the option “-H tcp://localhost:2375” to the end of this command (e.g. docker-compose -H “tcp://localhost:2375” or by setting your DOCKER_HOST environment variable to always use this port (e.g. $env:DOCKER_HOST=”tcp://localhost:2375”
Blog Application Source with Compose and Dockerfiles
This blog application is based on the Blog Engine ASP.NET web app availably publicly here: http://www.dnbe.net/docs/ . To follow this post and build the described application, a complete set of files is available on GitHub. Download the Blog Application files from GitHub and extract them to a location somewhere on your machine, e.g. ‘C:\build’ directory.
The blog application directory includes:
- A ‘web’ folder that contains the Dockerfile and resources that you’ll need to build the image for the blog application’s ASP.NET front-end.
- A ‘db’ folder that contains the Dockerfile and resources that you’ll need to build the blog application’s SQL database back-end.
- A ‘docker-compose.yml’ file that you will use to build and run the application using Docker Compose.
The top-level of the blog application source folder is the main working directory for the directions in this post. Open an elevated PowerShell session and navigate there now - e.g.
PS C:\> cd c:\build\
The Blog Application Container Images
Database Back-End Tier: The ‘db’ Service
The database back-end Dockerfile is located in the ‘db’ sub-folder of the blog application source files and can be referenced here: The Blog Database Dockerfile . The main function of this Dockerfile is to run two scripts over the Windows Server Core base OS image to define a new database as well as the tables required by the BlogEngine.NET application.
The SQL scripts referenced by the Dockerfile to construct the blog database are included in the ‘db’ folder, and copied from host to container when the container image is created so that they can be run on the container.
BlogEngine.NET Front-End
The BlogEngine.NET Dockerfile is in the ‘web’ sub-folder of the blog application source files.
This Dockerfile refers to a PowerShell script (buildapp.ps1) that does the majority of the work required to configure the web service image. The buildapp.ps1 PowerShell Script obtains the BlogEngine.NET project files using a download link from Codeplex , configures the blog application using the default IIS site, grants full permission over the BlogEngine.NET project files (something that is required by the application) and executes the commands necessary to build an IIS web application from the BlogEngine.NET project files.
After running the script to obtain and configure the BlogEngine.NET web application, the Dockerfile finishes by copying the Web.config file included in the ‘web’ sub-folder to the container, to overwrite the file that was downloaded from Codeplex. The config file provided has been altered to point the ‘web’ service to the ‘db’ back-end service.
Streamlining with Docker Compose
When dealing with only one or two independent containers, it is simple to use the ‘docker run’ command to create and start a container image. However, as soon as an application begins to gain complexity, perhaps by including several inter-dependent services or by deploying multiple instances of any one service, the notion of configuring and running that app “manually” becomes impractical. To simplify the definition and deployment of an application, we can use Docker Compose.
A Compose file is used to define our “containerized” application using two services—a ‘web’ service and a ‘db’ service. The blog application’s Compose File (available here for reference) defines the ‘web’ service which runs the BlogEngine.NET web front-end tier of the application and the ‘db’ service which runs the SQL Server 2014 Express back-end database tier. The compose file also handles network configuration for the blog application (with both application-level and service-level granularity).
Something to note in the blog application Compose file, is that the ‘expose’ option is used in place of the ‘ports’ option for the ‘db’ service. The ‘ports’ option is analogous to using the ‘-p’ argument in a ‘docker run’ command, and specifies HOST:CONTAINER port mapping for a service. However, this ‘ports’ option specifies a specific container host port to use for the service thereby limiting the service to only one container instance since multiple instances can’t re-use the same host port. The ‘expose’ option, on the other hand, can be used to define the internal container port with a dynamic, external port selected automatically by Docker through the Windows Host Networking Service – HNS. This allows for the creation of multiple container instances to run a single service; where the ‘ports’ option requires that every container instance for a service be mapped as specified, the ‘expose’ option allows Docker Compose to handle port mapping as required for scaled-out scenarios.
The ‘networks’ key in the Compose file specifies the network to which the application services will be connected. In this case, we define the default network for all services to use as external meaning a network will not be created by Docker Compose. The ‘nat’ network referenced is the default NAT network created by the Docker Engine when Docker is originally installed.
‘docker-compose build’
In this step, Docker Compose is used to build the blog application. The Compose file references the Dockerfiles for the ‘web’ and ‘db’ services and uses them to build the container image for each service.
From an elevated PowerShell session, navigate to the top level of the Blog Application directory. For example,
cd C:\build\
Now use Docker Compose to build the blog application:
docker-compose build
‘docker-compose up’
Now use Docker Compose to run the blog application:
docker-compose up
This will cause a container instance to be run for each application service. Execute the command to see that the blog application is now up and running.
docker-compose ps
You can access the blog application through a browser on your local machine, as described below.
Define Multiple, Custom NAT Networks
In previous Windows Server 2016 technical previews, Windows was limited to a single NAT network per container host. While this is still technically the case, it is possible to define custom NAT networks by segmenting the default NAT network’s large, internal prefix into multiple subnets.
For instance, if the default NAT internal prefix was 172.31.211.0/20, a custom NAT network could be carved out from this prefix. The ‘networks’ section in the Compose file could be replaced with the following:
networks:
default:
driver: nat
ipam:
driver: default
config:
- subnet: 172.31.212.0/24
This would create a user-defined NAT network with a user-defined IP subnet prefix (in this case, 172.31.211.0/24). The ipam option is used to specify this custom IPAM configuration.
Note: Ensure that any custom nat network defined is a subset of the larger nat internal prefix previously created. To obtain your host nat network’s internal prefix, run ‘docker network inspect nat’.
View the Blog Application
Now that the containers for the ‘web’ and ‘db’ services are running, the blog application can be accessed from the local container host using the internal container IP and port (80). Use the command docker inspect <web container instance> to determine this internal IP address.
To access the application, open an internet browser on the container host and navigate to the following URL: “http://<container ip>/ /BlogEngine/” appended. For instance, you might enter: http://172.16.12.216/BlogEngine
To access the application from an external host that is connected to the container host’s network, you must use the Container Host IP address and mapped port of the web container. The mapped port of the web container endpoint is displayed from docker-compose ps or docker ps commands. For instance, you might enter: http://10.123.174.107:3658/BlogEngine
The blog application may take a moment to load, but soon your browser should present the following page.
[caption id="attachment_8735" align="alignnone" width="1203"]
Screenshot of page[/caption]
Taking Advantage of Service Discovery
Built in to Docker is Service Discovery, which offers two key benefits: service registration and service name to IP (DNS) mapping. Service Discovery is especially valuable in the context of scaled-out applications, as it allows multi-container services to be discovered and referenced in the same way as single container services; with Service Discovery, intra-application communication is simple and concise—any service can be referenced by name, regardless of the number of container instances that are being used to run that service.
Service registration is the piece of Service Discovery that makes it possible for containers/services on a given network to discover each other by name. As a result of service registration, every application service is registered with a set of internal IP addresses for the container endpoints that are running that service. With this mapping, DNS resolution in the Docker Engine responds to any application endpoint seeking to communicate with a given service by sending a randomly ordered list of the container IP addresses associated with that service. The DNS client in the requesting container then chooses one of these IPs for container-container communication. This is referred to as DNS load-balancing.
Through DNS mapping Docker abstracts away the added complexity of managing multiple container endpoints; because of this piece of Service Discovery a single service can be treated as an atomic entity, no matter how many container instances it has running behind the scenes.
Note: For further context on Service Discovery, visit this Docker resource . However, note that Windows does not support the “-link” options.
Scale-Out with ‘docker-compose scale’
While the service registration benefit of Service Discovery is leveraged by an application even when one container instance is running for each application service, a scaled-out scenario is required for the benefit of DNS load-balancing to truly take effect.
To run a scaled-out version of the blog application, use the following command (either in place of ‘docker-compose up’ or even after the compose application is up and running). This command will run the blog application with one container instance for the ‘web’ service and three container instances for the ‘db’ service.
docker-compose scale web=1 db=3
Recall that the docker-compose.yml file provided with the blog application project files does not allow for scaling multiple instances of the 'web' service. To scale the web service, the 'ports' option for the web service must be replaced with the 'expose' option. However, without a load-balancer in front of the web service, a user would need to reference individual container endpoint IPs and mapped ports for external access into the web front-end of this application. An improvement to this application would be to use volume mapping so that all ‘db’ container instances reference the same SQL database files. Stay tuned for a follow-on post on these topics.
Service Discovery in action
In this step, Service Discovery will be demonstrated through a simple interaction between the ‘web’ and ‘db’ application services. The idea here is to ping different instances of the ‘db’ service to see that Service Discovery allows it to be accessed as a single service, regardless of how many container instances are implementing the service.
Before you begin: Run the blog application using the ‘docker-compose scale’ instruction described above.
Return to your PowerShell session, and run the following command to ping the ‘db’ back-end service from your web service. Notice the IP address from which you receive a reply.
docker run blogengine ping db
Now run the ping command again, and notice whether or not you receive a reply from a different IP address (i.e. a different ‘db’ container instance).*
docker run blogengine ping db
The image below demonstrates the behavior you should see—after pinging 2-3 times, you should receive replied from at least two different ‘db’ container instances:
* There is a chance that Docker will return the set of IPs making up the ‘db’ service in the same order as your first request. In this case, you may not see a different IP address. Repeat the ping command until you receive a reply from a new instance.
Technical Note: Service Discovery implemented in Windows
On Linux, the Docker daemon starts a new thread in each container namespace to catch service name resolution requests. These requests are sent to the Docker engine which implements a DNS resolver and responds back to the thread in the container with the IP address/es of the container instance/s which correspond to the service name.
In Windows, service discovery is implemented differently due to the need to support both Windows Server Containers (shared Windows kernel) and Hyper-V Containers (isolated Windows kernel). Instead of starting a new thread in each container, the primary DNS server for the Container endpoint’s IP interface is set to the default gateway of the (NAT) network. A request to resolve the service name will be sent to the default gateway IP where it is caught by the Windows Host Networking Service (HNS) in the container host. The HNS service then sends the request to the Docker engine which replies with the IP address/es of the container instance/s for the service. HNS then returns the service name (DNS) query to the container.
1 Comment
You must be a registered user to add a comment. If you've already registered, sign in. Otherwise, register and sign in.