- Home
- Azure
- Azure Integration Services Blog
- How to use BizTalk Blob adapter properly
- Subscribe to RSS Feed
- Mark as New
- Mark as Read
- Bookmark
- Subscribe
- Printer Friendly Page
- Report Inappropriate Content
BizTalk adapter family had a new member since BizTalk Server 2020 release, the Azure Blob storage adapter, which provide BizTalk the ability to talk with other software system by Azure Blob storage, more important, it connect on-premise world with Azure cloud world. We have documented at Azure Blob storage adapter in BizTalk Server for what it provides, and some basic receive and send setup steps.
Compare to file adapter, which mostly used in local area network, Blob adapter provide easy way to receive messages from outside world; Compare to ftp series adapter, like ftp, sftp, or ftps adapters, which you always need to setup a server, and manage the server, Blob adapter provide a quicker start, as everything is provided by Azure Storage, in which you can leverage all the security and stability of Microsoft Cloud technology.
Suppose your business need to talk to your partner, receive orders from your customer, or shipment information from your supply chain partner, you have your BizTalk Server setup in your local network, Azure Blob adapter could be a good option in this scenario.
Design Blob Storage structure
After create an Azure Storage account, before your start creating Blob storage receive locations, pause a little bit and think more,
- What kinds of information are you receiving through Blob adapters?
- How many customers or partners sending these different kinds of messages to you?
- How frequently you will receive from them?
Based on your answer to above question, think about different hierarchy options between multiple storage accounts, multiple containers, or multiple directories, for message categories and partners.
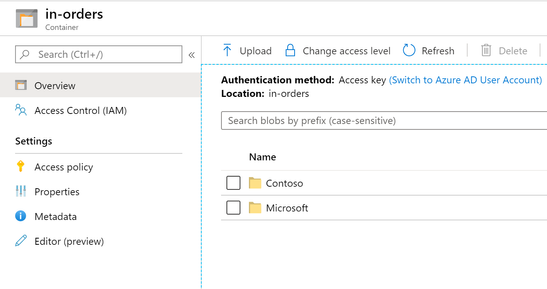
First thought in your mind might be put all the order messages in a container named in-orders, and ask your customers to put the orders in a directory named follow customer name, something like below.
It will work, just in Azure Blob Storage, there is no way to control the folder permission, which means you might ask your customer to put their order into Contoso directory, but you can’t stop them put into the wrong folder.
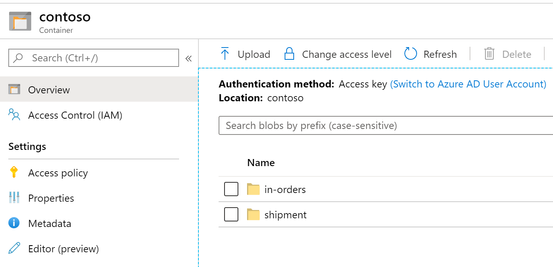
Below structure might be more suitable, create a container for each customer, and they can put different kinds of messages into different directories.
Authorization
Next thing you have to think about is, how do you authorize your partners when they put the blobs in to these directories. SAS is the recommended approach for this scenario. Below is a quote about what is SAS.
“A shared access signature (SAS) is a URI that grants restricted access rights to Azure Storage resources. You can provide a shared access signature to clients who should not be trusted with your storage account key but whom you wish to delegate access to certain storage account resources. By distributing a shared access signature URI to these clients, you grant them access to a resource for a specified period of time.”
Azure Storage provided different levels and different approaches for user to create SAS based on their business need. In this particular scenario, “Service SAS with stored access policy” will be a good option, so that you can make sure this customer only have create permission to this container during a certain date/time period, for example, from start to end of your contract period.
Azure portal provide the easiest way to create “Service SAS with stored access policy”, which can be done in 2 steps.
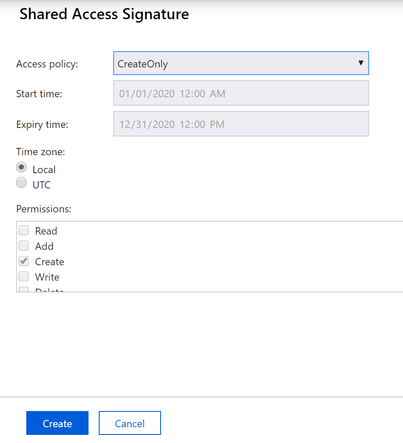
- Create an access policy in the container.
Notice mostly if your customer is only create new blob in your blob storage, they will require “Create” permission only, as screenshot above.
Start time and expiry time is option here, but consider you probably need to change this, maybe when you renew your contract, better approach is to provide here, so when you change the time period, the SAS won’t change, so no action is required from your partner.
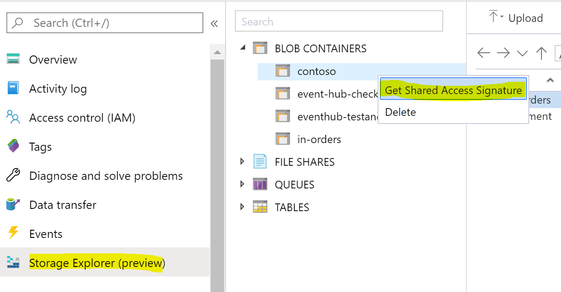
- Get a Shared Access Signature
The easiest way to get a SAS is from Azure portal Storage Explorer(preview).
Choose the Access policy create in step 1, click create button you will get the SAS URI.
After hit the “Create” button, you will get SAS URI and Query string. Share SAS URI with your partners, we will talk about how to use these later.
You can always create SAS by .Net code.
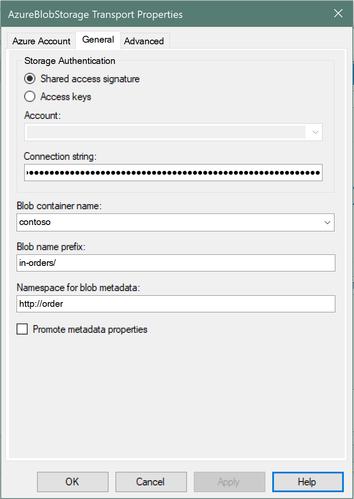
Now assume your partners can put their messages into your blob storage container, you can start to create receive location in BizTalk management console. For an Azure Blob Storage adapter, the major information need to provided are below.
The easiest way to get a connection string is go to Azure portal, your storage account, your container, and open “Access Keys”, where you can get a connection strings directly ,or you can choose to login to Adapter configuration UI in “Azure Account”, then choose “Access keys” in above UI, then choose Storage Account, then connection string can be automatically filled.
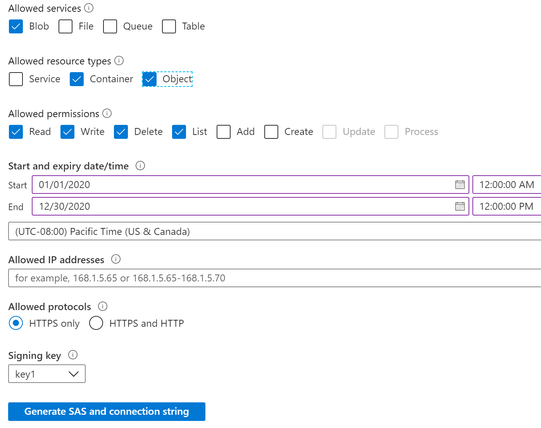
But the recommended way is using SAS connection string, you can generate an “account SAS” from “Shared access signature” in your storage account on Azure portal, like below.
After hit “Generate SAS and connection string” you will get a connection string, you can safely remove FileEndpoint, QueueEndpoint, TableEndpoint sections, as we are not using them, final connection string will be looks like
“BlobEndpoint=https://{StorageAccount}.blob.core.windows.net/;SharedAccessSignature={SAS}.
This will work in runtime, while an error message “no permission to list containers” will pop up when you input the connection string in adapter transport properties window, you can safely ignore it and input the container name manually. If you want to get rid of the “permission to list containers”, you should also select ”Service” for allowed resource types.
Notice the {SAS} part is actually the SAS query you got from previous section.
Above “Account SAS” give you certain sets of permissions to all the containers in the storage account. You can also create a “Service SAS with stored access policy” for this purpose.
BizTalk receive adapter requires below permissions to work.
- List blobs in the container.
- Read blob
- Delete blob
- Write Blob
BizTalk receive adapter requires “Write Blob” permission, because BizTalk receive adapter will lease blob and update blob metadata to lock the Blob to prevent multiple BizTalk server host instances/receive handlers receiving the same blob.
Fill the connection string in adapter configuration UI, choose the container, and also set the Blob name prefix, here you can use folder name with a “/”.
Then let’s consider the opposite side, if you are not the seller, but the buyer, how do you put your orders into your provider’s system when they shared the SAS to you?
Yeah, you are right, you will need Blob send adapter.
BizTalk send adapter need below permissions to put blob to container.
- Write(and Add) Blob
- Read blob
BizTalk requires “Read blob” permission only for checking existence of blob.
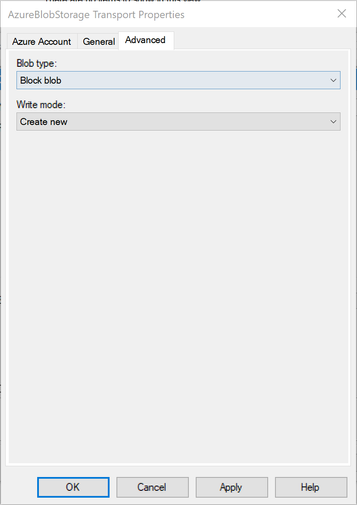
Blob send adapter supports different Blob type. Block blob and page blob support “Create new”, and “Overwrite” as Write mode, which requires only write and read blob permission only, while “Append blob” support “Append” mode, which can allow user to append new content to exists blob, which require “Add” permission.
Make sure the storage owner provide you SAS with proper permissions, and make sure the container exists. You runtime will have error like “Server failed to authenticate the request." if the container doesn’t exist cause it assume the container exists while the SAS you provided doesn’t have proper permissions.
Metadata
Blob storage provides the metadata feature for blob and container. BizTalk blob receive adapter can read the metadata and take it as BizTalk message context properties, while blob send adapter can write metadata to blob.
Proper BizTalk message design should have all the necessary information in the message/blob content, but if you have a temporary requirement which need extra information, for example, your partner has special requirement for their orders, which wasn't implemented in your message schema, blob metadata can be an easy approach to leverage.
Blob metadata has its limitation, the total size of all metadata pairs can be up to 8KB in size.
Also Blob metadata allows only ASCII characters are allowed for both “Name” and “Value”. BizTalk can send context properties with non-ASCII characters value to blob metadata by URL-encode it, similarly receive adapter will URL-decode blob metadata “Value” while receiving the blob.
Multiple applications scenario
There will always be multiple applications working on same blob container in this scenario. BizTalk Blob receive adapter picking up the blobs, publish them into BizTalk MessageBox, while your partners’ applications put messages into same blob container meanwhile.
Blob receive adapter will always first lease the blob to make sure other applications cannot update the blob during receiving process, suppose your customers want to update an order information to an exist blob, the update action will fail. They will have to do a retry later, but they should never try to break a lease, which could cause same blob received multiple times.
Blob send adapter sending messages will also fail in this scenario too, messages will be suspended, and sending will be retried later.
Retry will work, but it also bring duplicated messages since multiple versions of same order are received into MessageBox. One simple solution to avoid this is giving your customer enough time to put the right blob content. For example, increase your polling interval, make it only do polling in the first hour of a day, or you can use receive location schedule feature as well, so your customer has a day to fix their order blob mistakes.
You must be a registered user to add a comment. If you've already registered, sign in. Otherwise, register and sign in.
