The Azure CLI is one of the real benefits of getting to work with the Azure Resource Manager. Whether you are running it from a local workstation or using the Azure Cloud Shell, you can always count on Aure CLI to help make managing your deployments and accounts easier.


I'll provide you with a quick getting started guide with some links from the Microsoft Azure Docs site. I will also share some of my favorite Azure CLI commands or "one liners" that you can use in your bash shell with Azure CLI.
Getting started
Using the Azure CLI starts with choosing whether to install it, or not. Let me explain what I mean! The Azure CLI can be run on your local computer (Windows, Mac, Linux), a Docker container or right in the Azure Cloud Shell. Follow the documentation guides provided to install, or don't and use Cloud Shell.
One liner - local Mac install :party_popper:
Here's a one-liner for Mac to install Azure CLI locally, you will need the Homebrew package manager:
brew update && brew install azure-cli
Azure Cloud Shell
In part one we opened up the Cloud Shell, but let's take a quick reminder!
The Azure Cloud Shell is one of my favorite things about using Azure. Many of the administrative tasks that I may have had to run from a local computer can now be done from a browser anywhere I can authenticate into my Azure account. I used to always worry about needing a computer that had a shell or a terminal program with my ssh key on it all the time. Now, I am keeping much of this on my Azure Cloud Shell so I can work pretty much anywhere.

The Azure Cloud Shell can run either bash or Powershell.
- Launch Cloud Shell from the top navigation of the Azure portal.
- Select a subscription to create a storage account and Microsoft Azure Files share.
- Select "Create storage"
- Select the Bash environment.
Great. Now let's open a new tab from the Cloud Shell and get a full-size shell, or you can just navigate your browser to https://shell.aure.com to access full view:
One liner - create an ssh keypair :party_popper:
If you do not have an ssh key for your Azure bash Cloud Shell, or in your local terminal, it's very simple to create a keypair:
ssh-keygen -m PEM -t rsa -b 4096
you can find this newly created key in the ~/.ssh/ directory:
# private key
ls -al ~/.ssh/id_rsa

-rw------- 1 jay jay 1679 Mar 14  2016 /home/jay/.ssh/id_rsa

# public key
ls -al ~/.ssh/id_rsa.pub

-rw-r--r-- 1 jay jay 414 Mar 14  2016 /home/jay/.ssh/id_rsa.pub
The private key is important! Do not share it! The .pub key is what you will specify when sharing the key on a Linux VM.
One liner - list your subscription :party_popper:
If I run the following command I can see what subscriptions I am subscribted to:
az account list --all

The "id" value shows us what our account number is for the subscription I'd like to create resources in. I've obscured some parts of it above, but the account number is a 36 character string.
One liner - set yout default subscription :party_popper:
To pick a default subscription for your account, you can execute the following command:
az account set --subscription "f9bda450-etcetcetc-yourid"
We've told the CLI that all actions we send tot he Azure Resource Manager will be default to the "ca-jgord-demo-test" subscription.
One liner - list running VMs :party_popper:
We've got a Azure CLI installation going or using the cloud shell. We've authenticated, then we also set a default subscription. Time to get some details on running resources we have in our Azure account. I will use this command to find out information on my running virtual machines:
az vm list
Al the VM's currently running int he context of the default subscription will be provided by az cli along with details about their deployment.

Now that I have some details on one of my VM's, I'd like to open RDP so that I can log in and do some maintenance.
I want to work with servers in the funbyte resource group. This will require a security change to the network security group assigned to the VMs.
One liner - list your NSG :party_popper:
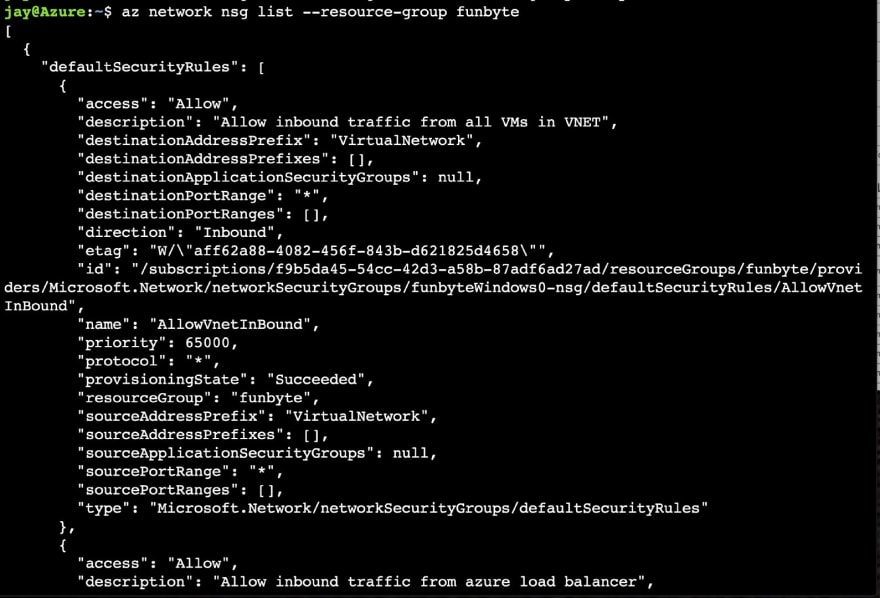
Let's list the group associated with the funbyteWindows server:
az network nsg list --resource-group funbyte
Our JSON out put will now tell us the name of our nsg (funbyteWindowsNSG)
One liner - create RDP firewall rule for VM :party_popper:
In this situation we'll specify we want to open port 3389 temporarily to my IP.
az network nsg rule create -g funbyte --nsg-name funbyteWindowsNSG -n jayRDPule \
    --priority 100 \
    --source-address-prefixes X.116.99.X/32 --source-port-ranges 3389 \
    --destination-address-prefixes '*' --destination-port-ranges 3389 --access Allow \
    --protocol Tcp --description "Allow Jay's home IP to RDP."
This single command allows us to now set a priority for our rule permitting my home IP address access to port 3389.
What's next?
You've got the tools, the links to docs and a few one liners to help you as a SysAdmin get acclimated to the Azure CLI and Cloud Shell.
If you'd like to get more training for free on this subject, be certain to check out the Microsoft Learn Module, "What is the Azure CLI?"
This module contains nine units to help you learn even more about how to use the Azure CLI to manage your account. Don't have an account just yet? Check out the "Create An Azure Account" unit or sign up here for $200 in free Azure credit.
I am super happy to help you more on your journey! Reach out on Twitter or just leave me a comment! Thanks so much for being part of Azure.