- Home
- Azure
- Azure Observability Blog
- How to analyze data exported from Log Analytics data using Synapse
- Subscribe to RSS Feed
- Mark as New
- Mark as Read
- Bookmark
- Subscribe
- Printer Friendly Page
- Report Inappropriate Content
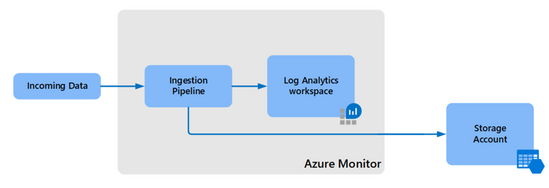
In this blog, you will learn how to use Azure Synapse Analytics to query data collected into Azure Log Analytics and was exported to Azure Data Lake storage. Log analytics new “Data export” feature allows you to also send the collected logs to Azure Data Lake Storage. Exported data can be retained for very long periods of time relatively cheap.
This capability can be used in several scenarios:
First, you are looking to run machine learning or batch learning models on top of data collected to a Log Analytics workspace.
Another option, you need to export Log Analytics data to another warm storage, might be for auditing purposes, this will also allow you to perform data manipulation\filtering in the process.
Last, you might want to retain data also externally to Log Analytics workspace, and you want to reduce costs, by converting the data to Parquet format, again after performing data manipulation\filtering in the process.
This blog will review couple of options to analyze the exported data. Using Azure Synapse, a limitless analytics service that brings together data integration, enterprise data warehousing and big data analytics. Synapse provides different tools and approaches to work with the collected data, including T-SQL scripts, spark code, and machine learning models.
In this blog, two features of Azure Synapse Analytics service will be used:
- Spark engine
- Serverless database
Spark model is designed for machine learning or complex (batch) analytics, while serverless database is especially useful for auditing scenario, for users that are familiar with T-SQL.
Setting up the environment
To setup the environment, you will first need to configure “data export” from your Log Analytics workspace to an ADLS gen2 (Azure data lake storage). Next step, you will create an Azure Synapse environment and connect the ADLS gen2 to this environment.
The first step, setting up "Data export" on the Log Analytics workspace. By setting up Log Analytics data export, you will be able to export specific Log Analytics tables to the ADLS Gen2 storage as JSON files. The data is exported to your storage account as hourly append blobs. The JSON files are created in a hierarchical folder structure, with a date/time prefixes in file or blob names. This allows ad hoc queries and hourly/daily jobs to filter blobs by time range.
Folder structure: WorkspaceResourceId=/subscriptions/{subscriptionId}/resourcegroups/{ResourceGroupName}/providers/microsoft.operationalinsights/workspaces/{WorkspaceName}/y=YYYY/m=MM/d=dd/h=hh/m=mm/PT1H.json
Next, let's spin up a Synapse environment, and link it to your ADLS storage.
Follow the instructions to Create and setup a Synapse workspace.
Make sure to set the right permissions for any user that will access Synapse studio:
- Assign the users to Contributor role on Synapse workspace.
- Assign the users the appropriate Synapse RBAC roles using Synapse Studio.
- Assign yourself and other users to Storage Blob Data Contributor role on the storage account.
For details on Azure Synapse Access control, see this article.
There are multiple ways to process the exported data, this blog will review two of them. First, you will learn to use the Spark engine to query the exported data. In the second scenario, you will first learn to convert the exported data to Parquet file, then learn how to create external tables based on the Parquet files, using Synapse’s serverless database engine.
First scenario – Query the exported data using Spark engine
This scenario will use Spark engine, this engine is usually more oriented for users from the machine learning space.
Before we can start to work, let’s configure the Spark environment:
Select the "Manage" icon --> "Apache spark pools" --> "New"
Name the pool "DefaultPool", Node size "small", Auto-scale "Disabled"\ number of nodes 3.
--> click "Create".
As the simplest example, let's try to count how many records have been exported to the Perf table.
- Open Synapse Studio.
- Go to "Data" --> "Linked" --> click on "+" --> "Connect external data" --> "Azure Data Lake Storage Gen2"
- Let's configure the ADLS with Log Analytics exported data. Remember to set the right permissions as listed above.
- Refresh "Azure data lake storage Gen2" section under "Linked" and check that the new configured storage was added.
- Let's drill into one of the JSON files under "am-export-perf" container, file name should be "PT1H.json"
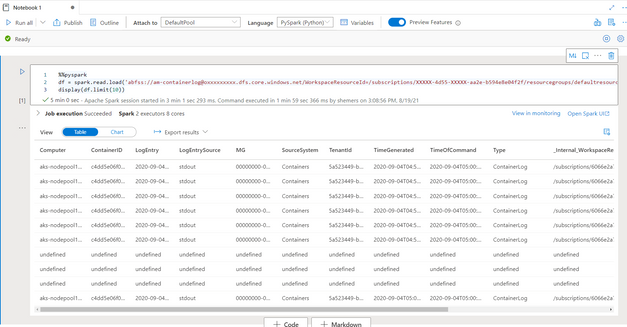
- Right click on the file --> "New notebook" --> "Load to DataFrame"
- A new notebook will be created, set the "Attach to" to "DefaultPool"
- Click "Run cell".
- Now, let's expand the data set, change the file path ending to y=*/m=*/d=*/h=*/m=*/PT1H.json'
- Change display(df.limit(10)) To df.count()
- Click "Run cell"
Note: First run will take longer, as the spark pool needs to spin up.
Second scenario – create external data table using converted Parquet files
In the first scenario, the data was kept in the original JSON format. In the following steps, you will learn how to convert the JSON files to Parquet files and create an external table using Synapse’s serverless database engine. This approach will allow you to get better performance both in querying speed and lower storage costs, though you will need to keep the Synapse environment running.
This method can also allow you to perform data manipulation, for example: filter rows, remove columns, and even join between different tables.
Parquet is a popular column oriented binary format and has some useful advantages over the JSON formatted files, specifically:
- Better data compression, the Parquet files are smaller, and will reduce storage costs.
- Better query performance, Parquet saves the data as columns, as opposed to rows in JSON, and indexed. This improves the query performance significantly.
- Parquet files are used by both Spark engine, same as the first scenario, and also by the SQL engine.
Couple of notes, Serverless will be slower compared to dedicated pool. You might want to consider loading the data to dedicated clusters at a later stage, also there is a restriction that serverless does not support time series, geo-spatial data.
Shared metadata tables - Azure Synapse Analytics | Microsoft Docs
Note: you can still use spark as in the first scenario, but load from the Parquet files, and still benefit from the same fast loading time.
First step, you will create a ‘copy activity’, the activity will convert the exported container logs JSON files to Parquet format:
- On the left pane, Click the "Integration" tab.
- Click the "+" button on the top right corner of the "Integration" blade --> select "Copy Data tool".
- In the "Copy data tool" window, Select "Built-in copy task"
- Name is "CopyPipeline_ContainerLogs"
- Set the "Task cadence or task schedule" to "Tumbling window"
- We will set the "Start time" to a week ago, the "Tumbling window" is tend to backfill data, of course, you can set any past time according to your requirement,
we recommend to read more and to set the properties accordingly. - For now, we will leave the other properties as is.
- Click "Next >"
- In "Source data store", Select the ADLS storage with the exported data,
if it does not exist in the list, click "Create new connection" --> choose "Azure Data Lake Storage Gen2" --> "Continue" -->
locate the ADLS service --> Click "Create" --> Click "Next >" - In "Choose the input file or folder", we will select the folder for container logs --> Click "Next >"
- In "File format settings", set "File format" to JSON --> Click "Next >"
- In "Destination data store", let's select our synapse default ADLS storage --> Click "Next >" --> In "" --> Set "Folder Path" to 'container-logs'
--> set "Copy behavior" to "Merge files" --> Click "Next >" --> in "File format settings" --> set "File format" to 'Parquet' --> Click "Next >" - In the "Schema mapping" let's leave the default mapping, in a later stage you might want to circle back to this stage
and make modifications according to your business needs. --> Click "Next >" - "Settings" --> Click "Next >"
- "Summary" --> Click "Next >" --> Click "Finish"
Now, the copy task will be deployed, this process might take a while.
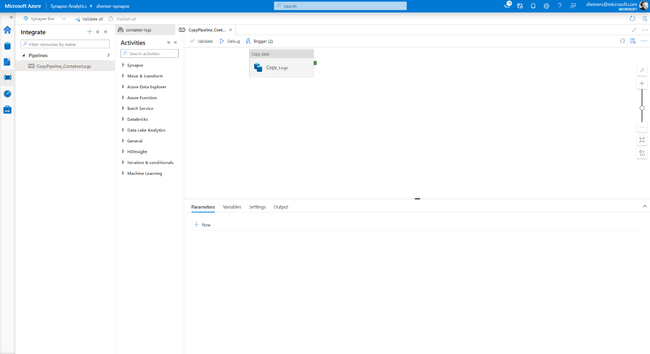
You will see in the "Integrate" tab on the left, under “Pipelines” your new pipeline should be listed. When clicking on the pipeline, a canvas with "Copy data" task will open.
To test the pipeline, first trigger the task to see that it is working as expected, on the top side of the canvas, Click "Trigger" --> "Trigger now" --> Click "Ok"
* Here we can add any transformation task and connecting this as the sync to the copy task.
Data flows - Azure Synapse Analytics | Microsoft Docs
Managing the mapping data flow graph - Azure Data Factory | Microsoft Docs
After we confirmed that the copy task works, we have two options, either we will trigger the task each time we want to query the data, this might be useful for scenarios where the data set is small, we are not running many operations on the data, and we are willing to “pay” for the extra operation time.
The other option is to create a scheduled trigger, this will continuedly convert the JSON file to parquet files.
- Click "Trigger" --> "New\Edit" --> Expend the select box "Chose a trigger" --> “+New”
- Set the Name
- Set the Type to “Storage Event”
- Fill in the storage account details.
- Select the relevant container.
- Set “Event” to “Blob created”
- Click “Ok”
- Remember to “Publish all” to commit the work.
Create tumbling window triggers in Azure Data Factory - Azure Data Factory | Microsoft Docs
Pipeline execution and triggers in Azure Data Factory - Azure Data Factory | Microsoft Docs
Second step, create an External table on-top of the Parquet files:
- On the left pane, Click the "Data" tab.
- Select the "Linked" tab --> Expand "Azure Data Lake Storage Gen2"
- Select the folder the Parquet files were created under in the previous step e.g. "container-logs".
- You should see at least one Parquet file inside the folder,
if the folder is empty, check that the run of the copy task completed successfully. - Click on one of the files --> "New SQL script" --> "Create external table".
- Set "External table name" ex: dbo.containerlogs
- Check that the selected DB is the correct one, and leave the "Using SQL script"
- Click "Create"
- A SQL script will show, here you can change\configure the tables columns.
- Change the value "Location" to * (wildcard) so the table will contain all future generated Parquet files.
- Run
Last step, query the data:
- On the left pane, Click the "Data" tab.
- Select the "Workspace" tab --> Expand "Databases"
- A list of databases will show, expend the database where the table was created in the previous step.
- Expend “External tables”
- Right click on the table name --> “New SQL script” --> “Select TOP 100 rows”
- Click “Run”
Conclusion
In this blog, we covered two possible methods for analyzing data exported from Azure Log Analytics using Azure synapse. Both methods suggested are simple, quick to deploy and effective.
For example, in the second scenario described in this blog, we are using Synapse's serverless database to create external table, using this option allows us to load the data from the files converted from JSON to Parquet format, this way we also save storage space and get better query performance in Synapse. We should keep in mind, that using dedicated SQL Pool will give better performance but will cost more.
We do recommend to continue and explore the many features Azure Synapse provides and find the best flow for your particular business need.
You must be a registered user to add a comment. If you've already registered, sign in. Otherwise, register and sign in.


