- Home
- Security, Compliance, and Identity
- Security, Compliance, and Identity Blog
- Using Azure Information Protection to protect PDF’s and Adobe Acrobat Reader to view them
- Subscribe to RSS Feed
- Mark as New
- Mark as Read
- Bookmark
- Subscribe
- Printer Friendly Page
- Report Inappropriate Content
Overview
As of October 12th, 2018, our Information Protection customers can use Adobe Acrobat Reader on Windows to open-labeled and protected PDFs. This reflects a fundamental change in the ability to enforce labels and encryption on PDFs – up until this announcement, PDFs protected by Azure Information Protection were renamed with the .pPDF file extension and could only be opened using the Azure Information Protection viewer. For more information about the new PDF protection standard, see section 7.6 Encryption from the document that is derived from ISO 32000-1 and published by Adobe Systems Incorporated.
In this blog we will cover the complete end-to-end configuration and deployment that allows your company to be able to label & protect PDFs in the new format, in addition to be able to consume them easily. We will also discuss how to enforce automatic classification on PDFs using the Azure Information Protection scanner. Lastly, we will provide a short script that will migrate an already labeled file in the pPDF format and will “re-label” it as the new PDF format.
Prerequisites
- Azure Information Protection client installed – version 1.37 and newer (versions 1.xx only).
- Adobe Acrobat Reader and Azure Information Protection plugin installed, which can be downloaded from here
- Windows 10 and previous versions through Windows 7 Service Pack 1
Service Configuration
With the current Azure Information Protection client version 1.41 and newer, by default AIP is configured to protect PDF's with the new format. In case you use version 1.37 then by default, PDFs are protected in the Pfile format and the extension is renamed to pPDF. As the new PDF format feature is in private preview, the Information Protection admin needs to opt-in his company to be able to protect in the new format.
1. If you haven't already done so, in a new browser window, sign in to the Azure portal, and then navigate to the Azure Information Protection blade.
2. From the Classifications > Labels menu option: Select Policies.
3. On the Azure Information Protection - Policies blade, select the context menu (...) next to the policy, then select Advanced settings. You can configure advanced settings for the Global policy, as well as for scoped policies.
4. On the Advanced settings blade, type the following advanced setting name and value, and then select Save and close.
Key: EnablePDFv2Protection
Value: True
Client configuration
Adobe Acrobat Reader and the Azure Information Protection plugin that goes with it can be downloaded from here.
The installation procedure is straight-forward; no special configuration is required
Initial labeling & protection of a PDF file
1. Select a PDF file that you would like to label with protection
2. Right-click the file and select “Classify and protect”
3. Select a label that applies for protection on the PDF file
4. Click “Apply” and notice that once the process completes, the PDF file extension remain the same and doesn’t change.
Initial open and view of protected PDF file
1. Double click on the protected PDF file to open it in Adobe Acrobat Reader
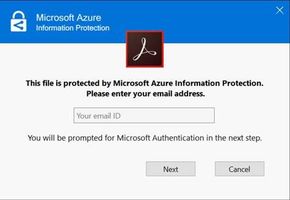
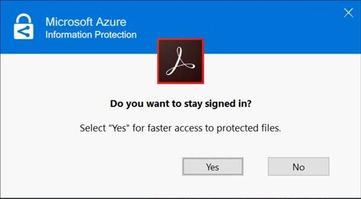
2. Initially, when you open the protected PDF file you will be prompted for your Microsoft account credentials. After successful authentication you will be prompt if you to stay “sign in” to avoid re-authentication process when the next file is opened:
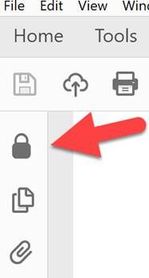
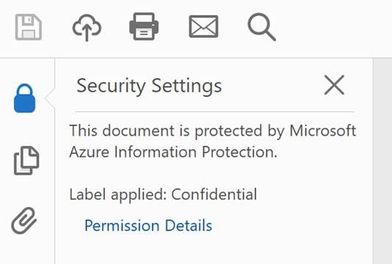
3. Once the protected file is consumed you will be able to see the small “lock” icon on the left pane, this indicate the file is protected.
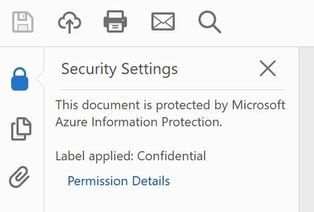
4. Clicking on this Icon will show the protection information on the current consumed PDF.
5. Clicking on “Permission Detail” will open the “Document Properties” window that will show more information on the protection rights.
Viewing the label ribbon when PDF is labeled or labeled and protected
To view the label ribbon in Acrobat reader interface please update or create the following registry entry on your computer
Computer\HKEY_CURRENT_USER\Software\Adobe\Acrobat Reader\DC\MicrosoftAIP
Create a DWORD value name called : bShowDMB with a Hexadecimal value of 1

That will allow the ability to view the label ribbon within the Acrobat interface
Apply automatic labels and protection on PDF files
Now, once your policy and your scanner is configured to properly protect PDFs using the new native Adobe format, all that you need to do is to apply your policy labels to your files. You can do that either manually or automatically. Yes, PDFs (which contain text that is not an image) can be inspected and labeled automatically based on the conditions that are configured in your policy.
You can perform the inspection manually by using the Set-AIPFileClassification cmdlet or by running the Azure Information Protection scanner with -enforce on parameter. The PDF extension will remain the same and will be available in the new format.
Additional Information
- Review Azure Information Protection official documentation
- Join Azure Information Protection Yammer community
Leave a comment with any thoughts or feedback!
You must be a registered user to add a comment. If you've already registered, sign in. Otherwise, register and sign in.
