Turn on suggestions
Auto-suggest helps you quickly narrow down your search results by suggesting possible matches as you type.
- Home
- Azure
- Microsoft Developer Community Blog
- Part 3: Secure your Logic App with Azure Active Directory using Azure API Management
Part 3: Secure your Logic App with Azure Active Directory using Azure API Management
- Subscribe to RSS Feed
- Mark as New
- Mark as Read
- Bookmark
- Subscribe
- Printer Friendly Page
- Report Inappropriate Content
By
Published
Feb 12 2019 03:16 PM
702
Views
Feb 12 2019
03:16 PM
Feb 12 2019
03:16 PM
First published on MSDN on Sep 21, 2017
This is the third part in the series about securing your Logic Apps. In the previous post, I've described how to add several Access restriction policies to your API inside of the API Management Service. In this post, I was going to show how you can leverage the Validate JWT Access Restriction Policy. But when I did some research for this article, I found out that, to proper implement that policy, it is better to first secure your Logic App with Azure Active Directory using API Management. And as this is also a great topic for this series, I've decided to add this as well. So, a little side step is added to this series.
In this series:
For this article, I've used the Logic App which is created in the first post of this series, and the API Management service which is created in the second post .
The first step is to grant permissions inside the Azure Active Directory for your Logic App. The Logic App is added to Azure AD as part as the configuring and publishing process from Visual Studio. To access the Azure Directory Tenant from the Azure Portal, click Azure Active Directory in the left menu, and then App Registrations.

Inside the App Registration window, click on the SecureLogicApp. The Settings page is openend. In there, click on Required Permissions , click Add, and click Select the API.

You can choose between two different APIs in the next screen for authenticating your application with Azure AD. In here select Windows Azure Active Directory.

In the next screen, the application permissions are set. As we only want to authenticate to Azure Active Directory, you only need to select the Read Directory Data permissions. Click Select .

Click Done.
Next, is to register the Azure API Management Service as an application in Azure Active Directory.
Inside the Azure AD tenant, in the Azure Portal, click App Registrations again. Then click on New Application Registrations , in the top menu.

Name the application, I've named mine APIMPortal, as an application pick Web app / api and fill in the API Management Service URL as the sign-on URL and append with '/signin'. In my case this is: https://msdnapimgmt.portal.azure-api.net/signin .
After creation, click the Properties tab of the App. Change the App ID URI to the API Management Service URL and append with '/SecureLogicApp': https://msdnapimgmt.portal.azure-api.net/SecureLogicApp . Click the Save button.
Now, open the API Management service in the Azure Portal and click OAuth 2.0 in the left menu.

Click the Add button.
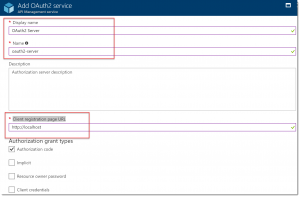
Add an optional name, like OAuth2 Server . In the 'Client registration page URL' box, add a placeholder URL, like http://localhost .
Next add, the Authorization Endpoint URL and the Token Endpoint URL. These values can be retrieved from the App Endpoints Page of the Azure AD application which is registered in the previous step. For this, you have to navigate to the Azure Active Directory tenant in the Azure Portal.


Copy the OAuth 2.0 authorization endpoint and paste it into the Authorization endpoint URL textbox.

Copy the OAuth 2.0 token endpoint and paste it into the Token endpoint URL textbox. Add an additional body parameter to the URL with Name = resource and Value = the App ID of the SecureLogicApp. You can obtain this URL from the Azure Active Directory tenant in the Azure Portal.


Next, specify the Client Credentials . These are the credentials for the resource you want to access, in this case the Azure API Management application which is added in the previous step. In the Azure Portal, this is called the Application ID.

For generating a client secret, click Keys in the left menu, add a description and select 1 year for expiration. Click the save button to save the configuration and display of the key.

Copy the key to the client secret field in the OAuth Service creation page.

Click Create.
Below the client secret is a. authorization code field. Copy the URL, switch back to the Azure AD portal and paste it in the Reply URL field of the API Management App and click Save .

The next step is to configure the permissions for the API Management application. Click Required Permissions and check the box for Read Directory Data.

Click the Add button, then Select An API , and in the search box type the name of the Logic App and select it from the list and click select.

For the permissions, there is only one possibility, Access SecureLogicApp . Check it.

Click the Select button, and after that, the Done button.
Now that the OAuth 2.0 server is configured, you can enable it in the API Management portal. Switch over to the API Management portal in the Azure Portal, click APIs in the left menu and select the SecureLogicApp . Click the Settings tab.

In there, under the Security section, select OAuth 2.0 and below select the OAuth 2.0 server. Save your settings.

Now, it is time to test the App. Something strange happened here, when I click the Test tab, next to the Settings tab at the top of the window, it is not possible to select the Authorization Server . But, when I open the Developer Portal, there is a possibility to select it. So, we have to do it from there.
To open the Developer Portal, click the menu item at the top of the Azure Management Service. Then, click APIs, SecureLogicApp and click the Try it button under manual-invoke.

Scroll down a bit and in the Authorization section, click the OAuth 2 Server dropdown and select Authorization Code .

And now comes the cool part...
After selecting Authorization Code, a window pops up! Wow!! Trust the application, by clicking the Accept button.

(Sorry for the Dutch language...)
After accepting the permissions, you get an access token and you can now test your API.

There will be a lot of production scenarios where you want to secure your Logic App with Azure AD. There are a lot of steps involved and it was kind of a puzzle to implement this in the 'new' Azure Portal, as the documentation I've found regarding this topic, was all aiming at the Classic Portal. I actually did not meet my deadline for this article because of this. But finally, it worked!
The next article will cover the Validate JWT Access Restriction Policy. So, stay tuned!
-Sjoukje
Authored by Sjoukje Zaal
This is the third part in the series about securing your Logic Apps. In the previous post, I've described how to add several Access restriction policies to your API inside of the API Management Service. In this post, I was going to show how you can leverage the Validate JWT Access Restriction Policy. But when I did some research for this article, I found out that, to proper implement that policy, it is better to first secure your Logic App with Azure Active Directory using API Management. And as this is also a great topic for this series, I've decided to add this as well. So, a little side step is added to this series.
In this series:
- Secure access to the trigger
- Secure your Logic App using API Management - Access Restriction Policies
- Secure your Logic App with Azure Active Directory using Azure API Management (this post)
- Secure your Logic App using API Management - Validate JWT Access Restriction Policy
For this article, I've used the Logic App which is created in the first post of this series, and the API Management service which is created in the second post .
Grant Permissions inside Azure Active Directory
The first step is to grant permissions inside the Azure Active Directory for your Logic App. The Logic App is added to Azure AD as part as the configuring and publishing process from Visual Studio. To access the Azure Directory Tenant from the Azure Portal, click Azure Active Directory in the left menu, and then App Registrations.
Inside the App Registration window, click on the SecureLogicApp. The Settings page is openend. In there, click on Required Permissions , click Add, and click Select the API.
You can choose between two different APIs in the next screen for authenticating your application with Azure AD. In here select Windows Azure Active Directory.
In the next screen, the application permissions are set. As we only want to authenticate to Azure Active Directory, you only need to select the Read Directory Data permissions. Click Select .
Click Done.
Register the Azure API Management Service in Azure Active Directory
Next, is to register the Azure API Management Service as an application in Azure Active Directory.
Inside the Azure AD tenant, in the Azure Portal, click App Registrations again. Then click on New Application Registrations , in the top menu.
Name the application, I've named mine APIMPortal, as an application pick Web app / api and fill in the API Management Service URL as the sign-on URL and append with '/signin'. In my case this is: https://msdnapimgmt.portal.azure-api.net/signin .
After creation, click the Properties tab of the App. Change the App ID URI to the API Management Service URL and append with '/SecureLogicApp': https://msdnapimgmt.portal.azure-api.net/SecureLogicApp . Click the Save button.
Configure an API Management OAuth 2.0 Authorization Server
Now, open the API Management service in the Azure Portal and click OAuth 2.0 in the left menu.
Click the Add button.
Add an optional name, like OAuth2 Server . In the 'Client registration page URL' box, add a placeholder URL, like http://localhost .
Next add, the Authorization Endpoint URL and the Token Endpoint URL. These values can be retrieved from the App Endpoints Page of the Azure AD application which is registered in the previous step. For this, you have to navigate to the Azure Active Directory tenant in the Azure Portal.
Copy the OAuth 2.0 authorization endpoint and paste it into the Authorization endpoint URL textbox.
Copy the OAuth 2.0 token endpoint and paste it into the Token endpoint URL textbox. Add an additional body parameter to the URL with Name = resource and Value = the App ID of the SecureLogicApp. You can obtain this URL from the Azure Active Directory tenant in the Azure Portal.
Next, specify the Client Credentials . These are the credentials for the resource you want to access, in this case the Azure API Management application which is added in the previous step. In the Azure Portal, this is called the Application ID.
For generating a client secret, click Keys in the left menu, add a description and select 1 year for expiration. Click the save button to save the configuration and display of the key.
Copy the key to the client secret field in the OAuth Service creation page.
Click Create.
Below the client secret is a. authorization code field. Copy the URL, switch back to the Azure AD portal and paste it in the Reply URL field of the API Management App and click Save .
The next step is to configure the permissions for the API Management application. Click Required Permissions and check the box for Read Directory Data.
Click the Add button, then Select An API , and in the search box type the name of the Logic App and select it from the list and click select.
For the permissions, there is only one possibility, Access SecureLogicApp . Check it.
Click the Select button, and after that, the Done button.
Enable OAuth 2.0 Authorization in the API Management Portal
Now that the OAuth 2.0 server is configured, you can enable it in the API Management portal. Switch over to the API Management portal in the Azure Portal, click APIs in the left menu and select the SecureLogicApp . Click the Settings tab.
In there, under the Security section, select OAuth 2.0 and below select the OAuth 2.0 server. Save your settings.
Now, it is time to test the App. Something strange happened here, when I click the Test tab, next to the Settings tab at the top of the window, it is not possible to select the Authorization Server . But, when I open the Developer Portal, there is a possibility to select it. So, we have to do it from there.
To open the Developer Portal, click the menu item at the top of the Azure Management Service. Then, click APIs, SecureLogicApp and click the Try it button under manual-invoke.
Scroll down a bit and in the Authorization section, click the OAuth 2 Server dropdown and select Authorization Code .
And now comes the cool part...
After selecting Authorization Code, a window pops up! Wow!! Trust the application, by clicking the Accept button.
(Sorry for the Dutch language...)
After accepting the permissions, you get an access token and you can now test your API.
Conclusion
There will be a lot of production scenarios where you want to secure your Logic App with Azure AD. There are a lot of steps involved and it was kind of a puzzle to implement this in the 'new' Azure Portal, as the documentation I've found regarding this topic, was all aiming at the Classic Portal. I actually did not meet my deadline for this article because of this. But finally, it worked!
The next article will cover the Validate JWT Access Restriction Policy. So, stay tuned!
-Sjoukje
0
Likes
You must be a registered user to add a comment. If you've already registered, sign in. Otherwise, register and sign in.