Turn on suggestions
Auto-suggest helps you quickly narrow down your search results by suggesting possible matches as you type.
- Home
- Azure
- Microsoft Developer Community Blog
- DevOps trick – Provision Azure Active Directory Apps in a highly controlled way - step by step
DevOps trick – Provision Azure Active Directory Apps in a highly controlled way - step by step
- Subscribe to RSS Feed
- Mark as New
- Mark as Read
- Bookmark
- Subscribe
- Printer Friendly Page
- Report Inappropriate Content
Published
Feb 12 2019 03:18 PM
1,475
Views
Feb 12 2019
03:18 PM
Feb 12 2019
03:18 PM
First published on MSDN on Oct 09, 2017
Hi,
Recently, I wrote a short blog post on how to provision Azure Active Directory (AAD) Apps in a highly controlled way, so I will not repeat all I said there, but it a nutshell, the idea is to make sure DevOps can automate the creation/update/deletion of AAD Apps entirely from VSTS while not being able to interact with non-DevOps apps.
Here is a step by step process on how to get there. Note that almost everything could be done from VSTS but, often, in organizations, the below tasks will involve different people & even different teams, hence the reason I decouple all the tasks.
As a Global Admin, go to the Azure Portal (I don't use PowerShell yet for sake of simplicity):
You will get prompted to consent, so just accept it!
Now that we have created the VSTS app, we need to grant it access to the subscription via Role Based Access Control (RBAC). To do so, go to the Subscriptions link (bottom of the page in the portal) ==> Access Control ==> Add, you should get a screen similar to this:

You have to select the Role from the dropdown. Here, there is no single answer to which role is the most suitable as it will depends on the enterprise you're working for. In some, DevOps would receive dedicated subscription(s), in others, DevOps will share subscriptions with other stakeholders, so of course, the role you're choosing, heavily depends on this. As you may notice, for the time being, there is nothing for AAD, hence the trick of granting permissions using OAuth's application permissions instead of RBAC.
In the Select textbox, just enter the App Id of the App we've just created and save your changes. Your VSTS app is now granted the Contributor/Owner role to the target subscription.
Now, it's time to create the VSTS endpoint.
Ok, go grab a coffee, it's time to summarize what we've done so far:
We're now ready to start building the thing in VSTS.
In order to gain access to AAD from our PowerShell scripts, we'll have to grab an access token using the VSTS app's credentials. That's where this differs from RBAC. With RBAC, the PowerShell scripts executed by VSTS will automatically use the role you granted them, not with AAD since there is no role as we've seen earlier. So, in order to store the app credentials in a safe place, we'll create a variable group.
Alternatively, if you happen to have on-premises build servers, you could also define environment variables at the host level. This comes with the advantage that you won't need to link the variable group to the release definition later on but the counterpart is that you must think of adding these environment variables whenever you add a new build server. Up to you to decide what's best for you!
So, I assume you're using the online agents and here is how to create the variable group:
Make sure to click on the small lock at the bottom right to hide the value.
So, if you're familiar with VSTS, you might want to build a custom task that you can reuse across release definitions as represented by the below screenshot.

Since building a custom task implies the setup of NPM and TFS CLI, I will not take that path, it'd be too long and I don't want to force you drinking two extra coffees to be able to keep reading this article :). However, if you want to know more about it, you can go to this repo https://github.com/Microsoft/tfs-cli
Whatever option you decide (custom task or not), you'll have to bind it to a release definition. So, I'm going to take some shortcuts as I will directly write a PowerShell script inside of the release definition so that you get the idea. In the real world, you'd rather have a build definition generating some artefacts such as a JSON file describing the Apps to be deployed by a solution and you'd bind this JSON file to your custom VSTS task in a similar way that what you do with ARM templates. But here again, I want to focus on the essence of this article so that it's not too lengthy, I leave the rest to your imagination.
Ok, that said:


[code language="PowerShell"]
Install-Module -Name AzureADPreview -Force -Scope CurrentUser
$body="resource=https%3A%2F%2Fgraph.windows.net&client_id=vstsappclientid&client_secret=$(vstsappsecret)&grant_type=client_credentials"
$resp=Invoke-WebRequest -UseBasicParsing -Uri https://login.microsoftonline.com/yourtenant/oauth2/token -Method POST -Body $body| ConvertFrom-Json
write-host "token is $resp.access_token" Connect-AzureAD -TenantId yourtenant -AadAccessToken $resp.access_token -AccountId user@yourtenant
New-AzureADApplication -DisplayName "testapp" -PublicClient $true [/code]
Some values must be replaced by your own values. Here is what is important from the above snippet:
The access token you get should contain the following role (minimum):

Remember that the access token is valid for 1 hour which should be largely enough for the execution of your PowerShell script but keep that in mind should your script run longer. Of course, you can elaborate a little bit. Imagine that this script takes the following JSON as input:

and if, on top of the above lines of code, you'd add something like this:
[code language="PowerShell"]$apps = Get-Content apps.json |ConvertFrom-Json
foreach($app in $apps.applications)
{
$TargetApp = Get-AzureADApplication -Filter "DisplayName eq '$($app.name)'"
if($TargetApp -eq $null)
{
if(!$app.IsPublicClient)
{
$NewApp = New-AzureADApplication -DisplayName "$($app.name)" -IdentifierUris $app.IdentifierUri
New-AzureADServicePrincipal -AppId $NewApp.AppId
}
else{
$NewApp = New-AzureADApplication -DisplayName "$($app.name)" -PublicClient $true
}
foreach($access in $app.RequiredResourceAccess)
{
$TargetResource = (Get-AzureADServicePrincipal | where {$_.ServicePrincipalNames.Contains($access.resource)})
if($TargetResource -ne $null)
{
$ResourceAccess = [Microsoft.Open.AzureAD.Model.RequiredResourceAccess]@{
ResourceAppId=$TargetResource[0].AppId ;ResourceAccess=@{}}
foreach($perm in $access.perms)
{
$PermAccess = $TargetResource[0].Oauth2Permissions | ? {$_.Value -eq "$($perm.name)"}
$res=[Microsoft.Open.AzureAD.Model.ResourceAccess]@{
Id = $PermAccess.Id ;
Type = "Scope"}
$ResourceAccess.ResourceAccess.Add($res);
}
Set-AzureADApplication -ObjectId $NewApp.ObjectId -RequiredResourceAccess $ResourceAccess
}
else
{
write-host "Resource $($access.resource) not found" -Verbose
}
}
}
else{
write-host "App $($app.name) already exists";
}
}
[/code]
you'd provision your new apps according to what is defined in the JSON file which in this case is an AAD App for a webapi and a native app that is granted access to that API. So, for sure, this script should be reworked (take into account app-only permissions, take into account updates, add error handling, etc...) but I hope you got the point!
If you combine this approach with the recently MSI announcement , you have everything in hands to store your app secrets (there is none in the above example) into Key Vault and let your web apps accessing it safely without having to disclose any information. I'll write a separate article on MSI very soon.
Happy DevOps
Authored by Stephane Eyskens
Hi,
Recently, I wrote a short blog post on how to provision Azure Active Directory (AAD) Apps in a highly controlled way, so I will not repeat all I said there, but it a nutshell, the idea is to make sure DevOps can automate the creation/update/deletion of AAD Apps entirely from VSTS while not being able to interact with non-DevOps apps.
Here is a step by step process on how to get there. Note that almost everything could be done from VSTS but, often, in organizations, the below tasks will involve different people & even different teams, hence the reason I decouple all the tasks.
Creation of the VSTS App in AAD (typically IAM team)
As a Global Admin, go to the Azure Portal (I don't use PowerShell yet for sake of simplicity):
- Go to App Registrations and click Create
-
Enter the following
-
Once the App is created, go to Required Permissions and add the following permission on Azure
Active Directory:
This permission is the one that allows us to work in an isolated way. Thanks to it, we'll be able to create/update/remove our own apps and manage our secrets etc. -
Create an App Secret by navigating to the Keys section of your app
make sure to copy the value (obfuscated in this screenshot) as we will use it later on


- It's now time to consent the app as it is using application permissions that are subject to admin consent. So, still as a Global Admin, open a browser tab and hit the following URL:
You will get prompted to consent, so just accept it!
Granting subscription access to the VSTS app with RBAC (IAM or DevOps team)
Now that we have created the VSTS app, we need to grant it access to the subscription via Role Based Access Control (RBAC). To do so, go to the Subscriptions link (bottom of the page in the portal) ==> Access Control ==> Add, you should get a screen similar to this:
You have to select the Role from the dropdown. Here, there is no single answer to which role is the most suitable as it will depends on the enterprise you're working for. In some, DevOps would receive dedicated subscription(s), in others, DevOps will share subscriptions with other stakeholders, so of course, the role you're choosing, heavily depends on this. As you may notice, for the time being, there is nothing for AAD, hence the trick of granting permissions using OAuth's application permissions instead of RBAC.
In the Select textbox, just enter the App Id of the App we've just created and save your changes. Your VSTS app is now granted the Contributor/Owner role to the target subscription.
Creation of the Service Endpoint is VSTS (DevOps team)
Now, it's time to create the VSTS endpoint.
- In VSTS, just go to the Services page. https://yourvstsworkspace/_admin/_services
-
Click on New Service Endpoint ==> Azure Resource Manager ==> at the bottom, click on the link labelled Use the full version of the endpoint dialog and fullfill the form with your own App Id & Secret retrieved from the previous step:
You can click on the link labelled Verify connection to see if everything is setup correctly.

Coffee Break
Ok, go grab a coffee, it's time to summarize what we've done so far:
- We created a VSTS App in Azure AD and we granted it the role Manage Apps that this app creates or owns. We will use this later from PowerShell scripts running in VSTS when provisioning apps.
- We granted that very same VSTS app a role on the subscription. Note that this has nothing to see with Azure AD but that can be used by some VSTS activities to provision components with ARM for instance.
- We created the service endpoint using the VSTS app's credentials
We're now ready to start building the thing in VSTS.
VSTS - Variable Group
In order to gain access to AAD from our PowerShell scripts, we'll have to grab an access token using the VSTS app's credentials. That's where this differs from RBAC. With RBAC, the PowerShell scripts executed by VSTS will automatically use the role you granted them, not with AAD since there is no role as we've seen earlier. So, in order to store the app credentials in a safe place, we'll create a variable group.
Alternatively, if you happen to have on-premises build servers, you could also define environment variables at the host level. This comes with the advantage that you won't need to link the variable group to the release definition later on but the counterpart is that you must think of adding these environment variables whenever you add a new build server. Up to you to decide what's best for you!
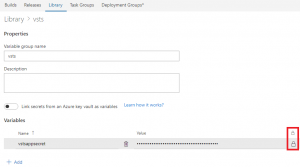
So, I assume you're using the online agents and here is how to create the variable group:
- In VSTS, go to Build and Releases ==> Library ==> Variable groups
- Create a new group and define the VSTS app secret as follows:
Make sure to click on the small lock at the bottom right to hide the value.
VSTS - TFS CLI (optional)
So, if you're familiar with VSTS, you might want to build a custom task that you can reuse across release definitions as represented by the below screenshot.
Since building a custom task implies the setup of NPM and TFS CLI, I will not take that path, it'd be too long and I don't want to force you drinking two extra coffees to be able to keep reading this article :). However, if you want to know more about it, you can go to this repo https://github.com/Microsoft/tfs-cli
VSTS - Release Definition
Whatever option you decide (custom task or not), you'll have to bind it to a release definition. So, I'm going to take some shortcuts as I will directly write a PowerShell script inside of the release definition so that you get the idea. In the real world, you'd rather have a build definition generating some artefacts such as a JSON file describing the Apps to be deployed by a solution and you'd bind this JSON file to your custom VSTS task in a similar way that what you do with ARM templates. But here again, I want to focus on the essence of this article so that it's not too lengthy, I leave the rest to your imagination.
Ok, that said:
- Create a new Release Definition and add an Azure PowerShell script of type inline (shortcut)
- Bind the Variable Group we created earlier to the release definition
- Now, inside of the script editor, you can write the following lines of code:
[code language="PowerShell"]
Install-Module -Name AzureADPreview -Force -Scope CurrentUser
$body="resource=https%3A%2F%2Fgraph.windows.net&client_id=vstsappclientid&client_secret=$(vstsappsecret)&grant_type=client_credentials"
$resp=Invoke-WebRequest -UseBasicParsing -Uri https://login.microsoftonline.com/yourtenant/oauth2/token -Method POST -Body $body| ConvertFrom-Json
write-host "token is $resp.access_token" Connect-AzureAD -TenantId yourtenant -AadAccessToken $resp.access_token -AccountId user@yourtenant
New-AzureADApplication -DisplayName "testapp" -PublicClient $true [/code]
Some values must be replaced by your own values. Here is what is important from the above snippet:
- Installation of AzureADPreview as this module contains the latest AAD cmdlets that are much more powerfull than V1 ones. If you're using your own build agent, you can skip the -Scope parameter but you need to see what are the PowerShell policies in place on your build servers with regards to installing untrusted modules.
- Then we create the HTTP Post body in order to retrieve an access token using the VSTS app's credentials. We get the client secret from the masked Group Variable. (tip: don't try to output the value of that variable with write-host as VSTS will not disclose it since it is masked).
- Then I simply connect to my tenant using the AccessToken
- Then I just create a Native AAD App to test whether it works
The access token you get should contain the following role (minimum):
Remember that the access token is valid for 1 hour which should be largely enough for the execution of your PowerShell script but keep that in mind should your script run longer. Of course, you can elaborate a little bit. Imagine that this script takes the following JSON as input:
and if, on top of the above lines of code, you'd add something like this:
[code language="PowerShell"]$apps = Get-Content apps.json |ConvertFrom-Json
foreach($app in $apps.applications)
{
$TargetApp = Get-AzureADApplication -Filter "DisplayName eq '$($app.name)'"
if($TargetApp -eq $null)
{
if(!$app.IsPublicClient)
{
$NewApp = New-AzureADApplication -DisplayName "$($app.name)" -IdentifierUris $app.IdentifierUri
New-AzureADServicePrincipal -AppId $NewApp.AppId
}
else{
$NewApp = New-AzureADApplication -DisplayName "$($app.name)" -PublicClient $true
}
foreach($access in $app.RequiredResourceAccess)
{
$TargetResource = (Get-AzureADServicePrincipal | where {$_.ServicePrincipalNames.Contains($access.resource)})
if($TargetResource -ne $null)
{
$ResourceAccess = [Microsoft.Open.AzureAD.Model.RequiredResourceAccess]@{
ResourceAppId=$TargetResource[0].AppId ;ResourceAccess=@{}}
foreach($perm in $access.perms)
{
$PermAccess = $TargetResource[0].Oauth2Permissions | ? {$_.Value -eq "$($perm.name)"}
$res=[Microsoft.Open.AzureAD.Model.ResourceAccess]@{
Id = $PermAccess.Id ;
Type = "Scope"}
$ResourceAccess.ResourceAccess.Add($res);
}
Set-AzureADApplication -ObjectId $NewApp.ObjectId -RequiredResourceAccess $ResourceAccess
}
else
{
write-host "Resource $($access.resource) not found" -Verbose
}
}
}
else{
write-host "App $($app.name) already exists";
}
}
[/code]
you'd provision your new apps according to what is defined in the JSON file which in this case is an AAD App for a webapi and a native app that is granted access to that API. So, for sure, this script should be reworked (take into account app-only permissions, take into account updates, add error handling, etc...) but I hope you got the point!
If you combine this approach with the recently MSI announcement , you have everything in hands to store your app secrets (there is none in the above example) into Key Vault and let your web apps accessing it safely without having to disclose any information. I'll write a separate article on MSI very soon.
Happy DevOps
You must be a registered user to add a comment. If you've already registered, sign in. Otherwise, register and sign in.