Turn on suggestions
Auto-suggest helps you quickly narrow down your search results by suggesting possible matches as you type.
- Home
- Windows Server
- Ask the Directory Services Team
- Reading LDAP SSL Network Traffic with NetMon 3.4 and NMDecrypt
Reading LDAP SSL Network Traffic with NetMon 3.4 and NMDecrypt
- Subscribe to RSS Feed
- Mark as New
- Mark as Read
- Bookmark
- Subscribe
- Printer Friendly Page
- Report Inappropriate Content
By
Published
Apr 04 2019 04:50 PM
9,214
Views
Apr 04 2019
04:50 PM
Apr 04 2019
04:50 PM
First published on TechNet on Nov 17, 2010
Hi folks, Ned here again. Today I show you how to decrypt LDAP traffic protected by SSL by using Network Monitor and its handy add-on NetMon Decryption Expert . This is useful when you need to see what an application is asking your domain controllers, especially when that app has lousy logging. Since the traffic is all encrypted on the wire, ordinary network captures are useless.
I’m not going to explain LDAP and SSL as we already have some great articles by James, Mike, Rob, Randy, and Dave here:
This is also possible to do in WireShark but naturally, you’re on your own there. Let them write some darned blog posts for once.
I like screenshots!
First download your tools:
Install these on the computer that’s talking LDAP; this could be the DC or a member server or a client or whatever. If you are troubleshooting a non-Windows OS then the DC is your only choice, obviously.
Note: NMDecrypt has its own support channels with a discussion group and issue tracker . They also have the people you can contact . They are probably not AskDS readers so using our Comments section is not the best use of your time.
It goes without saying that this is all being done in your test lab, mmmmmkay. Don’t have a test lab? Come back later when you do.
Now everything is readable (the filter removes a lot of the chaff created by the expert to render the translated frames). That previous capture was just a series of “Encrypted over SSL” message. In my example now, I can see all this attribute data being returned for the Users container and Alice Scott when I was querying with LDP. Sweet!
Naturally, everything I talked about today works for SSL-encrypted traffic in general. HTTPS web traffic can be analyzed with the same technique, for instance.
Don’t forget to delete that exported certificate when you’re done!
If you are allergic to network captures and the LDAP is coming from a Windows Vista or later computer, you can use ETW to leverage client tracing to see traffic before decryption or after decryption. Rather than reinvent those steps I recommend you examine these excellent write-ups:
Until next time.
- Ned “sizzle” Pyle
Hi folks, Ned here again. Today I show you how to decrypt LDAP traffic protected by SSL by using Network Monitor and its handy add-on NetMon Decryption Expert . This is useful when you need to see what an application is asking your domain controllers, especially when that app has lousy logging. Since the traffic is all encrypted on the wire, ordinary network captures are useless.
I’m not going to explain LDAP and SSL as we already have some great articles by James, Mike, Rob, Randy, and Dave here:
http://blogs.technet.com/b/askds/archive/tags/ldap/
This is also possible to do in WireShark but naturally, you’re on your own there. Let them write some darned blog posts for once.
I like screenshots!
What you need
First download your tools:
Install these on the computer that’s talking LDAP; this could be the DC or a member server or a client or whatever. If you are troubleshooting a non-Windows OS then the DC is your only choice, obviously.
Note: NMDecrypt has its own support channels with a discussion group and issue tracker . They also have the people you can contact . They are probably not AskDS readers so using our Comments section is not the best use of your time.
Getting the data
It goes without saying that this is all being done in your test lab, mmmmmkay. Don’t have a test lab? Come back later when you do.
1. Fire up NetMon, pick your network(s), and start capturing without filters.
2. Make the application start sending encrypted LDAP traffic. Naturally, you won’t be able to easily capture an LDAP application running on a DC itself, so use at least two computers to test. In my examples, I use LDP.EXE because it’s the closest thing to a “pure” LDAP client in Windows; PowerShell, ADSIEDIT, and other tools usually go through various levels of abstraction. LDP also obeys orders unlike many third party apps. You can download LDP with the Win2003 Support Tools . It’s included in Win2008/2008 R2/Vista RSAT/7 RSAT.
So in my example, I start up LDP.EXE and connect with port 636 and SSL set. Then I bind with my credentials and navigate (i.e. LDAP query) through a few levels until I return data for a user named Alice Scott.


In my example, this returned lots of unreadable data:

3. Filter your capture display by the IP address of the computer sending LDAP traffic and by “TLS”. This allows us to see the SSL handshake process, including the “Server Hello”:

The “Server Hello” is the response frame that tells the application which certificate is being used by LDAP to create the SSL-encrypted session. Examine the frame’s “Cert” field, and then drill down to the “SerialNumber” and “IdCeSubjectAltName” fields. These give important certificate uniqueness info that we can use later to identify which certificate was being used on the DC. Below I have an example – you will have completely different values obviously:


4. Now decrypt the traffic and this requires an exported PFX file copy of the certificate that was used on the DC to encrypt this traffic. Things can get gummy here so pay close attention.
A. Start MMC.EXE on that DC and add the Certificates snap-in for the Computer store:
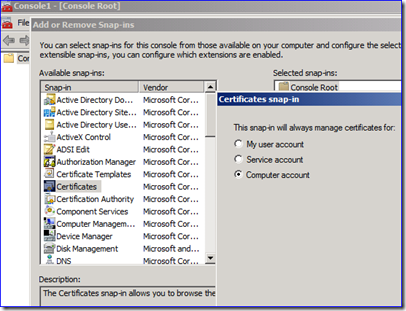
B. Examine the certificates. There may be a bunch or only one. You need to open each certificate and look at the details tab for the “Serial Number” and “Subject Alternative Name” fields. The certificate that matches your network capture data is the one you used.


C. Now right-click that certificate and select All Tasks then Export . This is where things get sticky – if the certificate has “yes, export the private key” grayed out, you cannot proceed. So the screenshot below is bad news:

When you decrypt the network capture later you will need a server authentication certificate PFX file that includes the private key info. So if the certificate being used doesn’t allow this, you will need to issue a new certificate that does allow private key export.
To fix this you change whatever server authentication certificate template that is being used for issuing to your DC to allow private key exports. In my example I have altered the built-in Domain Controller Authentication template to do this – I am doing this out of convenience in a lab, not need . You may decide to do something totally different. For instance, creating a special certificate for this troubleshooting is a good idea; only that DC could be allowed to enroll to minimize your risk, based on the template security. This can all be done through the Certificate Templates snap-in in an MMC console on your certificate authority.

If you are using certs issues by a third party that you have no control over, stop here: you cannot decrypt these captures. And you paid for that privilege… :-/
Having ironed all that out, request or auto-enroll that certificate to this DC so that it can be used for decryption. The old server authentication certificate will need to be deleted or it will simply keep being used. If it is being used for other things or if its deletion might break something, you need to stop now and take stock of this entire exercise. But since you’re in a test lab ( right?!?! ) it’s probably fine to zap it.
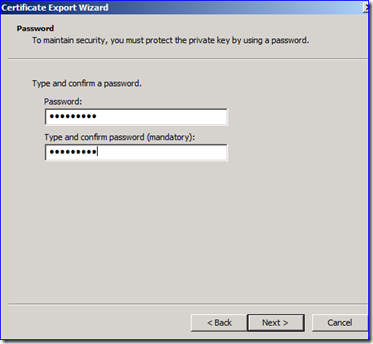
D. If you had to get a new certificate, you need to repeat all the steps leading up to here and confirm that your new certificate was used. At this point you can now export the certificate with the private key in a PFX format. Make sure you put the file somewhere safe and that it is named appropriately. You must set a password and it should be a good one.


5. Make sure you have the “All Traffic” node selected in the Network Connections pane – not “My Traffic” or any conversations. Now you decrypt the traffic with NMDecrypt . Click:
Experts –> NMDecrypt –> Run Expert.

6. NMDecrypt makes you save a copy of your capture. Select your saved PFX file by browsing the “server Certificate Path” and enter the password. Specify an output capture file in the “decrypted file path” field. You don’t have to specify a log unless you get errors with decryption.

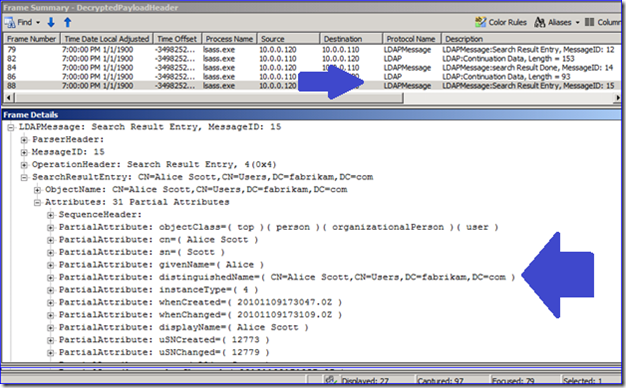
7. Click “Start” and the new CAP file will be created with all the SSL/TLS traffic decrypted and readable. This capture stands on its own so you can give it to others without the need to provide any certificates. To see the good stuff, use the following display filter in the capture:
DecryptedPayloadHeader

Now everything is readable (the filter removes a lot of the chaff created by the expert to render the translated frames). That previous capture was just a series of “Encrypted over SSL” message. In my example now, I can see all this attribute data being returned for the Users container and Alice Scott when I was querying with LDP. Sweet!

Naturally, everything I talked about today works for SSL-encrypted traffic in general. HTTPS web traffic can be analyzed with the same technique, for instance.
Don’t forget to delete that exported certificate when you’re done!
Common Mistakes
- Error “ SSL Frames are not found in the current capture file ”
This means that you did not select the “All Traffic” node when you started the expert. It must be selected.

- Error “ Invalid Key Exchange data or Invalid Certificate ”
This means you exported the wrong certificate and tried to decrypt with it. Go back to step 3.
Important Side Note
If you are allergic to network captures and the LDAP is coming from a Windows Vista or later computer, you can use ETW to leverage client tracing to see traffic before decryption or after decryption. Rather than reinvent those steps I recommend you examine these excellent write-ups:
- LDAP client tracing... (Spat’s blog)
- Tracing LDAP calls with Powershell (BSonPosh‘s blog)
Until next time.
- Ned “sizzle” Pyle
0
Likes
You must be a registered user to add a comment. If you've already registered, sign in. Otherwise, register and sign in.