Good morning world, Paul Fragale here to bring you the latest trend in smart card logon requests. Some people have been reading on our TechNet pages, such as Smart Card Authentication Changes , about the ability to allow users to have one smart card, one certificate on that smart card, and map to multiple users. This one certificate will allow them to authenticate both to a user account and to an account with special privileges (like an administrator). Why would they want to do this, you ask? They do not want to give administrator permissions to the user accounts but still need to be able to track who made the changes. This will effectively reduce the number of administrator accounts on the machine or environment.
However, this comes with a cost to administrative overhead. To set this up correctly, some steps must be done manually by an administrator that has access to the Active Directory Users and Computers Snap-in.
Also Windows Server 2008 DCs are required for the smartcard authentication. Smart card logon authentication requirements for Windows Server 2003 DCs have a strict User Principal Name (UPN) requirement. That means that a UPN has to be provided in the certificate for proper authentication. This restriction prevents the ability to log on using the name mapping feature that is required for this scenario.
The rest of this blog post contains the step by step for setting up this environment.
To enable this ability the following things will have to be done:
- Create Smartcard user Certificate Template that does not include the UPN as an alternate subject name.
- Enable the Group Policy for "User Name Hint"
- Create smart card certificate for a user using the new template.
- Export the user smart card certificate.
- Enable Name Mapping to both accounts.
Environment Required:
- Clients: Windows Vista or later
- Domain Controllers: Windows Server 2008 or later (Any Domain or Forest Functional level.)
- Certification Authority: Windows Server 2003, Windows Server 2008 or later Enterprise Issuing CA (Smartcard User or Smartcard Logon template is required)
Note: The CA must be running on an Enterprise Edition of the Operating System to meet this requirement.
Create Smart card Certificate Template
Creating a smart card template for this scenario is 90% the same as creating a duplicate template for any other function. The one exception is in step 7 of the procedure. The certificates issued must not reference a UPN for any mapped user or the authentication for the other mapped accounts will fail.
On the Certificate Authority perform the following tasks:
1. Open certsrv.msc .
2. Expand the name of the CA.
3. Right click Certificate Templates and choose Manage .
4. Right click the Smartcard User or Smartcard Logon template and choose Duplicate Template:

Note: If you are using a Windows 2008 CA you will be prompted to select the minimum CA for your new template. You can select either template option.
5. Provide a name for the smartcard template and set the validity period that you desire for the environment .
6. On the Subject tab, deselect User Principal Name (UPN):

7. On Issuance Requirements tab, do the following
a. Select The number of authorized signatures: and set it to 1 .
b. Under Policy type required in signature , select Application Policy .
c. Under Application Policy select Certificate request Agent:

8. Click Apply and then OK .
9. Close Certificate Templates console.
10. In the Certificate Authority snap-in, right click Certificate Templates folder and select New.
11. Select "Certificate Template to Issue”:

12. Select the new template and click Ok:

13. Restart Certificate Services.
Note: It is important to restart the CA services to ensure the CA is processing all the latest information.
Enable Group Policy for "User Name Hint"
Now that we have created and added the smart card certificate template, we need to configure the clients to show the Username Hint upon logon.
To enable the Allow user name hint Group Policy setting, follow these steps on a
Domain controller:
1. Open the Group Policy Management Console.
2. Right click the domain name and choose Create a GPO in this domain, and Link it here….
3. Name it something like "Smart card Auth Policy ".
4. Right click the policy and choose Edit :

5. Expand Computer Configuration >Policies > Administrative Templates > Windows Components , and then expand Smart Card .
6. Double-click Allow user name hint" :

7. Click Enabled and then click OK:

8. Run Gpupdate /force to update group policies on the workstations with smart card readers.
Create smart card certificate for a user using the new template
1. Log on to system that has a smart card reader with a user that has an Enrollment Agent certificate.
2. Start certmgr.msc
3. Expand Persona l, and then right-click on the Certificates folder.
4. Select All Tasks > Advanced Operations > Enroll on behalf of from the context menu:

5. Click Next .
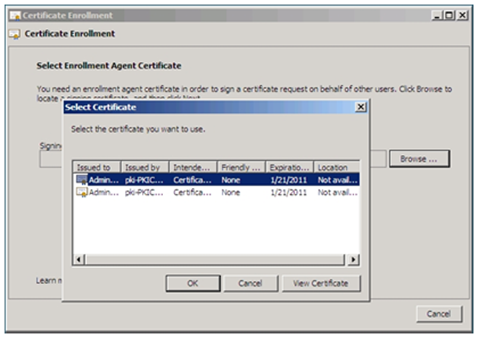
6. When prompted, browse to the signing certificate for the enrollment agent. Click Next :
7. Select the certificate template you created, and click Next :

8. Browse and select the user name (This will be the subject of the smartcard certificate.) Click Enroll :

Export the user smart card certificate
Ok, so we’ve got a certificate on a smart card; now we have to associate it with the accounts we want the user to be able to use. We first need to export the certificate. You can do this from the client, Active Directory Users and Computers or the Certificate Authority that issued the cert. One way of accomplishing this can be found at the following TechNet article: http://technet.microsoft.com/en-us/library/cc779668(WS.10).aspx
Enable Name Mapping to both accounts
Now that we have the certificate file we can map the certificate to our user’s accounts.
1. Open Active Directory Users and Computers.
2. Click View and select Advanced Features:

3. Navigate to the user account.
4. Right click the user account and choose Name Mappings :

5. Click Add and select the certificate file that was exported. Click Open :

6. Click Ok .
7. Click Ok.

8. Repeat steps 3-7 to add the same certificate file to each additional account that that the user logs on with.
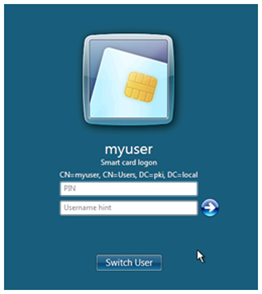
That is all there is to it. Now when that user inserts his smart card, they will have a Username Hints window. The user simply types the name of the account he wants to logon as and the PIN for his smartcard. The added benefit is that the user does not need to know two different passwords. They simply have to know the pin for the smartcard.
Until next time,
- Paul ‘One Cert to Rule Them All’ Fragale