Turn on suggestions
Auto-suggest helps you quickly narrow down your search results by suggesting possible matches as you type.
- Home
- Microsoft 365
- Modern Work App Consult Blog
- Packaging a UWP application with a Win32 component in the right way
Packaging a UWP application with a Win32 component in the right way
- Subscribe to RSS Feed
- Mark as New
- Mark as Read
- Bookmark
- Subscribe
- Printer Friendly Page
- Report Inappropriate Content
Published
Jan 15 2019 02:56 PM
1,826
Views
Jan 15 2019
02:56 PM
Jan 15 2019
02:56 PM
First published on MSDN on Jul 29, 2018
If you follow this blog, you'll remember that a while ago I've talked about the Desktop Bridge phase called Migrate . This feature of the Desktop Bridge allows to create a full UWP application that, only when it's running on a desktop machine, is able to invoke a Win32 process and to communicate with it using App Services. This feature can be very helpful when you want to move your application to the Universal Windows Platform, in order to get for free many features like a better security model, first class touch and inking support, etc. but, at the same time, you have some Win32 code you want to reuse. It can be because you're leveraging some features not supported yet by the Universal Windows Platform or because you have some very complex logic that will take a lot of time to be rewritten.
The process to achieve this goal wasn't very complex, but it wasn't really straightforward neither. You needed to deploy the UWP app at least once and then setup a post build task to copy the output of the Win32 project inside the deployment folder.
Thanks to the Windows Application Packaging Project, instead, now the procedure is much simpler to achieve. Additionally, using this approach is now a requirement. If you try to publish on the Store a package prepared in the old way, it will be rejected with the following error:
Let's see the right steps to follow.
If you are building an application in the Migrate stage, your Visual Studio solution should look like this:
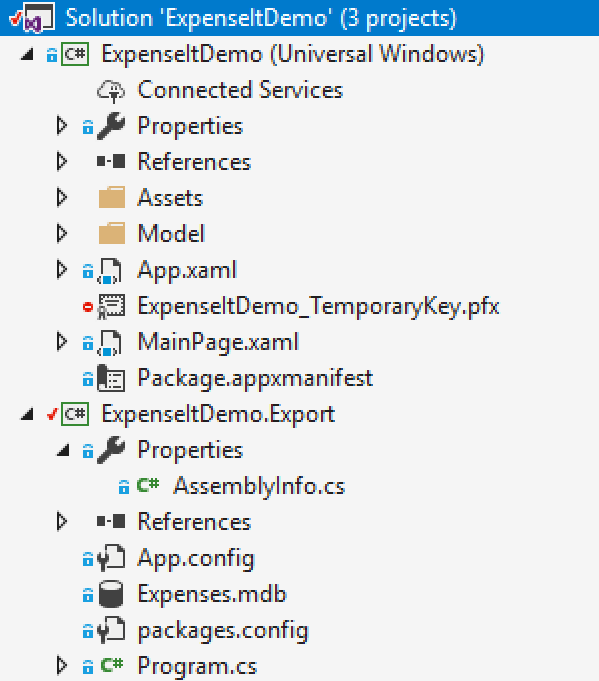
The first project, called ExpenseItDemo is the Universal Windows Platform application. The second one, called ExpenseItDemo.Export , instead, is the Win32 application. In this case, it's a command line application based on the .NET Framework.
In this sample application, the Win32 application is used to perform some queries against an Access database, since this kind of technology isn't supported by the Universal Windows Platform. As such, the UWP app invokes the Win32 application when needed, which retrieves the data from the database and then sends it back to the UWP app using an App Service as a communication channel. I won't go into the details on how this architecture is implemented, since it's outside the scope of this post. Additionally, this topic has already been covered in a previous post .
Let's focus on how to create a package that can be published on the Store or sideloaded on another machine.
First let's add a Windows Application Packaging Project. Right click on the solution, choose Add -> New project and select Windows Application Packaging Project under Visual C# -> Universal Windows. Give it a meaningful name (I've called mine ExpenseItDemo.Package ) and press OK.
Now right click on the project and choose Add reference . From the menu choose both the UWP and the Win32 project and press Add . This is how the project should look like:

Right click on the UWP project in the Applications list and choose Set as entry point .
That's it! However, if you try to run the application, you might notice some unexpected behaviors, like the Win32 process not launching correctly.
The reason is that, once you have setup this configuration, the main entry point of the package becomes the Windows Application Packaging Project. As such, the main manifest which describes the application isn't anymore the one included in the UWP project, but in the Packaging project one.
Let's see the most common changes that you will likely have to make.
If you are building an application in the Migrate stage, it's very likely that your UWP application exposes an App Service. This is the best technique to establish a communication channel so that the UWP app and the Win32 app can exchange data together.
As such, if you open the manifest file of your UWP application and you move to the Declarations tab, it's likely that you'll see an entry similar to the following one:

You need to remove this entry and recreate it inside the manifest of the Windows Application Packaging Project. As such, open the Package.appxmanifest file inside the Packaging Project and, from the Supported Declarations drodown, add a new App Service entry. Make sure to set the Name field with the same value you set in the other manifest.
When you have an application in the Migrate stage you need two things in order to launch the Win32 process:
For the same reason we have explained about App Services, also in this case we need to move the special extension from the manifest of the UWP app to the manifest of the Windows Application Packaging Project. However, since this special extension isn't supported by the visual editor, you need to manually add it.
Right click on the Package.appxmanifest of the UWP application and choose View code . In the Extensions section you will find a entry like the following one:
Also in this case you need to move this declaration from the UWP manifest to the Windows Application Packaging Project's one. Just right click on it, choose View code and copy & paste the extension.
You will need to make two additional changes:
Now you can test the work by setting the Windows Application Packaging Project as startup and by pressing F5. If you have done everything properly, the UWP application will start and you'll be able to start and exchange data with the Win32 process like you were doing before.
However, if you open the Start menu, you may notice that Visual Studio has deployed two applications:

This is happening because, by default, a UWP project in Visual Studio is set to be deployed when you launch a debugging session. As such, when you press F5, Visual Studio will deploy both the original UWP app and the Windows Application Packaging Project.
In order to solve this issue, choose Build -> Configuration Manager and uncheck the Deploy for the UWP app:

Only the Windows Application Packaging Projet should have the Deploy checkbox enabled. (Thanks to Ricardo Minguez Pablos for the tip!)
Remember that this technique is useful to avoid confusion only when you're testing your application. If you create a package for the store or for sideloading, the problem won't happen because Windows will deploy only the application declared as entry point in the manifest.
That's all. Now you can just right click on the Windows Application Packaging Project, choose Store -> Create App Packages and follow the wizard to create a package that you can upload on the Store or distribute manually. Just remember that, if you opt-in for Store distribution, the certification may take a bit longer than with a regular UWP app, since you're still using the restricted runFullTrust capability, which requires a specific validation.
Happy packaging!
If you follow this blog, you'll remember that a while ago I've talked about the Desktop Bridge phase called Migrate . This feature of the Desktop Bridge allows to create a full UWP application that, only when it's running on a desktop machine, is able to invoke a Win32 process and to communicate with it using App Services. This feature can be very helpful when you want to move your application to the Universal Windows Platform, in order to get for free many features like a better security model, first class touch and inking support, etc. but, at the same time, you have some Win32 code you want to reuse. It can be because you're leveraging some features not supported yet by the Universal Windows Platform or because you have some very complex logic that will take a lot of time to be rewritten.
The process to achieve this goal wasn't very complex, but it wasn't really straightforward neither. You needed to deploy the UWP app at least once and then setup a post build task to copy the output of the Win32 project inside the deployment folder.
Thanks to the Windows Application Packaging Project, instead, now the procedure is much simpler to achieve. Additionally, using this approach is now a requirement. If you try to publish on the Store a package prepared in the old way, it will be rejected with the following error:
Package acceptance validation error: Apps converted with the Desktop Bridge and that require the .NET Native framework must be pre-compiled by the .NET Native tool chain
Let's see the right steps to follow.
Adding the Windows Application Packaging Project
If you are building an application in the Migrate stage, your Visual Studio solution should look like this:
The first project, called ExpenseItDemo is the Universal Windows Platform application. The second one, called ExpenseItDemo.Export , instead, is the Win32 application. In this case, it's a command line application based on the .NET Framework.
In this sample application, the Win32 application is used to perform some queries against an Access database, since this kind of technology isn't supported by the Universal Windows Platform. As such, the UWP app invokes the Win32 application when needed, which retrieves the data from the database and then sends it back to the UWP app using an App Service as a communication channel. I won't go into the details on how this architecture is implemented, since it's outside the scope of this post. Additionally, this topic has already been covered in a previous post .
Let's focus on how to create a package that can be published on the Store or sideloaded on another machine.
First let's add a Windows Application Packaging Project. Right click on the solution, choose Add -> New project and select Windows Application Packaging Project under Visual C# -> Universal Windows. Give it a meaningful name (I've called mine ExpenseItDemo.Package ) and press OK.
Now right click on the project and choose Add reference . From the menu choose both the UWP and the Win32 project and press Add . This is how the project should look like:
Right click on the UWP project in the Applications list and choose Set as entry point .
That's it! However, if you try to run the application, you might notice some unexpected behaviors, like the Win32 process not launching correctly.
The reason is that, once you have setup this configuration, the main entry point of the package becomes the Windows Application Packaging Project. As such, the main manifest which describes the application isn't anymore the one included in the UWP project, but in the Packaging project one.
Let's see the most common changes that you will likely have to make.
Setting the App Service
If you are building an application in the Migrate stage, it's very likely that your UWP application exposes an App Service. This is the best technique to establish a communication channel so that the UWP app and the Win32 app can exchange data together.
As such, if you open the manifest file of your UWP application and you move to the Declarations tab, it's likely that you'll see an entry similar to the following one:
You need to remove this entry and recreate it inside the manifest of the Windows Application Packaging Project. As such, open the Package.appxmanifest file inside the Packaging Project and, from the Supported Declarations drodown, add a new App Service entry. Make sure to set the Name field with the same value you set in the other manifest.
Setting the entry point of the Win32 process
When you have an application in the Migrate stage you need two things in order to launch the Win32 process:
- In code, you need to invoke a special API which is included in the Windows Desktop Extension for UWP called FullTrustProcessLauncher
- In the manifest, you need to add a special extension to declare which is the Win32 executable you want to launch when the API is called
For the same reason we have explained about App Services, also in this case we need to move the special extension from the manifest of the UWP app to the manifest of the Windows Application Packaging Project. However, since this special extension isn't supported by the visual editor, you need to manually add it.
Right click on the Package.appxmanifest of the UWP application and choose View code . In the Extensions section you will find a entry like the following one:
<desktop:Extension Category="windows.fullTrustProcess" Executable="ExpenseItDemo.Export.exe" />
Also in this case you need to move this declaration from the UWP manifest to the Windows Application Packaging Project's one. Just right click on it, choose View code and copy & paste the extension.
You will need to make two additional changes:
- You need to declare the desktop XML namespace in the Package root:
   <Package


   xmlns="http://schemas.microsoft.com/appx/manifest/foundation/windows10"


   xmlns:mp="http://schemas.microsoft.com/appx/2014/phone/manifest"


   xmlns:uap="http://schemas.microsoft.com/appx/manifest/uap/windows10"


   xmlns:rescap="http://schemas.microsoft.com/appx/manifest/foundation/windows10/restrictedcapabilities"


   xmlns:desktop="http://schemas.microsoft.com/appx/manifest/desktop/windows10"


   IgnorableNamespaces="uap mp rescap desktop">
- It's likely that, in the previous version of the package, the Win32 was placed in the root along with the UWP application. When you package an application with the Windows Application Packaging Project, instead, the Win32 executable and libraries are copied in a subfolder with the same name of the application. As such, you need to adjust the Executable attribute of the extension to reflect this change. For example, in my case the Win32 application is called ExpenseItDemo.Export , so I needed to adjust the executable path like this:
<desktop:Extension Category="windows.fullTrustProcess" Executable="ExpenseItDemo.Export\ExpenseItDemo.Export.exe" />
One more thing
Now you can test the work by setting the Windows Application Packaging Project as startup and by pressing F5. If you have done everything properly, the UWP application will start and you'll be able to start and exchange data with the Win32 process like you were doing before.
However, if you open the Start menu, you may notice that Visual Studio has deployed two applications:
- The original UWP one
- The packaged version created with the Windows Application Packaging Project
This is happening because, by default, a UWP project in Visual Studio is set to be deployed when you launch a debugging session. As such, when you press F5, Visual Studio will deploy both the original UWP app and the Windows Application Packaging Project.
In order to solve this issue, choose Build -> Configuration Manager and uncheck the Deploy for the UWP app:
Only the Windows Application Packaging Projet should have the Deploy checkbox enabled. (Thanks to Ricardo Minguez Pablos for the tip!)
Remember that this technique is useful to avoid confusion only when you're testing your application. If you create a package for the store or for sideloading, the problem won't happen because Windows will deploy only the application declared as entry point in the manifest.
Wrapping up
That's all. Now you can just right click on the Windows Application Packaging Project, choose Store -> Create App Packages and follow the wizard to create a package that you can upload on the Store or distribute manually. Just remember that, if you opt-in for Store distribution, the certification may take a bit longer than with a regular UWP app, since you're still using the restricted runFullTrust capability, which requires a specific validation.
Happy packaging!
0
Likes
You must be a registered user to add a comment. If you've already registered, sign in. Otherwise, register and sign in.
Labels