Turn on suggestions
Auto-suggest helps you quickly narrow down your search results by suggesting possible matches as you type.
- Home
- Windows
- Windows Blog Archive
- Printing to on-prem printers from Azure AD-joined devices
Printing to on-prem printers from Azure AD-joined devices
- Subscribe to RSS Feed
- Mark as New
- Mark as Read
- Bookmark
- Subscribe
- Printer Friendly Page
- Report Inappropriate Content
Published
Jun 19 2019 05:37 AM
85.5K
Views
Jun 19 2019
05:37 AM
Jun 19 2019
05:37 AM
First published on TechNet on Apr 04, 2018
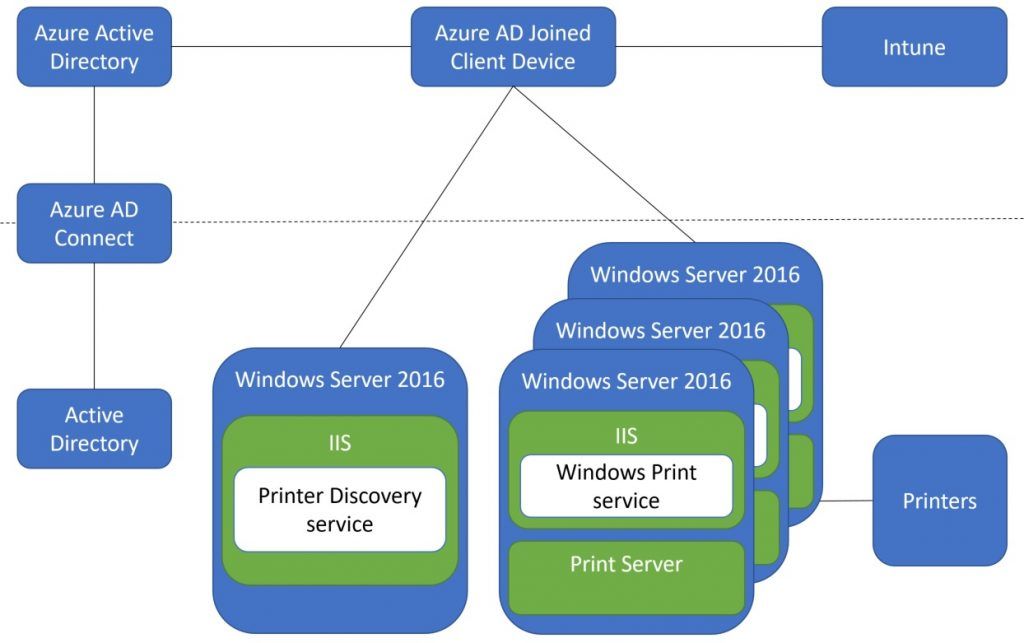
Since most of us have been using Active Directory for ages, you probably also take for granted the process for printing to your on-premises printers: They are published to Active Directory, you can search for them, and you can easily connect to them. But what happens when you join your devices to Azure AD instead? As discussed in https://blogs.technet.microsoft.com/mniehaus/2018/02/21/afraid-of-windows-10-with-azure-ad-join-... , you can certainly connect to a Windows Server (AD-joined) hosted print queue if you know its UNC path (authentication works via a Kerberos ticket). But how do you discover that printer in the first place? The low-tech approach is to label the printer with its UNC path, so you just walk up to it, read the UNC, and type it in.
Fortunately, we’ve released a higher-tech approach that solves two different problems:
This solution is called Hybrid Cloud Printing because it connects those Azure AD-joined devices to your existing Active Directory-joined Windows Server printing infrastructure. That was announced back in February via the Enterprise Mobility blog . As you can probably guess from the diagram included in that blog, there are a few components in the solution:
First, some requirements:
Then, you need to set it up. To make the connection from internet-facing Azure AD-joined devices to those on-prem Windows Server 2016-hosted services, Azure Application Proxy is used. This makes an outbound connection to Azure, which is used to then allow inbound traffic to the published services. There are two ways this can be set up:
Typically the first option is recommended, to support things like conditional access and multi-factor authentication. I recommend sticking with that that recommendation, following the “five” steps at https://docs.microsoft.com/en-us/windows-server/administration/hybrid-cloud-print/hybrid-cloud-p... :
Since each of those steps includes multiple sub-steps, it’s really more like a 20-25 step process. And initially I walked through all of those steps – and it didn’t work at all. Fortunately, one of the ConfigMgr/Intune MVPs, Sandy Yinghua, has a blog that documents how she did it . I used those steps to verify my configuration and with that was able to get everything working. I would note that I did things a little differently:
But otherwise, my setup matches. Here are the device configuration settings I configured in Intune:
What those look like in Intune:

And here are a few commands that I used as I was experimenting with the printer publishing process:
Publish a test printer
Publish-CloudPrinter -Printer EcpPrintTest -Manufacturer Microsoft -Model FilePrinterEcp -OrgLocation '{"attrs": [{"category":"country", "vs":"USA", "depth":0}, {"category":"organization", "vs":"AutoPilotRocks", "depth":1}, {"category":"site", "vs":"Redmond", "depth":2}, {"category":"building", "vs":"109", "depth":3}]}’ -Sddl "O:BAG:SYD:(A;;LCSWSDRCWDWO;;;S-1-5-21-501278528-1731656756-2472999879-1114)(A;OIIO;RPWPSDRCWDWO;;;S-1-5-21-501278528-1731656756-2472999879-1114)(A;OIIO;GA;;;CO)(A;OIIO;GA;;;AC)(A;;SWRC;;;WD)(A;CIIO;GX;;;WD)(A;;SWRC;;;AC)(A;CIIO;GX;;;AC)(A;;LCSWDTSDRCWDWO;;;BA)(A;OICIIO;GA;;;BA)" -DiscoveryEndpoint https://clouddiscoveryproxy-autopilotrocks.msappproxy.net/mcs -PrintServerEndpoint https://cloudprintproxy-autopilotrocks.msappproxy.net/ecp -AzureClientId 23772c3e-1a3b-4f28-86f9-ec614a53a776 -AzureTenantGuid 0b458c6e-97ce-4c7e-bc5e-1d29552989a5
Query published printers
Publish-CloudPrinter -Query -DiscoveryEndpoint https://clouddiscoveryproxy-autopilotrocks.msappproxy.net/mcs -AzureClientId 23772c3e-1a3b-4f28-86f9-ec614a53a776 -AzureTenantGuid 0b458c6e-97ce-4c7e-bc5e-1d29552989a5
Unpublish a printer
Publish-CloudPrinter -Unpublish -Printer EcpPrintTest -DiscoveryEndpoint https://clouddiscoveryproxy-autopilotrocks.msappproxy.net/mcs -PrintServerEndpoint https://cloudprintproxy-autopilotrocks.msappproxy.net/ecp -AzureClientId 23772c3e-1a3b-4f28-86f9-ec614a53a776 -AzureTenantGuid 0b458c6e-97ce-4c7e-bc5e-1d29552989a5
Let’s look at the client experience then. The first sign of something different is on the “Printers & scanners” page in Settings. There is a new “Search for cloud printers” link:

When you click that, you can then browse from a list of available locations, presented in a hierarchy that you can define:

And you can search for printers by keyword (or just leave the keyword blank to get all printers in that location):

And finally, select the printer and click “Add device” to add it:

Finally, I have a printer, with a slightly different icon to show that it’s a cloud printer:

And printing works, from any internet-connected location (thanks to the Azure Application Proxy). The particular “printer” in this case is useful for testing, as it doesn’t waste any paper: It just drops an XPS file into a folder on the server.

Check out the Ignite 2017 video at https://www.youtube.com/watch?v=Bvt1L--lqE4 for more information. And with any luck, this will be integrated into Windows Server 2019 and easier to set up.
Since most of us have been using Active Directory for ages, you probably also take for granted the process for printing to your on-premises printers: They are published to Active Directory, you can search for them, and you can easily connect to them. But what happens when you join your devices to Azure AD instead? As discussed in https://blogs.technet.microsoft.com/mniehaus/2018/02/21/afraid-of-windows-10-with-azure-ad-join-... , you can certainly connect to a Windows Server (AD-joined) hosted print queue if you know its UNC path (authentication works via a Kerberos ticket). But how do you discover that printer in the first place? The low-tech approach is to label the printer with its UNC path, so you just walk up to it, read the UNC, and type it in.
Fortunately, we’ve released a higher-tech approach that solves two different problems:
- Discovering Windows Server-hosted printers from Azure AD-joined devices
- Printing to those printers from anywhere in the world
This solution is called Hybrid Cloud Printing because it connects those Azure AD-joined devices to your existing Active Directory-joined Windows Server printing infrastructure. That was announced back in February via the Enterprise Mobility blog . As you can probably guess from the diagram included in that blog, there are a few components in the solution:
First, some requirements:
- Windows 10 1703 (Creators Update) or higher.
- Windows Server 2016 on your print servers.
- An Azure AD tenant.
- Azure AD Connect, to synchronize your Active Directory with Azure AD.
- An MDM service, e.g. Intune, to configure the print settings on each device.
Then, you need to set it up. To make the connection from internet-facing Azure AD-joined devices to those on-prem Windows Server 2016-hosted services, Azure Application Proxy is used. This makes an outbound connection to Azure, which is used to then allow inbound traffic to the published services. There are two ways this can be set up:
- Azure Active Directory pre-authentication, where Azure AD makes sure the user is authenticated before the traffic passes through the proxy.
- Passthrough authentication, letting Windows Server authenticate the users via Kerberos.
Typically the first option is recommended, to support things like conditional access and multi-factor authentication. I recommend sticking with that that recommendation, following the “five” steps at https://docs.microsoft.com/en-us/windows-server/administration/hybrid-cloud-print/hybrid-cloud-p... :
- Install Azure AD Connect to sync between Azure AD and AD. I covered that in https://blogs.technet.microsoft.com/mniehaus/2018/01/19/afraid-of-windows-10-with-azure-ad-joi... .
- Install the Cloud Print package on the print server.
- Install the Azure Application Proxy.
- Configure the MDM policies.
- Publish desired shared printers.
Since each of those steps includes multiple sub-steps, it’s really more like a 20-25 step process. And initially I walked through all of those steps – and it didn’t work at all. Fortunately, one of the ConfigMgr/Intune MVPs, Sandy Yinghua, has a blog that documents how she did it . I used those steps to verify my configuration and with that was able to get everything working. I would note that I did things a little differently:
- I didn’t use a custom internet URL (mcs.smsboot.com in her example) for the Azure App Proxy-published websites. Instead, I used the generated msappproxy.net URLs because then I didn’t need additional certs.
- I did get a public cert for my print server, so that I didn’t need to distribute a trusted root cert to the client machines when they talk to the print server via the Azure App Proxy. Self-signed certs aren’t any fun (although Intune has no issues deploying them, so it wouldn’t be that bad).
But otherwise, my setup matches. Here are the device configuration settings I configured in Intune:
-
Printer discovery URL (my configured Azure App Proxy URL, pointing to the internal print server’s IIS):
https://clouddiscoveryproxy-autopilotrocks.msappproxy.net/mcs/ -
Print access authority URL (the logon URL for your Azure AD tenant, with the GUID from the tenant properties):
https://login.microsoftonline.com/0b458c6e-97ce-4c7e-bc5e-1d29552989a5 -
Azure native client app GUID (copied earlier from the native API app that was added):
23772c3e-1a3b-4f28-86f9-ec614a53a776 -
Print service resource URI (the registered app):
http://MicrosoftEnterpriseCloudPrint/CloudPrint -
Maximum printers to query (Mobile only) (guess a number):
500 -
Printer discovery service resource URI (the other registered app):
http://MopriaDiscoveryService/CloudPrint
What those look like in Intune:
And here are a few commands that I used as I was experimenting with the printer publishing process:
Publish a test printer
Publish-CloudPrinter -Printer EcpPrintTest -Manufacturer Microsoft -Model FilePrinterEcp -OrgLocation '{"attrs": [{"category":"country", "vs":"USA", "depth":0}, {"category":"organization", "vs":"AutoPilotRocks", "depth":1}, {"category":"site", "vs":"Redmond", "depth":2}, {"category":"building", "vs":"109", "depth":3}]}’ -Sddl "O:BAG:SYD:(A;;LCSWSDRCWDWO;;;S-1-5-21-501278528-1731656756-2472999879-1114)(A;OIIO;RPWPSDRCWDWO;;;S-1-5-21-501278528-1731656756-2472999879-1114)(A;OIIO;GA;;;CO)(A;OIIO;GA;;;AC)(A;;SWRC;;;WD)(A;CIIO;GX;;;WD)(A;;SWRC;;;AC)(A;CIIO;GX;;;AC)(A;;LCSWDTSDRCWDWO;;;BA)(A;OICIIO;GA;;;BA)" -DiscoveryEndpoint https://clouddiscoveryproxy-autopilotrocks.msappproxy.net/mcs -PrintServerEndpoint https://cloudprintproxy-autopilotrocks.msappproxy.net/ecp -AzureClientId 23772c3e-1a3b-4f28-86f9-ec614a53a776 -AzureTenantGuid 0b458c6e-97ce-4c7e-bc5e-1d29552989a5
Query published printers
Publish-CloudPrinter -Query -DiscoveryEndpoint https://clouddiscoveryproxy-autopilotrocks.msappproxy.net/mcs -AzureClientId 23772c3e-1a3b-4f28-86f9-ec614a53a776 -AzureTenantGuid 0b458c6e-97ce-4c7e-bc5e-1d29552989a5
Unpublish a printer
Publish-CloudPrinter -Unpublish -Printer EcpPrintTest -DiscoveryEndpoint https://clouddiscoveryproxy-autopilotrocks.msappproxy.net/mcs -PrintServerEndpoint https://cloudprintproxy-autopilotrocks.msappproxy.net/ecp -AzureClientId 23772c3e-1a3b-4f28-86f9-ec614a53a776 -AzureTenantGuid 0b458c6e-97ce-4c7e-bc5e-1d29552989a5
Trying it out
Let’s look at the client experience then. The first sign of something different is on the “Printers & scanners” page in Settings. There is a new “Search for cloud printers” link:
When you click that, you can then browse from a list of available locations, presented in a hierarchy that you can define:
And you can search for printers by keyword (or just leave the keyword blank to get all printers in that location):
And finally, select the printer and click “Add device” to add it:
Finally, I have a printer, with a slightly different icon to show that it’s a cloud printer:
And printing works, from any internet-connected location (thanks to the Azure Application Proxy). The particular “printer” in this case is useful for testing, as it doesn’t waste any paper: It just drops an XPS file into a folder on the server.
Check out the Ignite 2017 video at https://www.youtube.com/watch?v=Bvt1L--lqE4 for more information. And with any luck, this will be integrated into Windows Server 2019 and easier to set up.
0
Likes
2 Comments