- Home
- Windows Server
- Virtualization
- Excluding virtual disks in Hyper-V Replica
- Subscribe to RSS Feed
- Mark as New
- Mark as Read
- Bookmark
- Subscribe
- Printer Friendly Page
- Report Inappropriate Content
Since its introduction in Windows Server 2012, Hyper-V Replica has provided a way for users to exclude specific virtual disks from being replicated. This option is rarely exercised but can have a significant benefits when used correctly. This blog post covers the disk exclusion scenarios and the impact this has on the various operations done during the lifecycle of VM replication. This blog post has been co-authored by Priyank Gaharwar of the Hyper-V Replica test team.
Why exclude disks?
Excluding disks from replication is done because:
- The data churned on the excluded disk is not important or doesn’t need to be replicated (and)
- Storage and network resources can be saved by not replicating this churn
Point #1 is worth elaborating on a little. What data isn't “important”? The lens used to judge the importance of replicated data is its usefulness at the time of Failover. Data that is not replicated should also not be needed at the time of failover. Lack of this data would then also not impact the Recovery Point Objective (RPO) in any material way.
There are some specific examples of data churn that can be easily identified and are great candidates for exclusion – for example, page file writes . Depending on the workload and the storage subsystem, the page file can register a significant amount churn. However, replicating this data from the primary site to the replica site would be resource intensive and yet completely worthless. Thus the replication of a VM with a single virtual disk having both the OS and the page file can be optimized by:
- Splitting the single virtual disk into two virtual disks – one with the OS, and one with the page file
- Excluding the page file disk from replication
How to exclude disks
Application impact - isolating the churn to a separate diskThe first step in using this feature is to first isolate the superfluous churn on to a separate virtual disk, similar to what is described above for page files. This is a change to the virtual machine and to the guest. Depending on how your VM is configured and what kind of disk you are adding (IDE, SCSI) you may have to power off your VM before any changes can be made.
At the end, an additional disk should surface up in the guest. Appropriate configuration changes should be done in the application to change the location of the temporary files to point to the newly added disk.
Figure 1: Changing the location of the System Page File to another disk/volume

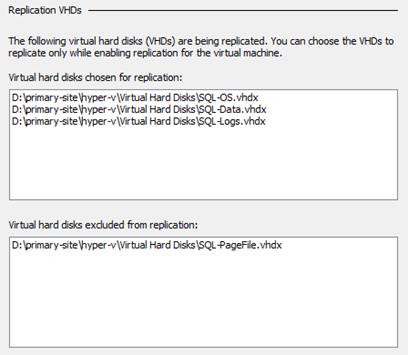
Right-click on a VM and select “ Enable Replication… ”. This will bring up the wizard that walks you through the various inputs required to enable replication on the VM. The screen titled “ Choose Replication VHDs ” is where you deselect the virtual disks that you do not want to replicate. By default, all virtual disks will be selected for replication.
Figure 2: Excluding the page file virtual disk from a virtual machine

The Enable-VMReplication commandlet provides two optional parameters: –ExcludedVhd and –ExcludedVhdPath . These parameters should be used to exclude the virtual disks at the time of enabling replication.
After running this command, you will be able to see the excluded disks under VM Settings > Replication > Replication VHDs .
Figure 3: List of disks included for and excluded from replication
Impact of disk exclusion
| Enable replication | A placeholder disk (for use during initial replication) is not created on the Replica VM. The excluded disk doesn’t exist on the replica in any form. |
| Initial replication | The data from the excluded disks are not transferred to the replica site. |
| Delta replication | The churn on any of the excluded disks is not transferred to the replica site. |
| Failover |
The failover is initiated without the disk that has been excluded. Applications that refer to the disk/volume in the guest will have their configurations incorrect.
For page files specifically, if the page file disk is not attached to the VM before VM boot up then the page file location is automatically shifted to the OS disk. |
| Resynchronization | The excluded disk is not part of the resynchronization process. |
Ensuring a successful failover
Most applications have configurable settings that make use of file system paths. In order to run correctly, the application expects these paths to be present. The key to a successful failover and an error-free application startup is to ensure that the configured paths are present where they should be. In the case of file system paths associated with the excluded disk, this means updating the Replica VM by adding a disk - along with any subfolders that need to be present for the application to work correctly.
The prerequisites for doing this correctly are:
- The disk should be added to the Replica VM before the VM is started. This can be done at any time after initial replication completes, but is preferably done immediately after the VM has failed over.
- The disk should be added to the Replica VM with the exact controller type, controller number, and controller location as the disk has on the primary.
There are two ways of making a virtual disk available for use at the time of failover:
-
Copy the excluded disk manually (once) from the primary site to the replica site
- Create a new disk, and format it appropriately (with any folders if required)
When possible, option #2 is preferred over option #1 because of the resources saved from not having to copy the disk. The following PowerShell script can be used to green-light option #2, focusing on meeting the prerequisites to ensure that the Replica VM is exactly the same as the primary VM from a virtual disk perspective:
The script can also be customized for use with Azure Hyper-V Recovery Manager , but we’ll save that for another post!
Capacity Planner and disk exclusion
The Capacity Planner for Hyper-V Replica allows you to forecast your resource needs. It allows you to be more precise about the replication inputs that impact the resource consumption – such as the disks that will be replicated and the disks that will not be replicated.
Figure 4: Disks excluded for capacity planning

Key Takeaways
- Excluding virtual disks from replication can save on storage, IOPS, and network resources used during replication
- At the time of failover, ensure that the excluded virtual disk is attached to the Replica VM
- In most cases, the excluded virtual disk can be recreated on the Replica side using the PowerShell script provided
You must be a registered user to add a comment. If you've already registered, sign in. Otherwise, register and sign in.