- Home
- Security, Compliance, and Identity
- Core Infrastructure and Security Blog
- Setting up cross farm searches via Federated Search
- Subscribe to RSS Feed
- Mark as New
- Mark as Read
- Bookmark
- Subscribe
- Printer Friendly Page
- Report Inappropriate Content
First published on MSDN on Oct 07, 2008
In recent months I've seen significant issues with search crawl times at numerous customers who have deployed MOSS globally. The issues often are caused by the need to crawl other farms across the world, so "global" results will show up on one search page. Crawling the world from one location is a very bad idea because bandwidth and latency between data centers across the world is very poor. For more reading on search performance, check out the Microsoft Enterprise Search blog , and focus on the "Perf and Scale" tagged content. With the release of the MOSS Infrastructure Update, Microsoft has added Federated Search features to MOSS. Search Federation allows for the aggregation of queries on one search page. (in separate result sets) I haven't seen any good walkthroughs on how to set this up, so I'm going to walk through the process quickly for everyone out there. We'll assume you have your MOSS farm(s) set up and patched up to the IU at a minimum.
I want to give a big thanks to Mitch Prince for helping me out with this. He was the original brains behind the post.
The first step we need to take is to set up a federated search location. To do this, we'll need to navigate to the Search Administration Page for the SSP we want to set up the Federated Location for. Once there, we'll need to click on the "Federated Locations" link in the Queries and Results section on the left.

Next we need to click the "New Location" button to create a new Federated Search Location.

Once here we're going to need to add some information regarding our location. Pick a Location Name, Display Name and Description. If desired, add the author and version information.

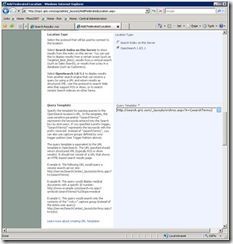
The next section is Triggers. Triggers allow you to fine tune your query. For this walkthrough, we're going to stick with the default setting. The next and most important section is the Location Information section. This is the area where we specify the target that our query is going to go against. For this example we're talking about other SharePoint farms, but in practicality, we could use any search engine that supports the OpenSearch standard. Since MOSS supports OpenSearch, we're going to select it. Then we need to specify the information for the query template. This identifies the URL and parameters that we're going connect to and pass. The instructions here are pretty good. (You're going to need to target a specific search center site) In my lab environment, I have a search center at the root of a web application at http://search.griz.com . Using example A, I can formulate the URL for my purposed. I substitute in my URL for "server". My search center is sitting in the root, so I can remove the "Search Center" path for the search center site in the hypothetical site collection. I'll keep the path to the page that returns the RSS-ized version of the results. I just want to pass my search terms as the keyword parameter, so I'll leave the k={searchTerms} as well. There are many other options you can pass as part of the query. Examples might be specific scopes, like people, or specific parameters.
The last section that is of concern for this demo is Restrictions and Credential Information. In a true world scenario, were I want to search to all world locations, I want to choose no restriction. I will need to choose the right option for Specify Credentials. Anonymous is not a good choice, unless we want the world seeing our content. In most SharePoint implementations, we need to respect the security trimming options set in our site collections. In order to do this, we need to specify user credentials. To best facilitate the user experience, we should pass credentials automatically. The only way to do this is via Kerberos. (If you're not already using Kerberos, there a several good reasons why you should be. That conversation is outside the scope of this walkthrough.) Assuming we have Kerberos configured for all of our web applications, we'll choose it, and hit OK.

Once this is completed, we can now add the Federate Search Web Part to results pages on our Search Centers around the world. Browse to your search center and execute a query to get to the results page. One there, we'll need to edit the page. To do this, click the Site Actions Menu and choose Edit Page.

In the right zone, click the "Add a Web Part" button. Then select the Federated Results Web Part.


After doing that, you'll see the new web part on the page. (It defaults to searching Microsoft Live Search) We now need to select our new federated search location.

Click the edit button and select the Modify Shared Web Part option for our new Federated Results Web Part. Once the menu appears, we'll see the Location Properties section open. In the Location drop down, select the name of our new Location and click ok.

Once this is done, click the Publish button on the page editing toolbar to complete the changes to the page. We should now see the results of our search against the federated location in the new web part. (For this demo, I used the original search center as the source, so we'll see the same results in the webpart)

We've now fully set up Federated Search and can do this to search other locations around the world. In an ideal scenario, you'd have a search center for each country or region. On each Search Center, you could create a "Search the World" tab. On the results page for that tab, you will need to add all the federated search locations from around the world. Doing this manually might be tedious, but fortunately all of this stuff is accessible via the SharePoint Object Model.
There are some things to note about Federated Search. If there are no results from one location for that query, the web part will hide itself. The web part runs asynchronously, so it will not slow down page loads. Please keep in mind that Federated Search only works with the simple search via the UI, so it's not accessible if the query came via advanced search, through the API or search web service.
You must be a registered user to add a comment. If you've already registered, sign in. Otherwise, register and sign in.