- Home
- Security, Compliance, and Identity
- Core Infrastructure and Security Blog
- Power belongs to YOU - the OSD Prestart Command
- Subscribe to RSS Feed
- Mark as New
- Mark as Read
- Bookmark
- Subscribe
- Printer Friendly Page
- Report Inappropriate Content
First published on MSDN on Apr 22, 2015
The topic of imaging is big with lots of options, lots of flexibility, lots to learn and lots of decisions to make! One such option is deciding whether to make use of the prestart command. Configuring the prestart command is done either directly on the boot image or when creating task sequence media.


Let’s start from the beginning. What exactly is a prestart command and why should you care? A prestart command is exactly what it says – a command that will be executed before the imaging process begins. Specifically, the prestart command can call pretty much anything – an HTA, a PowerShell script, a command line on the system being imaged, an executable, whatever. If the command references a script or files that are not already on the imaging system then it is also required to provide a path to those files so they can be included in the boot image or the task sequence media being created.
Note: A word of caution here. If configuring a source path be sure to make that path as specific as possible. Just like creating a source path for a package all content in the source path will be included when creating either the boot image or task sequence media. If the source path is too broad this will result in unnecessary files being added and the size of the boot image or task sequence media will be larger than needed.
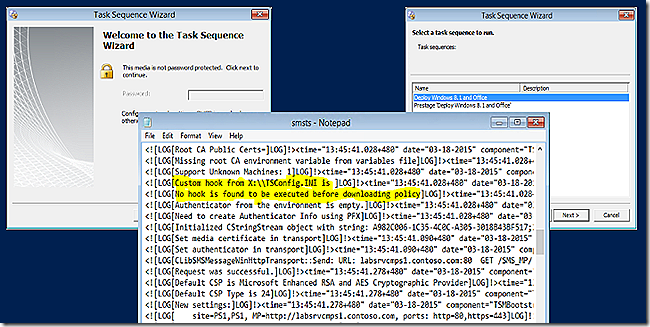
It was already mentioned that the prestart command executes before the imaging process begins. It’s important to understand what this means. A good way to illustrate this is to consider the process of booting from standard media. The very first screen that comes up allows various choices and when ready the user selects to continue. It is at this stage that the prestart command will be launched. After the prestart command completes the process continues and attempts to connect to the ConfigMgr servers to obtain policy. This is illustrated in the screenshots below.
Knowing this is important because it means the prestart command executes and completes before the system ever tries to connect to the ConfigMgr environment. Said another way, the prestart command will complete before the imaging system reaches the point of requesting policy. Interesting! So does this mean that by running a prestart command it is possible to do work against the environment to prepare for requesting policy and then all of the pre-work will be in place and actionable when policy is actually requested? Yes. An example is coming up that will illustrate that and also illustrate how powerful that ability can be.
Now back to the choice of whether to implement the prestart command on the boot image itself or to embed it in the task sequence media. If it possible to add a prestart command to boot image why would a decision EVER be made to instead place the prestart on the task sequence media and NOT on the boot media? Great question. The answer really is based on whether the prestart command should apply universally to all systems imaging with a given boot image or if there are some specific scenarios where a unique prestart command would be needed. If such scenarios exist then having the flexibility of choosing just to add a prestart command to the task sequence media becomes very useful.
Note: If adding a prestart command to the boot image it is recommended (by me at least) to avoid making the change to the default boot image. It is so easy to add a customized boot image and make these more significant changes there that it just makes sense to avoid junking up the default. I also tend to avoid making modifications to the default boot images unless those changes are really minor – such as adding the logging option.
The best way to illustrate using the prestart command is with a couple of examples.
HTA
Adding an HTA allows the flexibility of user interaction during the imaging process. Typically an HTA will be used in the imaging process to gather specific information that will be needed along the way. Examples include which image to deploy, the final computer name, settings to be implemented on the system and more. Other, more inventive uses could be leveraged as well.
A bit of searching with your favorite search engine (BING) will show many examples of configuring an HTA. Many of those will illustrate calling an HTA during task sequence execution. Very few that I found discussed configuring a prestart command to call an HTA file.
To configure an HTA as a prestart command simply call it as shown.

Note the use of the cmd /c precursor. If the HTA is intended for user interaction then using cmd /c is required. Failing to specify this option and simply calling the HTA by filename alone will result in the HTA being launched but never being visible on the screen.
The screenshot below is an example of using this boot image to launch the HTA and the log files indicating the launch.


A couple of callouts from the log snip. First, the actual prestart command line is visible in the TSConfig.INI file which is in the root of the X: drive created when booting with the boot media. Second, note that this prestart command had content that was included in the task sequence media. What evidence proves that? The reference to package folder SMS10000.
Once the user completes the required fields and selects Submit the HTA will process the data according to the code inside the HTA. This could and often would include interacting with the task sequencing environment to add variables and conditions that will be needed during execution. After the HTA completes the screen offering task sequences would appear.
Cool stuff? How about another example. This time a PowerShell script.
PowerShell
As stated earlier, the prestart command could be virtually anything that is needed. For the example a PowerShell script will be used. This specific example also illustrates the power of knowing that the prestart command executes and completes prior to any contact with the ConfigMgr infrastructure. A bit of setup is required to fully understand what is happening with this example.
One of the conveniences of OSD is the ability to image unknown systems easily. It’s so easy that imaging unknown systems is often the focus when first using OSD. Often environments never proceed to the next level of using known systems where additional flexibility and power are available. Accordingly, an option that would tie together the convenience of unknown imaging and the power of known imaging would be compelling. That is the focus of this example and the use of a prestart command is the perfect way to allow systems to boot using unknown support but become known in the process.
As illustrated, the prestart command processing will finish prior to any contact with the ConfigMgr infrastructure. With the processing order in mind it is fully possible to build a PowerShell script that will run on the imaging system, discover all of the detail about the system and even imaging options for the system and then use that information to add the system being imaged to ConfigMgr ‘on the fly’ so that it becomes known. That way when the prestart command exits and the system contacts ConfigMgr for instructions it will no longer receive a deployment targeted to an unknown device but instead will receive deployments and detail specifically targeted to itself.
Configuring the PowerShell script to run as a prestart command is as easy as configuring the HTA. There are some command line switches that should be added to achieve the desired results such as potentially bypassing the default execution policy.

The processing is no different. The system boots, user selects to continue, the PowerShell script is called, executed and then PowerShell exits and the process continues. The PowerShell script is different from the HTA example as no user interaction is required. Accordingly, the PowerShell script could be run in either a lite touch or zero touch scenario.

Easy, huh? OK, back to the actual script itself. What does the script do while it’s running? The example given is basic to illustrate the concept. During execution the script will detect the MAC address of the imaging system, the computer name and then securely connect to the ConfigMgr server to import that information into the database. From there the script adds the new machine to the collections of interest. The idea here is that multiple collections may be present to control image deployment and the script will logically add systems to the correct collection during import.
In production additional logic should be added for better control such as
· Handling multiple NIC’s
· Dynamically attaching to the appropriate site server and site code (for hierarchies)
· Better error handling
· Options for computer naming
· Testing to validate collection membership prior to proceeding
· Adding variables to the new machine object to control imaging flow
· More
The point of the example is that through using scripts and the prestart command it is fully possible to import the imaging system ‘on the fly’, add it to a collection, add variables to the machine and fully prepare it so that when requesting policy the machine is now know and gets specific policy when requested.
For a script such as this it’s likely that script processing time could be 5-6 minutes or maybe a bit longer. Consider though that this full import process could be run unattended on a system booted as unknown. There would be no need for end user interaction or presence.
The script example is below.
# Note: As of date of writing PowerShell in Windows PE does not support remoting. This vesion of the script
# is adjusted to avoid the use of remoting and just call the appropriate WMI methods directly.
# Configure Environment
# Instantiate connection to task sequencing environment
$TSEnv = New-Object -ComObject Microsoft.SMS.TSEnvironment
# Future work - Allow site for import to be dynamic
$SiteServerName = "<hard code name of site server here>"
$SiteCode = "<hard code site code here>"
# Get the local computer name that will be used for sysem import
$LocalComputerName=Get-Content env:computername
# Set username and password for use with remote session from boot media variable
$ConnectionAccount = $TSEnv.Value("SSSvcAccount")
$ConnectionPassword = $TSEnv.Value("SSvcAccountPassword")
$Password = ConvertTo-SecureString $ConnectionPassword -asplaintext -force
$cred = New-Object -TypeName System.Management.Automation.PSCredential -argumentlist $ConnectionAccount,$Password
# Get MAC address of local NIC
# Note: This only assumes a single NIC. Additional scripting needed if multiple NICs expected
Function Get-MACAddress
{
$NicObjects = Get-WmiObject -Class "Win32_NetworkAdapterConfiguration" -Filter "IpEnabled = TRUE"
ForEach ($Nic in $NicObjects)
{
$MacAddress = $Nic.MacAddress
}
return $MacAddress
}
# Call function to determine local MAC address
$SystemMacAddress = Get-MACAddress
# Future work to add collection direct membership logic
# Fix hardcoded collection value
$CollectionQuery = Get-WmiObject -NameSpace Root\SMS\Site_"$SiteCode" -Class SMS_Collection -Filter "Name='All Systems'" -computername $SiteServerName -credential $cred
# Create new computer account
# The first commented out option works but doesn't allow passing creditials. Credentials are needed in Windows
# PE so using the second option which includes the ability to use credentials and gives the same results.
$WMIConnection = Get-WMIObject -List -ComputerName $SiteServerName -NameSpace Root\SMS\Site_"$SiteCode" -Credential $cred -class SMS_Site
$NewComputerAccountDetail = $WMIConnection.psbase.GetMethodParameters("ImportMachineEntry")
$NewComputerAccountDetail.MACAddress = $SystemMacAddress
$NewComputerAccountDetail.NetbiosName = $LocalComputerName
$NewComputerAccountDetail.OverwriteExistingRecord = $True
$Resource = $WMIConnection.psbase.InvokeMethod("ImportMachineEntry",$NewComputerAccountDetail,$null)
# Future work - Force update of All Systems collection
# Future work to check for presence of system in All Systems collection, wait for it to appear and then
# add a direct membership rule to target collection
#Create the Direct MemberShip Rule
#$NewRule = ([WMIClass]"\\Server100\root\SMS\Site_PRI:SMS_CollectionRuleDirect").CreateInstance()
#$NewRule.ResourceClassName = "SMS_R_SYSTEM"
#$NewRule.ResourceID = $Resource.ResourceID
#$NewRule.Rulename = $ResourceName
#Add the newly created machine to collection
#$CollectionQuery.AddMemberShipRule($NewRule)
The power of the prestart command should be obvious at this point and it is a very cool way to build even more flexibility into a process that is already very flexible.
You must be a registered user to add a comment. If you've already registered, sign in. Otherwise, register and sign in.