- Home
- Security, Compliance, and Identity
- Core Infrastructure and Security Blog
- Installing System Center 2012 using the Unified Installer
- Subscribe to RSS Feed
- Mark as New
- Mark as Read
- Bookmark
- Subscribe
- Printer Friendly Page
- Report Inappropriate Content
First published on MSDN on May 24, 2012
The unified installer ships with System Center 2012. What is the Unified Installer and what is the experience like when using it to install System Center 2012? Lets find out by walking through my experience.
First and foremost - READ THE DOCUMENTATION – all of it! If you adhere to what is listed in the documentation you will avoid many problems along the way. The Unified Installer User Guide is the starting point. Follow all of the links and thoroughly understand what you will be doing and make all required system changes up front! Documentation is available here .
OK, with that taken care of, a few impressions right up front.
Pros:
1. The Unified Installer is targeted for lab/proof of concept installations only . That is clearly stated in the popup that shows when you first launch setup.

Also clearly indicated is the fact that when using the Unified Installer detailed and advanced configuration for setting up the various products in the suite is suppressed. This allows getting the suite components up and running more quickly but without understanding some of the configurations that should be considered and possibly implemented during install.
2. The Unified Installer leverages System Center Orchestrator runbooks to drive installation of suite components. The Unified Installer is a great engine to show what is possible with runbooks. And the runbook components of the Unified Installer are visible in the Orchestrator console and useful as a learning tool in and of themselves.
3. Working through the Unified Installer is a really good academic exercise. You learn a TON about WinRM and Orchestrator and, after installs are complete, you are able to surf through the installed components to quickly gain a feel for the various components in each product, see the location of installed files, the SQL database and more.
4. Once you work through the process of using the Unified Installer, future attempts to set things up will be much more streamlined.
Cons:
1. Setting up the Unified Installer is TIME CONSUMING!!! There is significant effort to assemble and extract all of the prerequisites. This is time that would be spent even without the Unified Installer as the prerequisites are just that – prerequisites – but once you go to the effort to get ready for deployment you are a long way toward just installing individual suite components and gaining the significant extra learning opportunity and configuration flexibility that is associated with the full installation experience.
2. Using the Unified Installer streamlines the installation process but at the cost of more fully understanding the requirements of installation for the various suite components.
3. The Unified Installer installs suite products using a single server per product and gives no option to add additional servers or create more complex deployments. While I understand that masking installation complexity is the nature of the Unified Installer, it does limit knowledge gained during the process.
4. There are multiple places in the installation wizard where you might encounter problems. Most are due to incorrect configuration on systems due to not fully reading the very good documentation available.
My Recommendation:
The Unified Installer is great to learn since it is part of the System Center suite. Having used the tool once I don’t plan to again for lab installs as I tend to need more custom setup than what the tool provides. If you are new to System Center there is a lot of good learning that comes with wetting up the individual products manually. For that reason, I strongly urge anyone setting up System Center to take the extra time to work through installing the products individually. I also very much encourage working through the Unified Installer at least once. Doing so will help gain some understanding of WinRM which is a very cool component for remote management and also will help you begin to understand System Center 2012 Orchestrator.
The Walkthrough:
The unified installer makes use of an installer system and target systems.
The installer system can be either Windows 7 SP1 or Windows 2008 R2 SP1. System Center Orchestrator is the engine that drives the Unified Installer. Thus, it is possible to configure the Unified Installer to be co-located with System Center Orchestrator on the Installer computer provided that the Installer computer is running Windows Server 2008 R2 SP1. All other components must be on remote target systems. You can also elect to install Orchestrator on a remote target system if so desired. It is possible to use the Unified Installer to deploy only a single suite product or suite components in combination up to including every product in the suite. In the example scenario, the Installer computer will be a Windows Server 2008 R2 SP1 host where Orchestrator will be co-located. The Unified Installer will be used to deploy every component of the System Center suite to various systems.
There are specific system requirements for using the Unified Installer. As highlighted earlier, the documentation is your key to ensuring everything is configured as you need. The Unified Installer makes heavy use of WinRM and, accordingly, settings will need to be applied through policy to the various systems participating in the installation. These configurations differ depending on whether setting up the installer or target system. Note that if co-locating Orchestrator on the same server as the Unified Installer, you will need to run through both sets of WinRM configurations on that one server. More on the required configuration changes shortly.
Before launching the setup wizard take some time to identify and download the System Center 2012 source files and prerequisites needed. The Unified Installer will allow you to download prerequisites (not the source) as a part of the wizard but I found it easier to organize the needed items ahead of time. Specifically, you need the following items:
Source
The source files you need will depend on which components you want to install. At a minimum you will need System Center Orchestrator. Other source files needed might include System Center Virtual Machine Manager, System Center App Controller, System Center Operations Manager, System Center Configuration Manager, System Center Service Manager and System Center Data Protection Manager. Note that Unified Installer wizard requires expended source files.
Prerequisites:
There are a number of prerequisites that are needed by various components during installation. Required prerequisites are as follows, .NET Framework 4.0 Extended, Microsoft Report Viewer Redistributable 2008, Microsoft Report Viewer Redistributable 2012, SQL Server 2008 R2, SQL Server 2008 R2 Native Client, Windows Automated Installation Kit, SQL Server 2008 R2 Analysis Management Objects, SQL Server 2008 R2 SP1 and SQL Server 2008 R2 Cumulative Update 4. Here also the files will need to be expanded. So, in the case of SQL Server 2008 R2 SP1 (as one example), the service pack comes as a single executable. Extract the files by launching the executable and noting the location of the temp folder. Copy the content of the temp folder to a location you have specified. Once you have the files simply exist the installation wizard that launched as a result of starting the service pack install. Another example is the WAIK which is downloadable as a .ISO image. The contents of the .ISO must be extracted to a folder for use in the Unified Installer wizard.
If the source files are in the form of an MSI or already expanded then no further action is needed.
OK, so lets dive in. The first thing to know is that the Unified Installer log is found under the <logged on users profile>\AppData\Local\Microsoft System Center 2012\Unified Installer\Logs. Be sure to set your view options appropriately if you don’t see AppData. The installation logging is really good good and will help keep you on track if something should go wrong during the installation. Also cool is that once you complete the wizard and start installation, settings are retained so if you need to start over, consistency is maintained as to servers and settings selected!
Before launching the wizard go ahead a work through setting the required group policy objects, either directly or through WinRM commands shown shortly, on all systems that will be touched during installation. Required group policy settings will vary by the type of system and are shown below. If setting policy by changing group policy objects it’s a good idea to manually force a policy update after configurations are complete by running gpupdate /force. Also, changes can be made on individual systems with local policy changes or can be implemented in the domain and filtered to the desired systems.
Installer Computer
This is the system where the Unified Installer console is operating.
In the Local Computer Policy console configure the settings as follows:

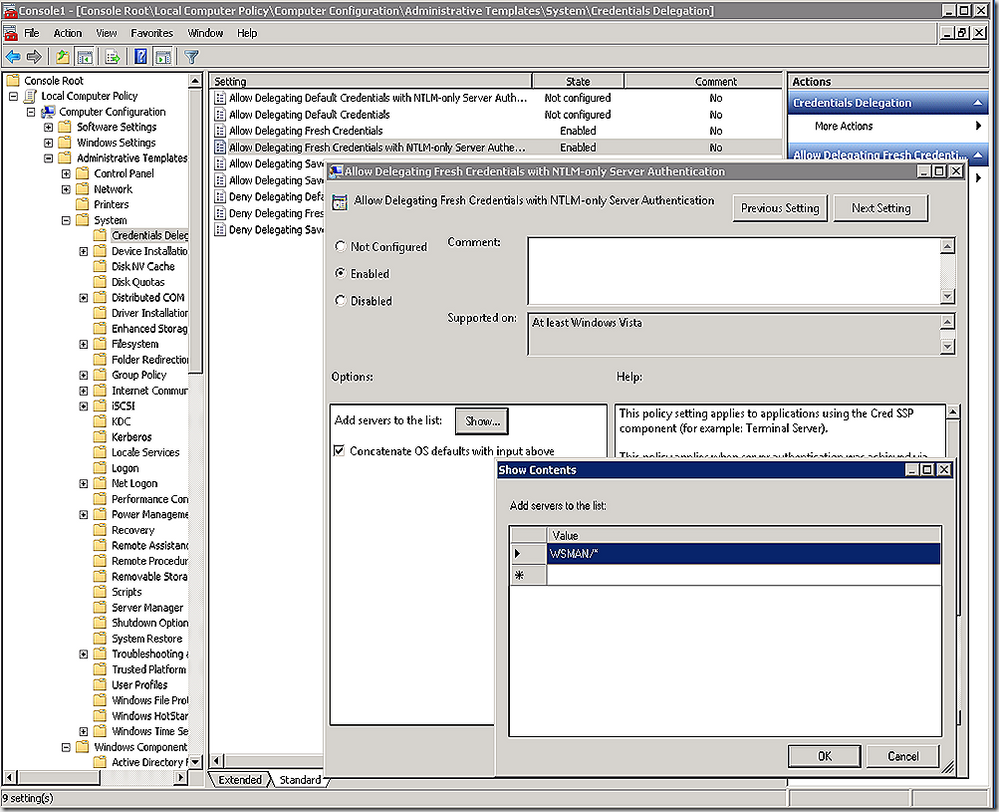

The above settings are also configurable using WinRM commands as follows:
winrm set winrm/config/client/auth @{CredSSP="True"}
winrm set winrm/config/client @{TrustedHosts="*"}
Target computer
These are the systems where the Unified Installer is working to install suite components.
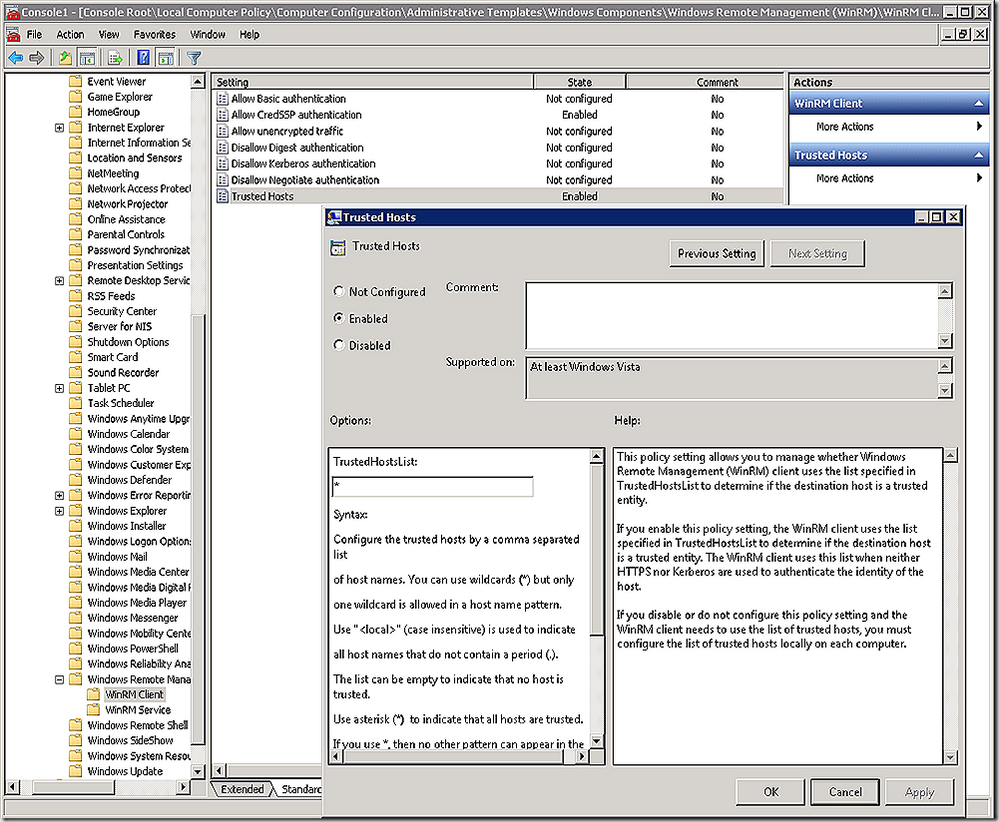
In the Local Computer Policy console configure the settings as follows:


The above settings are also configurable using WinRM commands as follows:
winrm set winrm/config/service/auth @{CredSSP="True"}
winrm set winrm/config/winrs @{AllowRemoteShellAccess="True"}
winrm set winrm/config/winrs @{MaxMemoryPerShellMB="2048"}
Whether or not you are using WinRM or policy settings set manually you will for sure want to run the following command on the target systems. This enables them for remote management and ensures they are listening when remote management requests come in.
winrm qc –q
Before getting started with the installation be sure to validate firewall settings are configured as required. Refer to the firewall configuration section of the documentation for details. Also, during my install I found the installer would sometimes hang, seemingly without error. I resolved this problem by increasing the maximmum concurrent policy instances on the Installer system which is running the Orchestrator management server. Details on how to do that are found here .
The environment
The diagram below shows the lab environment I have used for working through the installation.

Running the Unified Installer wizard
Tired yet? ON TO THE INSTALL!!
Note the splash screen provides links to the various documentation and also allows you to either install multiple suite products, up to the entire suite, by selecting Install System Center or a custom installation on the local server can be done by selecting Custom install on local server. The later option only allows a single suite product to be installed. For the example installation I chose the former option.

Fill out the registration information as well as supplying a product key or choosing an evaluation installation. Also select that you agree with the license agreement.

Choose which suite products should be installed

Browse to the locations for the expanded source files discussed earlier. A potential problem you will see here is when specifying the source path for System Center 2012 Data Protection Manager. Be sure to point at the folder containing autorun.inf. In my case the log errored indicating a version mismatch stating the FPP version was expected but not found. Be sure that the version of source that you have in place matches what is expected by the Unified Installer. The two types of source I’ve seen the Unified Installer ask for are either ‘evaluation’ or ‘select’ based on selections made on the Getting Started screen earlier.

On the next two pages of the wizard, accept the various license agreements


On the prerequisite page of the wizard, point to the various prerequisite files downloaded earlier or, if you missed one, download it here. Remember, the wizard requires the source files be expanded.

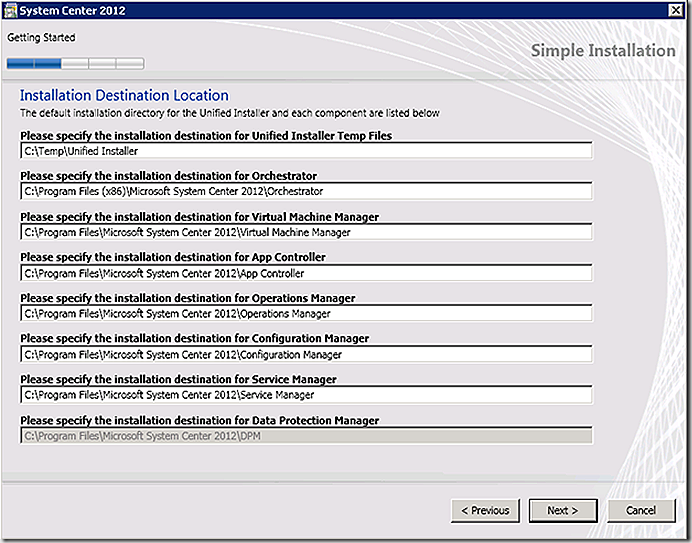
Next, pick the path that each product should use when installing
Finally, choose which servers should receive which products. Note that the only product that may be co-located on the Installer system (assuming it is running Windows 2008 R2 SP1) is System Center 2012 Orchestrator. Also note that no system is able to receive more than one suite component. Input your selections. Note that the wizard will verify connectivity to systems. Also note that the wizard may appear to hang here. It really isn’t, it is going out to each configured system to verify WinRM is able to access remotely. Just take a look at the UISetupWizard.log located in <user profile>\AppData\Local\Microsoft System Center 2012\Unified Installer to see the activity. If there is a problem an error will popup but in my experience was often behind the Unified Installer wizard. Just hover over the Unified Installer icon on the task bar to see if there are more than a single instance showing. If there is likely one of them is an error popup.

After validation takes place the next screen allows configuring service accounts. This is a lab or proof of concept (should NOT be a production deployment) so using a single account is convenient.

Set the options for System Center 2012 Operations Manager, Configuration Manager and Service Manager

Decide what to do with error reporting

Review the summary page

LET THE INSTALLATION BEGIN!!!!

At this stage, take a break – a LONG one – this will take a while. The installation ran for multiple hours in my lab environment. The progress bars keep moving right along and normally this indicate activity is taking place. To confirm, you should also see the UISetupWizard.log updating. If the log fails to update for 2 hours the Unified Installer will interpret that as a failure and stop so it’s a good idea to keep an eye on things. It is normal to sometimes see 15-20 minute gaps in time between updates to the log as various activity runs on the various target systems being installed.

The Unified Installer may complete with all components in an error state, some components installed successfully while others failed (as shown below) or all successful. If you encounter an installation failure for one or more components, review the UISetupWizard.log file. This log tracks the progress of the installation for the various components and will often help identify a failing component. The UISetupWizard.log resulting from the installation below is available here .

Another option is to evaluate any Orchestration failures by reviewing the messages in the Events table of the Orchestrator SQL database as shown.

After investigating the cause of the problem it is a simple matter to restart the installation to try again – just be sure to remove from the list any components that did successfully install in the first run. If the results window is still open simply click previous and again click Install. If not, simply start the Unified Installer again, all settings from the previous attempt are preserved.
Relevant Files
A bunch of log files and components are created on the various systems during install. Many of them are suite component specific and I won’t go through each but there are a few locations worth of further discussion here.
<user profile>\AppData\Local\Microsoft System Center 2012\Unified Installer
As already mentioned, this is the location (under the logs folder) where we find the UISetupWizard.log but there is more here as well. In this folder you will find the source files that are used for the Unified Installer and to get the Orchestrator component up and running on the server. Looking in the Unified Installer folder on the Installer machine you will see txt files that describe the work that needs to be done for the various components. Below we see the Unified Installer folder on the Installer system where the Unified Installer is being run.

DeploymentPack.xml – This file contains the deployment configuration. While working through the UI certain servers were specified to receive specific suite components. This file details component to server mapping as well as containing instructions for installation. A snip from this file focused on the System Center 2012 Operations Manager deployment is shown below. All sensitive data is encrypted.

On target machines the Unified Installer folder may be empty.
SelectedProduct.xml
This file details installation information for all suite products that have been chosen for installation. The file contains all details such as component source location, destination location, required prerequisites and their location and more.
SQL_ files
The various files that begin with SQL_ describe the SQL server configurations that will be implemented for the particular products. These are text files and specify information such as service startup configuration and associated account information for the services. along with instructions needed to execute the installation silently, such as SQL features and automatic license acceptance.
<user profile>\AppData\Local\Microsoft System Center 2012\Orchestrator
This location contains the log files associated with setting up System Center 2012 Orchestrator. Log files on the Installer machine include ManagementServiceMSI.log, RunbookDesignerMSI.log, RunbookServerMSI.log, SetupWizard.log and WebComponentMSI.log. The Target machines will have this folder as well but since they do not host the full version of Orchestrator they only will have the RunbookServerMSI.log and SetupWizard.log.
c:\Temp
This folder will be present on the Installer and all Target systems but the contents will vary. This folder will be the location where source files or prerequisites for the specific suite component being installed will be staged before installation begins.
c:\Temp\Unified Installer
On the Installer computer you will see the Unified Installer folder along with xml files representing the various Target systems involved in the installation. The xml files each contain an inventory of the various Targeted servers and show which features/roles are already installed or are not installed.


c:\Temp\Unified Installer\UIInstall
The Unified Installer folder will also contain a UIInstall folder with the binaries needed by the Unified Installer.
c:\Temp\Unified Installer\UIInstall\Repository
This folder contains three files of interest.
PKConfig-<numberic>.xml
This file contains needed product key information based on inputs during the wizard.
Prerequisites.xml
This file describes the prerequisites that need to be in place for the Unified Installer to operate correctly.
Progress.xml
This file keeps track of progress as the Unified Installer is installed. Progress results are communicated back to the Unified Installer and recorded in the UISetupWizard.log to keep track of various components as installation proceeds.
c:\Temp\Unified Installer\UIInstall\Runbooks
This folder contains the Unified Installer Runbook.ols_export. This runbook is used by System Center 2012 Orchestrator to drive the installation of suite components. This includes checking prerequisites, installing needed components (like SQL) and installing the System Center 2012 components themselves. If you open System Center 2012 Orchestrator Runbook Designer after it’s installed you can navigate the runbook (it’s already there) to see how it works. If you haven’t used System Center 2012 Orchestrator before this is a really cool way to gain some insight as to whats possible.

Final thoughts
And there you have it, the Unified Installer has done it’s job and it’s now time to explore the environment and what has been done. Don’t be shy, poke around a bit – this is a lab (or should be) so that’s the point. Enjoy learning System Center 2012. I know I’m a Microsoft employee – but it honestly is the best management solution going!
You must be a registered user to add a comment. If you've already registered, sign in. Otherwise, register and sign in.