- Home
- Security, Compliance, and Identity
- Core Infrastructure and Security Blog
- Extending a Class in the Authoring Console
- Subscribe to RSS Feed
- Mark as New
- Mark as Read
- Bookmark
- Subscribe
- Printer Friendly Page
- Report Inappropriate Content
First published on MSDN on Sep 16, 2011
Sometimes as an OpsMgr administrator you may need to extend a class to include an additional attribute or two. This action is very easy in the Operations Console but results in management packs that are potentially confusing when opened in the authoring console or directly in an XML reader. The confusion is due to the way the Operations Console generates unique workflow identifiers which results in seemingly unintelligible strings of data throughout the management pack. This information is not visible to the user in the Operations Console but is quite apparent when viewing the management pack in other ways.
Before digging into how extended classes might be created in the authoring console, let’s quickly review the components of an extended class created in the Operations Console so we can see the difference. First, to help understand what extended classes are, a definition. Extended classes are, quite simply, extensions being made to existing classes. Thanks Mr. Obvious. But hang on – I see a number of customers that get this wrong and, as a result, miss the point of Extended classes. For clarification, when you extend a class you are simply adding a new attribute to the existing class. Often, as a result, you end up creating a new class and storing it in your own custom management pack but that isn’t always the case. If the class being extended is defined in an unsealed management pack already then the extra attribute could simply be an edit to the existing class – no need for a new class since the existing class is editable in an unsealed management pack. If, on the other hand, the existing class is one from a sealed management pack then there is no ability to edit it directly – in this case it is required to create a new class, add the attribute and store it all in an unsealed management pack. This later scenario is the most common use of extended classes.
So, to be clear, it is true that extending a class DOES result in a new class but the criteria for class membership is exactly the same as the original class. Said another way, by extending a class – whether the class is in an unsealed or a sealed management pack to start – you aren’t affecting membership of the class in any way. This is what often trips folks up as it is often thought that by adding a new attribute to a class you are essentially filtering the class further – not so. Adding the extra attribute simply allows additional criteria to be defined on a class that can be used for filtering in views, groups, etc.
The best way to understand this is to see an example. In the Operations Console I create an extended class by right-clicking Attributes and selecting Create a New Attribute.

The Create Attribute Wizard launches. I supply a name for the new attribute I’m adding and click next

Here I specify whether information about my new attribute will be pulled from the registry or wmi – these are the only two choices available when building an attribute through the Operations Console. This actually is one key reason to use the authoring console – it gives more flexibility such as the ability to populate extended classes with script – see my blog entry here for an example. For the example I choose Registry and select the name of the base class that I want to extend. For the example I choose Windows Server 2008 Computer. Note that this class is one that exists in a sealed MP. Because of that when you select OK after choosing the class the name of the actual target class is modified with a _Extended extension. This is an indication that the class chosen was from a sealed management pack and, as a result, the chosen class cannot be modified but must be ‘copied’ and stored in an unsealed management pack in order to add the attribute. This was discussed previously.
Note: It is recommended to change the default name to a value other than _Extended as if you extend multiple classes, each will have the default of_Extended appended to their name which may lead to confusion.
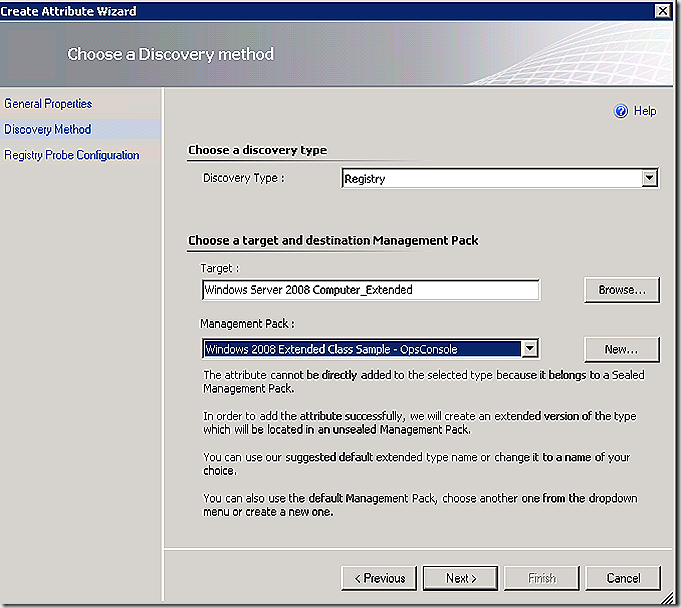
This attribute will be populated from information found in the Registry. In this sample I’m just looking for systems that have the HKLM/Software registry – key which should be all Windows System.

From here, click Finish and that’s all. We have successfully extended the Windows Server 2008 Computer class. Let’s take a look at the results. In the Monitoring node of the OpsConsole, select Discovered Inventory and choose Change Target Type from the Actions menu. In the list of classes, select the Windows Server 2008 Computer class. This was the base class we chose for the extension. Note that we have 13 objects displayed in the list – this is the total membership of this class. Note also the column headers. These represent all of the attributes defined on the base class.

OK, now select Change Target Type again and this time choose the Windows Server 2008 Computer_Extended class that we just generated. Note the number of objects displayed is identical – and that every attribute that was listed in the base class is present here too – with our additional attribute visible as well and populated with data.

OK, easy enough. Now, what was that about how extending a class in the Operations Console causes potential confusion when trying to open the management pack in the authoring console or an XML editor? Let’s take a look.
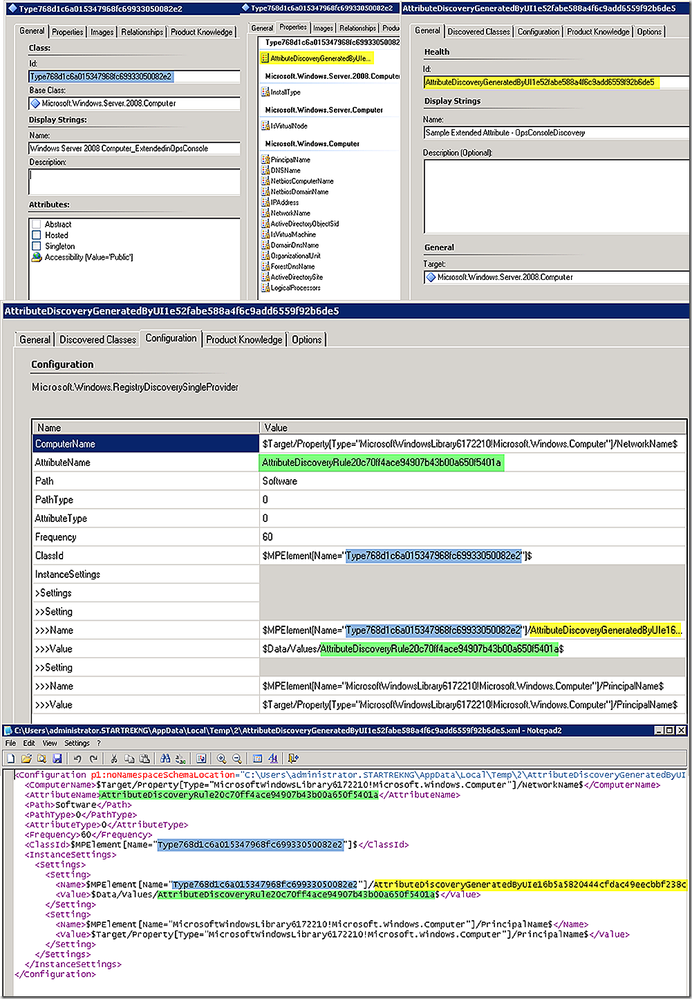
As just seen, when extended classes (or any management pack content for that matter) are built in the Operations Console, everything is perfectly readable and useful. If we open the management pack just created in the authoring console, however, let’s see what we get. Notice that instead of the class name we expect, we se a name of Type768…. To see the class name as it will appear in the Operations Console we need to open the class and note the Name field.

The same sort of potential confusion exists with your attribute discovery.


And to potentially add to the confusion, here is a partial view of the management pack (which is extremely simple) in an XML editor.

If you know what your looking at it’s actually fairly easy to make sense of all of this. If this is new to you – all of these random strings just adds to the confusion! The ability to do authoring, such as attribute extensions, in the Operations Console and then open the resulting management pack in the Authoring console is actually a very good learning tool – and one we will use here. By opening the management pack just created we see the elements (a class and a discovery) we need to create extended attributes using the authoring console from scratch. Pulling the two pieces together we can see how these items all map together and where items relate to one another in the authoring console. The graphic below shows various key identifiers and where they are used to tie together the class and the discovery. The bottom most graphic is an XML view of the information in the configuration tab. This is a key place where you will want to make edits when extending a class from scratch in the authoring console.
Using our example as a model we can easily build out a custom extended class in the authoring console. Simply open a new instance of the authoring console and select to build a blank management pack. Create a new custom class and custom attribute with the information shown below.


Easy as that – we have our extended class. Having the extended class alone though doesn’t help – we need to also have a discovery that populates the additional attribute. To do that we just need to create a new discovery.
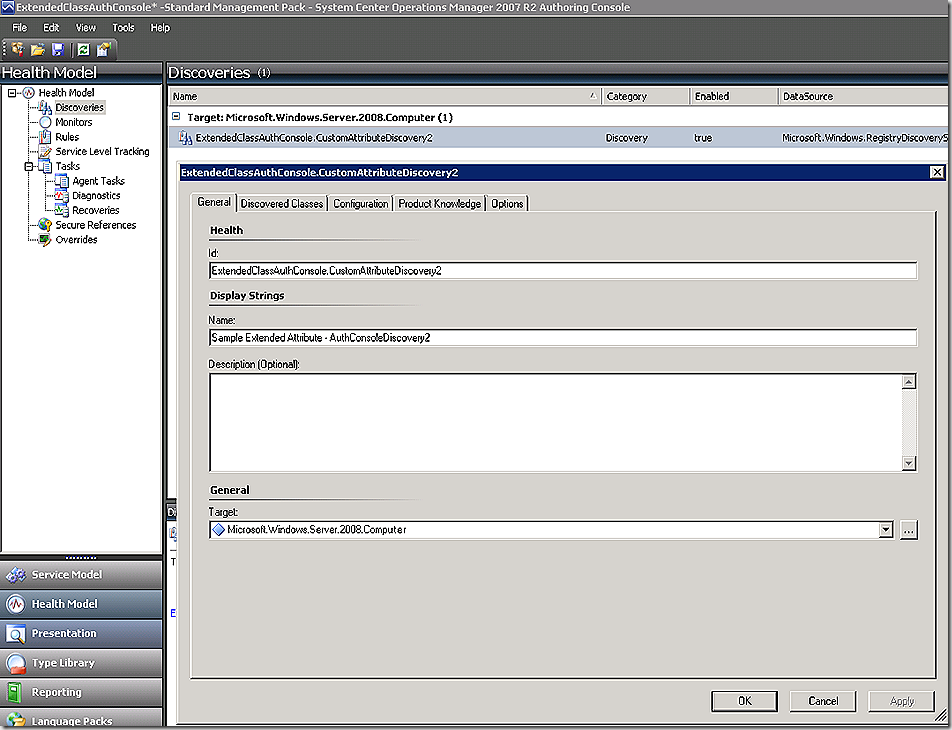
There are a couple of interesting things on the Configuration tab. First, and easy to miss, is the specific type of discovery that is being configured. If you select to create a custom discovery then when you first hit this tab you will need to select what kind of discovery will be created. In this case the discovery will be a registry discovery (highlighted in blue). Once that is selected you will see the default configuration options show up. Note that the configuration options listed by default do not match the configuration options that were in place on the same discovery when built in the Operations Console. No worries – it’s easy to edit these settings but you have to be careful to make sure your edits are correct – this is where having the Operations Console generated example is particularly helpful and also where you can see the flexibility of the authoring console allowing configuration beyond the default choices.

Simply click edit and modify the XML to match the needed fields from the Operations Console example, populating the various XML elements with the needed data from the defined class and discovery. Refer back to the color coded example from the Operations Console generated example to know where to get the various data.
The completed XML edit for the authoring console generated extended class is below.

You must be a registered user to add a comment. If you've already registered, sign in. Otherwise, register and sign in.