- Home
- Microsoft 365
- Microsoft 365
- Step by Step Message encryption Office 365
Step by Step Message encryption Office 365
- Subscribe to RSS Feed
- Mark Discussion as New
- Mark Discussion as Read
- Pin this Discussion for Current User
- Bookmark
- Subscribe
- Printer Friendly Page
Aug 16 2017
11:11 AM
- last edited on
Feb 01 2023
12:52 PM
by
TechCommunityAP
- Mark as New
- Bookmark
- Subscribe
- Mute
- Subscribe to RSS Feed
- Permalink
- Report Inappropriate Content
Aug 16 2017
11:11 AM
- last edited on
Feb 01 2023
12:52 PM
by
TechCommunityAP
Microsoft Office 365 Message Encryption
In this post, I will look at configuring message encryption in Office 365. What is message encryption?
Microsoft Office 365 Message Encryption is an extra add-on online service build on Microsoft Azure Right Management (Azure RMS), By enabling Azure RMS administrators can configure message encryption by configuring exchange online transport rules. The Rules can apply to multiple or only a few users i.e. CEO who needs to send encrypted emails across the internet.
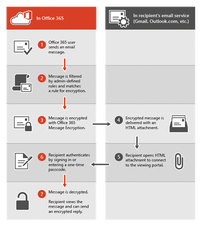
The Following diagram showcase the flow of the encrypted email.
To get started with the setup we need to make sure that we have the prerequisites completed. In order for us to make use of the service we need the following.
- Microsoft Office 365 organization for Exchange Online or Exchange Online Protection subscription this will include Azure RMS subscription.
The next step would be to enable Azure RMS before we can continue, let’s have a look at how to enable Azure RMS.
Azure RMS has some prerequisites that we need to follow as well and they include the following.
- Supported operating System: Windows 10, Windows 7, Windows 8, Windows 8.1, Windows Server 2008, Windows Server 2008 R2, Windows Server 2012, Windows Server 2012 R2
- Minimum version of Windows PowerShell: 2.0
- Microsoft .Net Framework: 4.5
Next, we can download the Azure RMS PowerShell Module Here: https://www.microsoft.com/en-us/download/details.aspx?id=30339 .
From the local folder double click the exe file (WindowsAzureADRightsManagementAdministration_x64) to start the Azure AD RMS Setup wizard.
Next open PowerShell and the following cmdlet to import the newly installed modules.
Import-Module AADRM
To see which cmdlet is available for the newly imported module type the following.
Get-Command -Module ADDRM
To get started we need to connect to Azure RMS, type the following cmdlet and enter the credentials of a Global Administrator.
Connect-AadrmService
Now that we have a successful connection establish with Azure RMS, we can go ahead and run the following Cmdlet to Enable Azure RMS.
Enable-Aadrm
For the purpose of this lab I will not active Azure RMS across all user in my Office 365 organization, instead I will configure Azure RMS to only allow the users to protect content using Azure RMS if they meet the following. Note If you don’t want all users to be able to protect files immediately by using Azure Rights Management, you can configure user onboarding controls by using the Set-AadrmOnboardingControlPolicy PowerShell command. You can run this command before or after you activate the Azure Rights Management service.
- Is part of an security group?
- Has an Azure RMS license?
The complete post can be found Here: http://thatlazyadmin.com/2017/08/16/encrypting-email-messages-microsoft-office-365/
- Labels:
-
Admin
-
Exchange
-
Office 365
-
On-Premises
-
Security
- Mark as New
- Bookmark
- Subscribe
- Mute
- Subscribe to RSS Feed
- Permalink
- Report Inappropriate Content
Aug 17 2017 01:31 AM
Beautiful Article.
thanks for posting
- Mark as New
- Bookmark
- Subscribe
- Mute
- Subscribe to RSS Feed
- Permalink
- Report Inappropriate Content


