- Home
- Content Management
- The SharePoint Community blog
- [MVP Blog] Provisioning an Office 365 group with an approval flow and Azure functions-part 1
- Subscribe to RSS Feed
- Mark as New
- Mark as Read
- Bookmark
- Subscribe
- Printer Friendly Page
- Report Inappropriate Content
Office 365 groups span over various Office 365 services and provide a great way for collaborating. By default, every user can create an Office 365 group. While self-service is a good thing and many businesses adopted into that direction, some companies still prefer the controlled approach.
In real world environments, organizations usually want to restrict the group provisioning so that IT can control the wild growth of groups. This article series shows how to create an Office 365 group with an attached approval process with SharePoint Online, Flow and Azure functions. See how this works here!
This is part 1 of a 3 part series. This article series was written by Martina Grom and Toni Pohl.
For showing all the technics behind that requirement we developed a demo scenario showing all necessary steps. You need to have a SharePoint Administrator, a Flow license and an Azure subscription and some basic knowledge about web technologies. There are some steps required, but the process is simple. Follow these steps to get your solution up and running.
The scenario
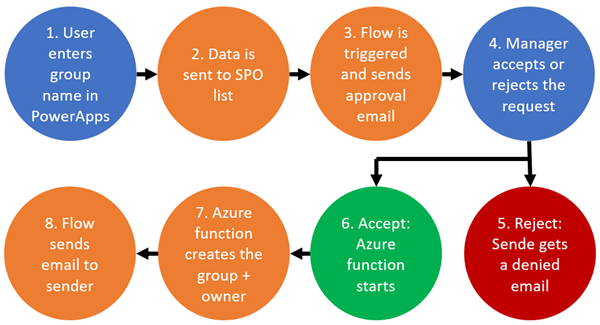
The following graphics delivers the planned steps for the approval workflow. The blue steps require a user interaction, the orange ones are automatic processes. Green and red show an accept or deny decision.
If a user requests to create an Office 365 group (which can be requested f.e. in a PowerApp or in a SharePoint list) and it gets accepted, the function provisions the group and the initiator gets a notification email. In this sample, we start with the base part that does the work: provisioning the Office 365 group, first as a demo, then in part two the code follows.
First, see how group operations work with Microsoft Graph Explorer
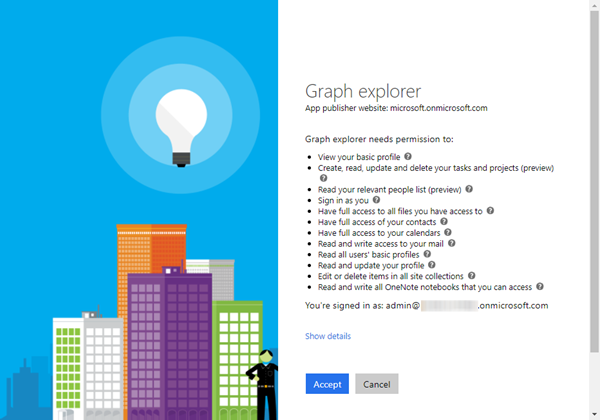
Open developer.microsoft.com/graph/graph-explorer, sign in and accept the consent for the Microsoft Graph App.
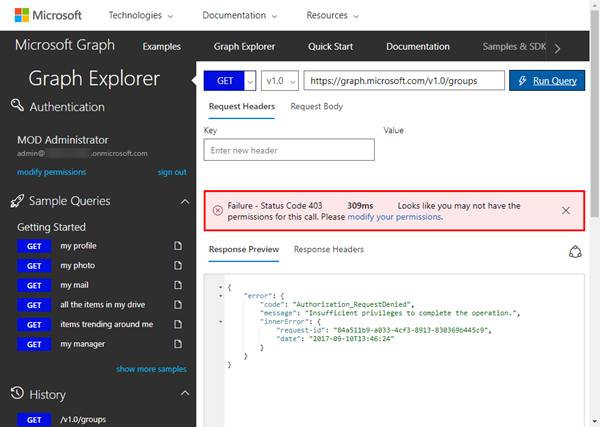
Now, try to access the Microsoft groups with a GET request of this URL:https://graph.microsoft.com/v1.0/groups
If you get an error as here, your account (even if it's the global administrator) does not have the necessary permissions.
The error says "Authorization_RequestDenied", and "Insufficient privileges to complete the operation."
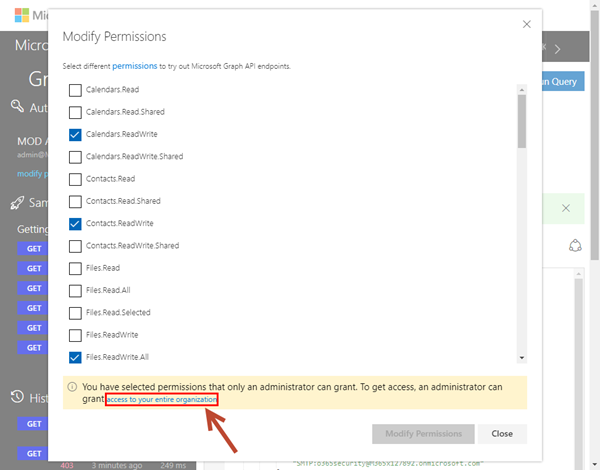
You need to modify the permissions. Open the link in the red message box (or on the left below your account). In the Modify Permissions dialog, click "access to your entire organization" and confirm the "Modify Permissions" button. Alternatively, you can add the required permissions "Read and write all groups" manually.
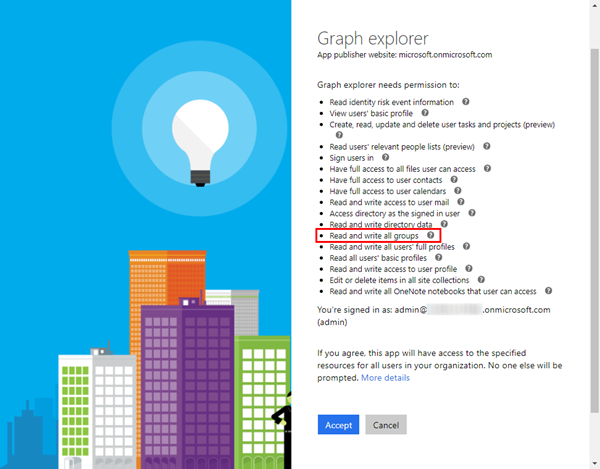
Then, sign in again (which happens automatically that you get redirected to the login page again). Now, you get a new consent with all possible permissions. Accept the new consent for your organization.
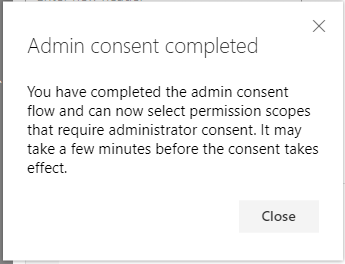
Another box informs about the newly granted permissions, and yes, it can take some minutes before the consent takes effect, but mostly it works instantly.
We're done with the permissions for our administrator user.
Update December 2017: All App permissions
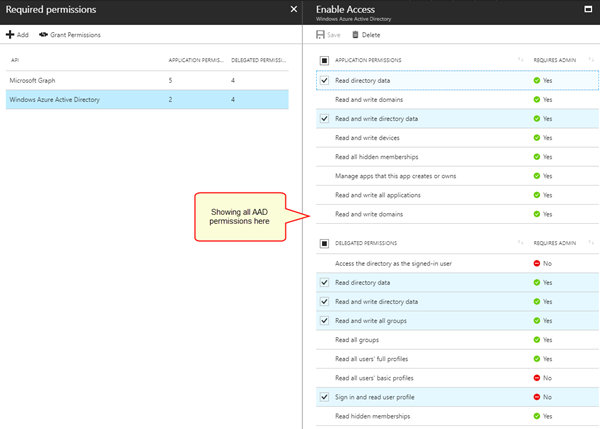
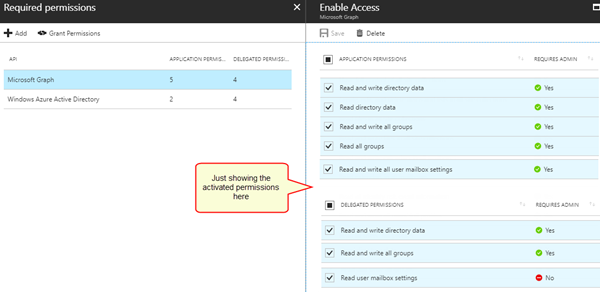
Since we got some feedback on the required permissions for the app, see the following screenshots for all activated permissions of that app:
For AAD, the following app permissions were used:
For Graph, these permissions have been set.
We hope, this clarifies the permissions.
Accessing groups through the Microsoft Graph API
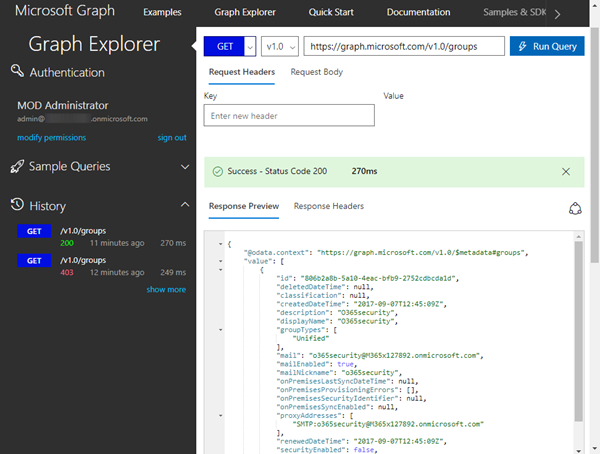
Ok, now we should be able to use the API for Office 365 groups. For our demo, we are using Microsoft Graph API version 1.0 (which is the current version). The next attempt against https://graph.microsoft.com/v1.0/groups works as expected: We get all groups of the tenant - which is one single existing Office 365 group in our sample.
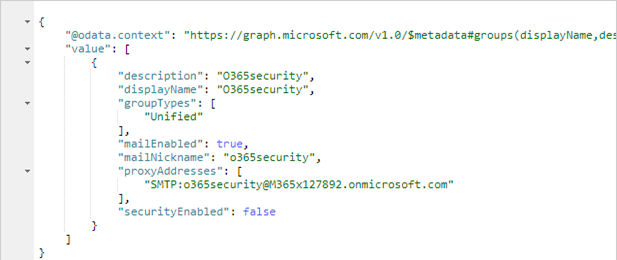
Since the API represents an OData interface, we can use expressions as filtering, paging and more. Here we reduce the output to the relevant properties with $select as parameter:
https://graph.microsoft.com/v1.0/groups?$select=displayName,description,groupname,groupTypes,
mailNickname,mailEnabled,securityEnabled,proxyAddresses
For a list of more OData options, see Use query parameters to customize responses and Supported queries, filters, and paging options | Graph API concepts.
Create a new Office 365 group with the Microsoft Graph API
We can create a new Office 365 group with a POST operation and the necessary data as follows. First, we simply copy the JSON output from above and adapt it as needed. We create a new group "My Demo 1" with some description and the necessary properties as here:
{
     "displayName": "My Demo 1",
     "description": "This is a demo group",
     "groupTypes": ["Unified"],
     "mailEnabled": true,
     "mailNickname": "mydemo1",
     "securityEnabled": false
}
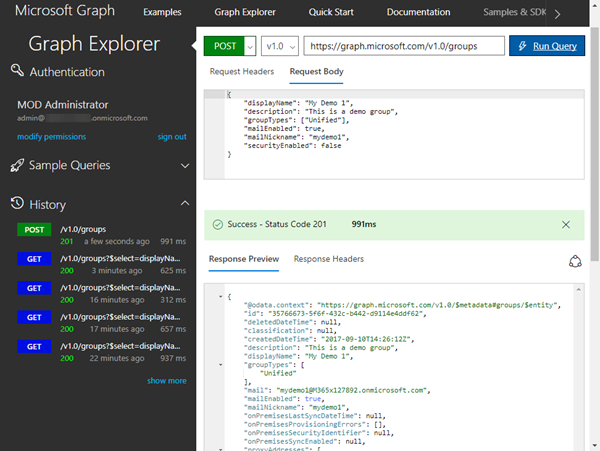
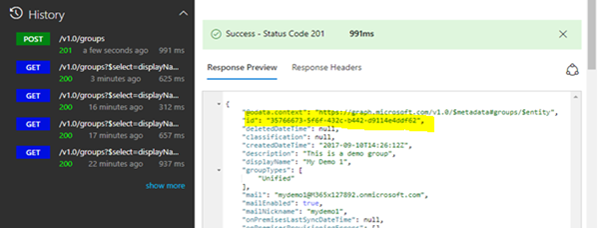
An Office 365 group is defined by the group type "Unified". This JSON-description must be pasted into the "Request Body". So, let' s execute this operation against https://graph.microsoft.com/v1.0/groups with a POST as here:
You should get a HTTP status code 201 (which means Ok, the request has been fulfilled and has resulted in one or more new resources being created.) and the runtime of the operation and some output.
To see, what properties can be used for a POST operation and what properties are read only check out the list at group resource type.
Set the owner of a group
When we create a new group with the Global Administrator with Graph Explorer, that user is automatically owner of the new group which is fine. If we do it (in part 2) with an app, there is no owner set. This means, that the user who requested the new group will not be able to access or to manage it. So, it's essential, that we are able to set the owner of a group programmatically as well.
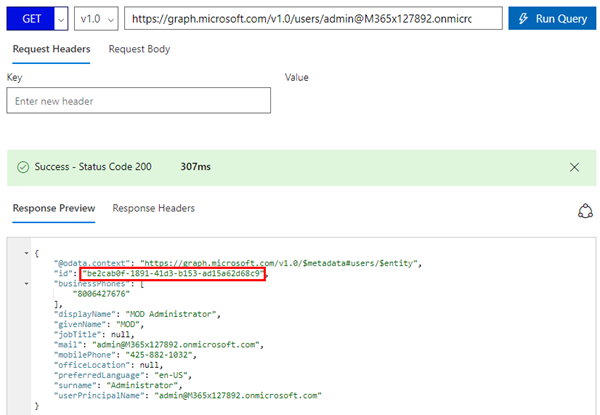
The good story is that we are able to do this with the Microsoft Graph API. See https://developer.microsoft.com/en-us/graph/docs/api-reference/v1.0/api/group_post_owners how this works. Basically, we need to get the User Id of the owner first. We can get it by asking for the user by his UPN:
https://graph.microsoft.com/v1.0/users/admin@M365x127892.onmicrosoft.com
In our sample, the User ID is be2cab0f...
Also, we need the Group ID. To get a quick list of all groups, use this GET query:
https://graph.microsoft.com/v1.0/groups/?$select=displayName,id
...and copy the Group ID from the output as we did before with the User ID. Here it's 79744859...
Now we can add that User Id to the list of owners. Create a POST operation in Graph Explorer wit the address of the desired group as follows:
https://graph.microsoft.com/v1.0/groups/79744859-fb99-4a09-8b15-0f3a3d7bb117/owners/$ref
The Request body needs to contain the JSON data of our new owner (the user's address endpoint):
{"@odata.id": "https://graph.microsoft.com/v1.0/users/be2cab0f-1891-41d3-b153-ad15a62d68c9"}
This sets the owner of the new group to a specific user. We also need to add the owner as a member of the group. This is exactly the same method (the same JSON body with the same user), just the endpoint is members instead of owners:
https://graph.microsoft.com/v1.0/groups/79744859-fb99-4a09-8b15-0f3a3d7bb117/members/$ref
The owner now can fully manage the group container object.
Create a new Office 365 group with PowerShell
Of course, we can use PowerShell as well. First, we connect to Exchange Online.
Connect-MsolService -Credential $cred
$session = New-PSSession -ConfigurationName Microsoft.Exchange `
-ConnectionUri https://ps.outlook.com/powershell/ `
-Credential $cred -Authentication Basic -AllowRedirection
Import-PSSession $Session -AllowClobber
To see a list of all existing Office 365 groups, use Get-UnifiedGroup.
Now we can create a new group as described in https://technet.microsoft.com/en-us/library/mt219359%28v=exchg.160%29.aspx?f=255&MSPPError=-21472173... . There are a bunch of possible options, but this basic syntax is sufficient for the new group:
New-UnifiedGroup -DisplayName "My Demo 2" -Alias "mydemo2" `
-PrimarySmtpAddress "mydemo2@M365x127892.onmicrosoft.com" `
-Owner "admin@M365x127892.onmicrosoft.com"
The group gets provisioned in the same way as before with the Microsoft Graph API.
Check it in Outlook
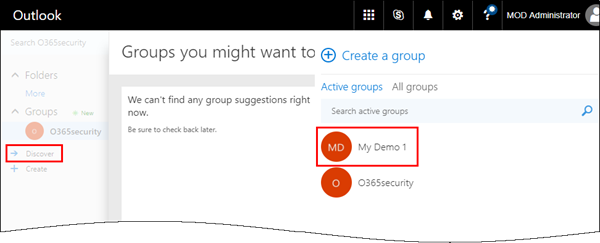
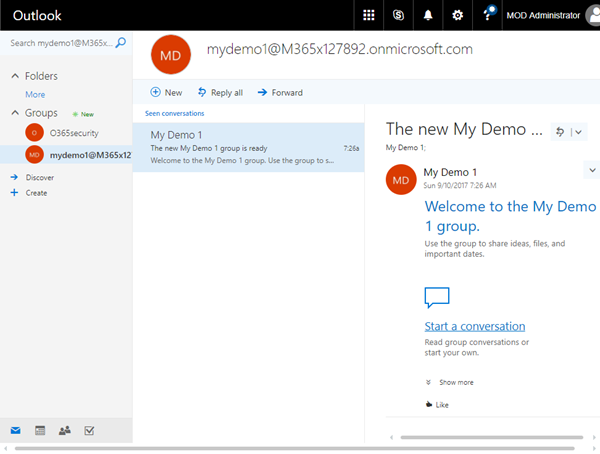
Open https://outlook.office.com/ and discover the modern groups. "My Demo 1" should show up in the list of Office 365 groups.
It worked! The mail nickname is the email address with the primary domain defined in that Office 365 tenant. The email address can be changed later with PowerShell. To do that, see the details at Why we moved away from Exchange distribution groups to Office 365 groups and "Setting custom email addresses for the Office 365 group".
Get an Office 365 group with Microsoft Graph
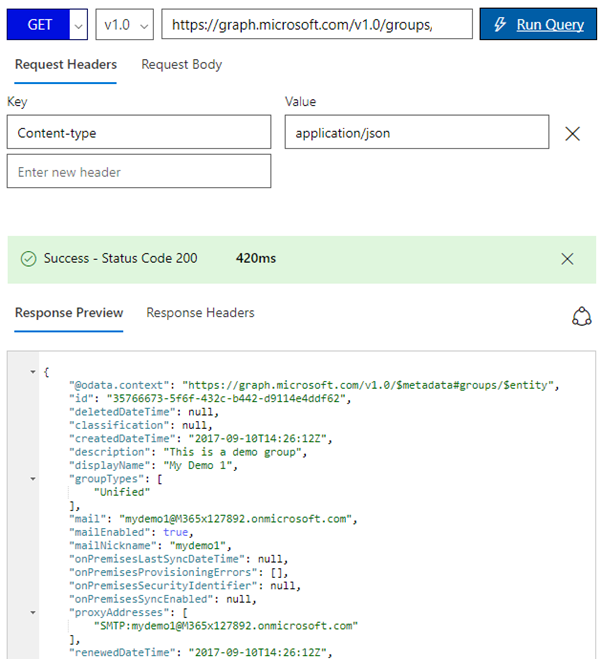
To access one specific group, we can filter that easily: To identify one group, the ID is added to the request. So you can get the ID from the Graph Explorer Request above.
So, in our case that's an operation as here:
https://graph.microsoft.com/v1.0/groups/35766673-5f6f-432c-b442-d9114e4ddf62
...and we get just this group.
Delete an Office 365 group
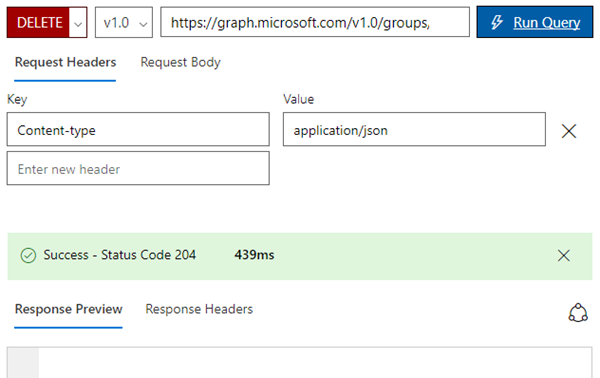
Now, deleting that specific group is easy. The HTTP operation is changed to DELETE.
When the query is executed, it delivers HTTP status code 204 (The server has successfully fulfilled the request and that there is no additional content to send in the response payload body).
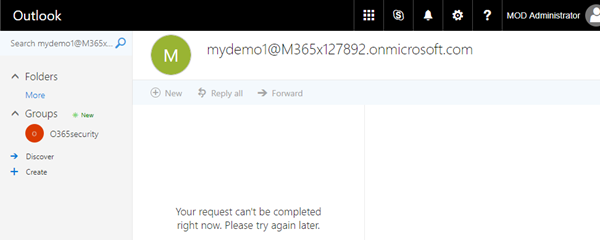
The group has been deleted and should no longer be present in Outlook.
Deleted Office 365 groups are (nowadays) soft deleted. This means, you can undelete a group with the Active Directory Module and the PowerShell CmdletRestore-AzureADMSDeletedDirectoryObject -Id <objectId>
as described in Restore a deleted Office 365 Group.
The choice is yours
As we have seen, you can use tools as CURL, Fiddler, Postman, PowerShell or similar or any other programming language as C# to manage Office 365 groups programmatically.
In part two, we develop the code for our planned automation.
You must be a registered user to add a comment. If you've already registered, sign in. Otherwise, register and sign in.
