- Home
- Windows Server
- Failover Clustering
- Deploying Cluster Shared Volumes (CSV) in Windows Server 2008 R2 Failover Clustering
- Subscribe to RSS Feed
- Mark as New
- Mark as Read
- Bookmark
- Subscribe
- Printer Friendly Page
- Report Inappropriate Content
Hi cluster fans,
By now you have probably heard of the new architectural innovation being brought to Failover Clustering in Windows Server 2008 R2 known as Cluster Shared Volumes, or CSV. CSV functions as a distributed-access file system optimized for Hyper-V. A comparison would be to a clustered file system, however, unlike other clustered file systems, CSV does not use any proprietary technology – it uses standard NTFS, so there is nothing special you need to purchase or support – it just works! If your storage is suitable as a standard clustered disk, it can be used as a Cluster Shared Volume. In the past, only one node could host a virtual machine (VM) and access the VHD on the shared storage, so if another node needed to host the VM or access the disk, it would need to failover and it would affect every resource on that shared disk. With CSV in R2, any node can host the VM and any node can access the VHD on shared storage, so VM and disk ownership can move freely across cluster nodes without impacting any other resources on that shared disk.
CSV will provide many benefits, including easier storage management, greater resiliency to failures, the ability to store many VMs on a single LUN and have them fail over individually, and most notably, CSV provides the infrastructure to support and enhance live migration of Hyper-V virtual machines. This blog post will cover configuring and deploying Hyper-V VMs using CSV in a Windows Server 2008 R2 Failover Cluster. We will discuss other benefits and features of CSV and live migration in future posts. All information is based on the Beta 7000 build of Windows Server 2008 R2 and is subject to change for the RTM version of this product.
Please report any bugs through the Microsoft Connect site or send us feedback by clicking the ‘Email’ link in the upper-left corner of this site.
Thanks,
Symon Perriman
Program Manager
Clustering & High-Availability
1) Prepare your cluster
To configure CSV we must first build the cluster. There is nothing different which needs to be done for CSV. R2 clustering will still support iSCSI, Fibre Channel and Serial Attached SCSI (SAS) for storage. CSV will work with any of these, so long as the disk is using NTFS as the file system.
[Update 3/31/10] For best practices regarding Hyper-V networking and NICs based on RTM behavior, please refer to this documentation: http://technet.microsoft.com/en-us/library/ff428137(WS.10).aspx
For the networks, it is still recommended to have a public network for client connections. Additionally, we recommend a dedicated network for CSV, internal communication and 'heartbeat' traffic, and another NIC for live migration traffic which should be at least 1 GB. This is to ensure that the heartbeat network does not get flooded by live migration traffic and miss health-checks which would cause a failover. If you are using iSCSI you will need another NIC for that iSCSI network.
Once you have verified that the hardware you will use in the cluster supports Hyper-V, you install the Failover Clustering feature and the Hyper-V role from Server Manager on every node in the cluster. Due to the way which CSV disks are accessed, it is recommended that you use the same drive letter for your OS on every cluster node (such as C:\).
Once the hardware is connected and the correct roles and features are installed, you should ensure that the entire clustering configuration is supported. This is done by running the built-in Validate a Configuration tool (Guide: Validating Hardware for a Failover Cluster ). So long as every component in the solution has a logo for Windows Server 2008 R2 and it passes ‘Validate’ then it is supported for CSV. Alternatively, you can purchase a pre-Validated solution from one of our partners in the Failover Clustering Configuration Program .
After the solution has passed ‘Validate,’ create a cluster (Guide: Creating a Failover Cluster )
2) Enable CSV
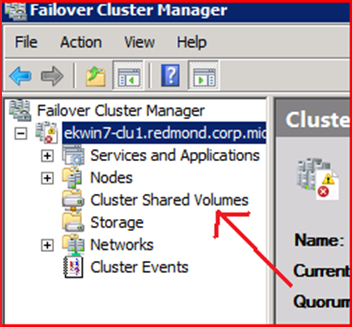
To enable Cluster Shared Volumes (CSV) on a cluster, click on that cluster name in the navigation pane in the Failover Cluster Manager MMC snap-in. In the center pane, click the “Enable Cluster Shared Volumes…” link. A notification appears reminding you that CSV is only for use with Hyper-V . The cluster now supports CSV.

A new node appears in the navigation pane for Cluster Shared Volumes:
3) Create CSV Disks
Now that CSV is enabled, create some CSV disks.
A. Select the Cluster Shared Volumes node in the navigation pane in the Failover Cluster Manager.

B. In the right Actions pane, select “Add storage”. This will bring up a window that shows all the disks in the Available Storage group. Check the disks you want to add, then select “OK”
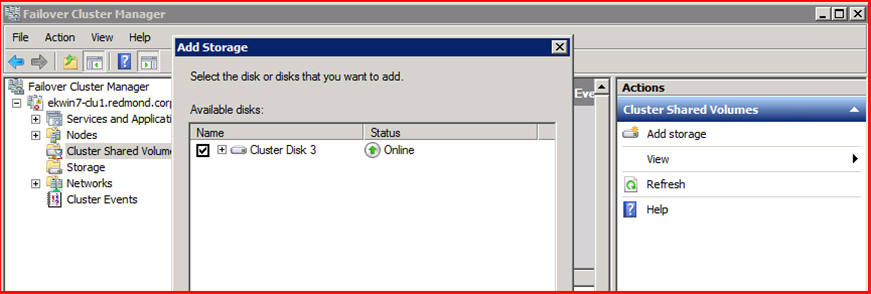
C. The new disk(s) now appear in the list for Cluster Shared Volumes:

4) Copy VHDs to your CSV Disks
CSV allows every cluster node to access the disk concurrently. This is accomplished by creating a common namespace under %SystemDrive%\ClusterStorage. For this reason, it is necessary to have the OS on the same drive letter on every node in the cluster (such as C:\, which will be used in this blog). You will see the same directory from every node in the cluster and this is the way to access CSV disks.

Each CSV disk has its own volume in the directory and is assigned the default name, VolumeX , for each disk. In this example we have 3 CSV disks so we see 3 folders. The C:\ClusterStorage directory must keep the same name, however the volumes within this directory can be renamed.
You will need to copy your VHDs onto these directories to create highly-available VMs. CSV will support dynamically-expanding, fixed-sized, and differencing VHDs. CSV will not support pass-through disks.
5) Create VMs on CSV Disks
After enabling CSV and placing the VHDs on the CSV disks, we are ready to make those virtual machines highly-available.
A. Open Hyper-V Manager
B. From the Action pane, select “New” and then “Virtual Machine”. This will open the New Virtual Machine Wizard.
C. Provide a name for the Virtual Machine and check-mark the box for “Store the virtual machine in a different location”, then specify the path under “C:\ClusterStorage\” for the volume that you want the VM to use.

D. Specify the memory for the VM, then “Next >”
E. Specify the network for the VM, then “Next >”
F. In the “Connect Virtual Hard Disk” page of the wizard, if you specify either “Create a virtual hard disk” or “Use and existing virtual hard disk”, specify a path to a Cluster Shared Volume under C:\ClusterStorage\

G. Select “Next >”
H. Choose the desired options in the “Installation Options” wizard page. Select “Next >”
I. Select “Finish” at the Summary Page of the Wizard
6) Make your CSV VMs Highly-Available
Now that we have created our VMs on our CSV disks, we can make them highly-available so they can be managed by the cluster and can fail over.
A. Open Failover Cluster Manager
B. In the left pane, select “Services and Application”
C. In the Action pane, select “Configure a Service or Application”. This will open the “High Availability Wizard”

D. Select “Virtual Machine”, then select “Next >”
E. Check the Virtual Machine that you want to add to the Failover Cluster. (Note, the VM must be shutdown/turned off to be added) Select “Next >”
Failover Clustering will determine if this VM is using CSV or standard cluster disks based on the path of the VHD (it will look for the %SystemDrive%\ClusterStorage path).

F. Review the Confirmation page in the wizard and select “Next >”
G. Review the Summary page in the wizard. If the status is not “Success”, review the report by selecting the “View Report...” button and investigate the information for possible causes. Otherwise, select “Finish”
The Virtual Machines will be shown in the left pane of Failover Cluster Manager. They are automatically given the Name “Virtual Machine” with a number to differentiate them. These names can be changed by right clicking on them and selecting “rename”.

Start your VMs when you are ready.
7) Perform a Live Migration
You now have your CSV cluster up and running with no special hardware or additional considerations. You can manage the Virtual Machine resource like any standard resource, such as changing properties, creating dependencies, and performing failovers. You will notice that for VMs you can now perform a live migration which allows you to move a running VM from one cluster node to another cluster node without any client disruption. This keeps a VM highly-available even when the VM moves between different physical machines.
To perform a live migration, select the ‘Live migrate this virtual machine’ button and pick a target in the right Actions pane in the Failover Cluster Manager snap-in. This will perform the live migration and its status will be indicated in the center information pane.


You can have CSV without live migration and you can perform a live migration without CSV, however, these are complementary technologies which enhance each other. We will look at the functions of each in more detail in later blog posts.
Additional Resources
· Whitepaper: Windows Server 2008 R2 & Microsoft Hyper-V Server 2008 R2 - Hyper-V Live Migration Overview & Architecture: http://www.microsoft.com/downloads/details.aspx?FamilyID=fdd083c6-3fc7-470b-8569-7e6a19fb0fdf&d...
· Step-by-Step Guide for Hyper-V: Using Live Migration in Windows Server 2008 R2:
http://technet.microsoft.com/en-us/library/dd446679.aspx
You must be a registered user to add a comment. If you've already registered, sign in. Otherwise, register and sign in.