- Home
- Security, Compliance, and Identity
- Security, Compliance, and Identity Blog
- Create custom templates in Azure RMS with the Azure Management Portal
- Subscribe to RSS Feed
- Mark as New
- Mark as Read
- Bookmark
- Subscribe
- Printer Friendly Page
- Report Inappropriate Content
Happy Thursday everyone,
Today we’re announcing the preview of our new custom template work as well as integration into the Azure Management Portal. Both are features we have been asked for by you, our customers.
As usual, follow us on this blog, @TheRMSGuy on twitter or join in on the fun at www.yammer.com/AskIPTeam . We’re soon going to add a new mail list option as that has been commonly requested (think “push blogs”).
As the AD RMS crowd know, custom templates let you define the protection policies you would like to roll out within your organization. Whether your organization is using Azure RMS in as part of your on premises deployment (via the RMS connector ) or as part of Office 365, you can now do this via the Azure Management Portal.
Manag ing Azure RMS custom templates from the Azure Management Portal
To get started you can open the Office 365 admin center, click on Service Settings , choose Rights Management and then select manage . On the Rights Management section you can select additional configuration which will lead you to the new Rights Management section of the Azure Management Portal. Alternatively, you can navigate directly to https://manage.windowsazure.com . Once there select the Active Directory service on the left, then click on Rights Management and choose your tenant from the list. You will need an Azure subscription to access this portal, if you don’t have one you can get one for free.

Once there you will see the Quick Start screen, where you will notice you now have the option to create custom Rights Policy templates. When you initially activate Azure Rights Management capabilities in your organization we automatically create two default Rights Policy Templates that cover the most common needs in the majority of organizations. These two policies, called “< Organization> – Confidential” and “< Organization> – Confidential View Only” and give all users in your organization either full access or restricted access to the documents protected with them.
Custom templates complement these default policies, giving you more flexibility in controlling how groups of users within the organization can access and use sensitive documents. With custom templates you can designate different groups of users that will have access to documents protected with these templates, and you can define an access level or a list of rights for each of these groups. You can also control for how long content protected with these templates will be accessible, and you can define whether you want to require users to be online to access the content (thus, getting maximum control over their ability to access the document in case your policies change over time and ensuring all accesses to the documents get logged) or you want to allow them to cache document licenses so they get the ability to access the content from disconnected locations for up to a defined period of time.
Please note, as our favorite superhero would say ‘with great power comes great responsibility’. Don’t go crazy with templates. Start simple. Even more, keep it simple. Think of your users and, above all, keep the your XACML loving experts away from this tool. You’ll thank us later.
By way of example, most of our leading RMS organizations have less than 10 company-wide templates, which is a list most users can quickly scan through to identify the template they need. Use short names and descriptive titles. Don’t redundantly say template. List company name as there may be others later on. In the description, express what rights are granted and to whom. When read by a normal user, it should offer clear guidance. It’s not an SMS so stay away from TLA or MLAs that only the ENG or R&D IT understand. K?
Example of a poor choice: HR Template -- This template protects files for human resources. RO/DNF.
A better choice: Contoso HR Sensitive -- Grants view only rights to Contoso human resources employees only. No ability to print or forward.
Let’s go through the exercise of creating a custom Rights Policy template. Let’s say you want to create a policy for your new product specifications. You want everyone in your engineering and marketing organizations to be able to access these specifications, but only engineers should be able to modify them.
You start from the Getting Started screen where you can click on the option to Create an additional rights policy template :

You will be asked to select a default language for your template. You can configure a template to have a name and a description that is available in multiple languages, which is useful if in your organization you have users that speak different languages that could deny understanding the policy on a document because it was in a language they don’t understand. For our example we will enter one name in English (which users will see listed in their applications when they open the option to protect content, in general it is advised to include the name of your company in the name of the templates in case users have to use templates from multiple organizations, but to keep it simple in our case we will enter “ Product Specifications ”) and a description that users consuming the content will see, usually at the top of their document in a yellow banner (it is recommended that this description clearly indicates the expectations regarding the handling of the document and indicates what rights users can expect on the document). Enter any description you want for this exercise.
After entering the name and description click Next .
After you have created your template and added a name and description for it, you can select Templates at the top of the screen and select the Product Specifications template from the list to configure additional settings.

Once you have selected the template you can add users and groups to it by clicking on the Rights option and then clicking on the Add button at the bottom of the screen.

When adding people to your policies, it is generally advised that you use groups instead of individual users. After all you usually want to grant rights to people based on their role or position and the work they do, not based on who they are, and individual users change positions and join and leave the company, so assigning rights to individual users makes maintaining the policies much easier. Keep in mind that your groups must have an email address for you to be able to use them in a custom template. If you need to add rights to a group, you can do that from the Office 365 management portal. In this case, you will add the Engineers group to grant them rights.
Select a group from the list of groups in your directory (in our case the Engineers group), then click on the Next button . You will be able to select from a list of pre-defined access levels such as Co-owner or Viewer. If you need more granularity in the assignment of rights, you can choose the Custom option, where you will be able to assign individual rights such as the ability to copy, print or save a document. In our example you should add co-owner rights to the Engineering group so they have full control over their specifications. You can then add the Marketing group to grant them viewer rights , or you can grant them custom rights if they have the need to print and copy content from the specifications into other documents.
After you have finished assigning rights, you can configure additional settings such as defining a duration for the document or settings for offline access, or you can define additional languages with names and descriptions for the template. You do this by clicking on the Configure option. For our template, you can leave these settings at their default values, which offer a good balance of security versus usability.
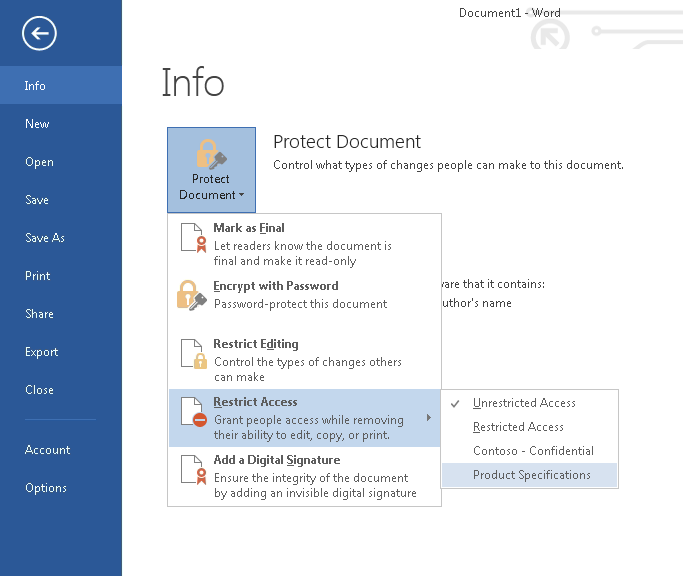
Once that is done, your template is ready for publishing. Until you publish your template it will remain in an Archived state, where it won’t be distributed to users. We will publish this template by clicking on the Publish button at the top of the Configure screen. Once published the template will be made available to users in their favorite applications so they can be used to protect their sensitive documents (sensitive product specification documents in our example):
Some applications may take a while to download the new templates, or they may require that the users log off and log back on to get templates refreshed. To learn more about this or about configuring custom templates see our online help at http://technet.microsoft.com/en-us/library/dn642472.aspx#BKMK_HowToConfigureCustomTemplates .
This is just the beginning for our new management portal, over the next few months we will continue adding capabilities here so keep an eye on this blog for future announcements. In the meantime, leave us some feedback below, or via @TheRMSGuy on twitter or at www.yammer.com/AskIPTeam .
Thanks,
Dan on behalf of the RMS team
You must be a registered user to add a comment. If you've already registered, sign in. Otherwise, register and sign in.