- Home
- Security, Compliance, and Identity
- Core Infrastructure and Security Blog
- Provisioning a Mail Enabled User
- Subscribe to RSS Feed
- Mark as New
- Mark as Read
- Bookmark
- Subscribe
- Printer Friendly Page
- Report Inappropriate Content
First published on MSDN on Sep 08, 2015
I’d like to cover something that I get asked about a lot: provisioning mail enabled users with FIM. In this example, I’m going to focus more on the FIM pieces and much less on the Exchange piece as I am in no way an Exchange guy. (Heck, I’m just barely a FIM guy.) As such, this is going to be the most basic environment with a singular domain, Exchange server and mail database. I realize out in the real world your mail environment is probably a lot more complex, but hey, that’s why you have Exchange people. Let them figure out their stuff and we’ll build the FIM.
To begin, open the synchronization engine:

Right click on the AD management agent corresponding to the AD forest where we wish to provision mailboxes and select “Properties”

In the “Properties” window, choose “Select Attributes”:

Be sure to check the box to “Show All” in the top right-hand corner:

Scroll down to locate the “homeMDB” attribute, then click to select it:

Likewise, locate the “msExchHomeServerName” attribute and click to select it:

When finished, click “OK”
Next, return to the synchronization engine, and again, right click the AD management agent we wish to modify, then select “Properties”

On the “Properties” window, select the “Configure Extensions” tab:

In the drop down for “Provision for:”, we may select either Exchange 2007 or Exchange 2010.

In this example, we have elected to provision into an Exchange 2010 environment. As such, in the field for “Exchange 2010 RPS URI:”, enter the path to the mail server, as show below:

When finished, click “OK”.
Next, right-click on the FIM Management Agent and, again, select “Properties”.

This will open the “Properties” window. On the left-hand side, select the “Configure Attribute Flow” tab:

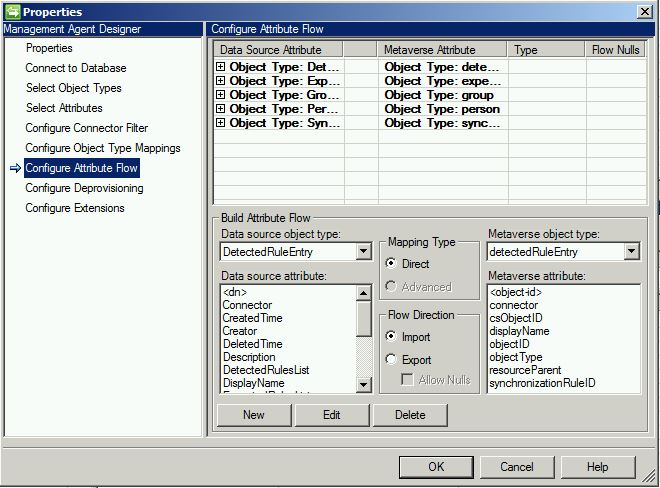
Select the attribute flow for “Person to Person” to expand it. Here we see some configured attribute flows:

In the “Data source object type:” and “Metaverse object type:” fields, select the “email” attribute, with a flow direction of “Export” and click “New”.

And do the same thing for the attribute “mailNickname”:
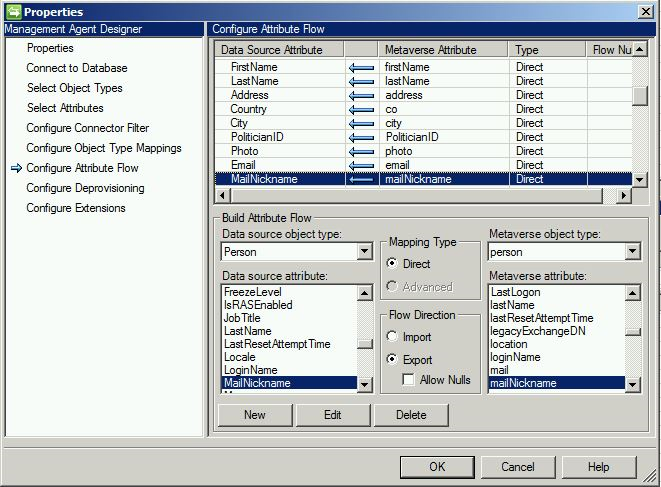
Next, we will again create a new flow for “mailNickname”, only this time, for “Flow Direction” we will choose “Import”:

And create an “Import” flow for “email”.

When finished, click “OK”.
Now it is necessary that we collect some Exchange specific information (two specific attribute values) to proceed. The easiest way of doing this is by evaluating an existing mail enabled user object in AD.
To begin, open Active Directory Users and Computers (ADUC):

At the top of the screen, select “View” and make sure the option for “Advanced Features” is checked:

Next, find an existing mail enabled user object, right-click and select “Properties”:

This will display the “Properties” window:

Select the “Attribute Editor” tab:

Scroll through the list until you locate the attribute “homeMDB”. Click “Edit”. This will display the full attribute value. Copy this value.
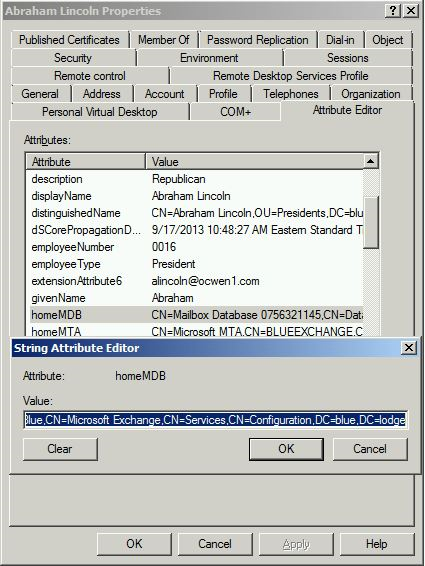
Next, locate the attribute for “msExchHomeServer”. Again, select “Edit” to display the attribute value, then select and copy it.

You may find it helpful to paste each of these value into a text file, as we will need to reference them when we create attribute flows in the outbound synchronization rule(s).

Now, having performed the necessary steps in the synchronization engine, and having gathered required information from Active Directory, we are ready to complete the final piece of mailbox provisioning in the Portal.
To begin, navigate to the FIM portal:

At the bottom of the left-hand navigation menu, select “Administration:

In the “Administration” menu, select “Synchronization Rules”

Click the synchronization rule we wish to configure to open it:

Once the synchronization rule is open, click the tab for “Outbound Attribute Flow”:

Click “New Attribute Flow”:
In the drop-down menu, scroll to the bottom and select “String”:

In the text box, paste the string for “msExchHomeServer”:

Select the “Destination” tab. For “destination”, select the “msExchHomeServerName” attribute, then click “OK”.

Create another attribute flow of type “string”, and this time paste the value for “homeMDB”.

Likewise, in the “Destination” tab, select “homeMDB”, then click “OK”.

Finally, make sure to place a check box in the “Initial Flow Only” column next to each of these attributes, as seen below:

Now, I know you’re probably saying, “But we have multiple mail databases and the above method won’t work; what now?”
This is a tricky situation. One common approach many organizations take is to dedicate one mail database to be a staging area. When we create a new mail enabled user, they get created there and a member of the Exchange team moves them to where they need to go. If, however, you’re a very large organization, this can still be a very time consuming task.
There is a solution here to handle automation, but unfortunately it’s very much dependent on the layout of your environment. If you have mail databases sorted in some meaningful manner (by geographic location, by department, by division, etc.), we can use this to dynamically build the path much in the same way as DN.
Questions? Comments? Love FIM so much you can't even stand it?
EMAIL US>WE WANT TO HEAR FROM YOU!<
You must be a registered user to add a comment. If you've already registered, sign in. Otherwise, register and sign in.