- Home
- Security, Compliance, and Identity
- Core Infrastructure and Security Blog
- How to Reduce the Size of the Winsxs directory and Free Up Disk Space on Windows Server 2012 Using Features on Dema...
- Subscribe to RSS Feed
- Mark as New
- Mark as Read
- Bookmark
- Subscribe
- Printer Friendly Page
- Report Inappropriate Content
First published on TechNet on Feb 24, 2013
** If you're looking to free up disk space and reduce the size of the WinSxS directory on Windows 7 SP1, make sure to check out the following blog post on this topic**
** If you're looking to free up disk space and reduce the size of the WinSxS directory on Windows Server 2008 R2, make sure to check out the following blog post on this topic**
--------------------------------------------------------------------------------------------------
Remember these on Windows 2003 Server?

I cannot count the number of times I’ve been asked how to clean this up. Apparently I’m not the only one that hates clutter.
And what about that annoying prompt to insert your product CD-ROM now at the most inopportune time? I’ve literally been on mission critical server down situations where no one could locate a CD.
File corruption, repairs, installing features all required the CD.
Introduction of the Component Store
So with Windows Server 2008 and later, we moved from that to the Windows Side-by-Side (WinSXS) directory and there was much rejoicing as it introduced many new features that made the administrator’s job much easier:
- We no longer prompt for the CD when installing a role or feature (unless you’ve completely removed which only applies to Windows Server 2012 or later)
- We automatically repair corrupt files using a good copy from the component store
- Repairs such as System File Checker (SFC) no longer prompt for media
- All the previous versions of the operating system files are still readily available and newer versions (just in case you install a role or feature in the future) are too

But a few nagging questions began to popup…These typically come hand in hand with disk space cleanup.
What is this winsxs directory and why is it so large? See below.
Can I delete winsxs? No.
Can I move winsxs? No.
Can I cleanup winsxs? It depends…
The gist, you could uninstall a role/feature, but it was still there…along with all the updates that might ever be needed.
There’s also a good content on how to reclaim space after installing a service pack:
http://support.microsoft.com/kb/2795190/EN-US or if you’re looking to cleanup disk space on Windows Server 2012 in general, check this out: http://social.technet.microsoft.com/wiki/contents/articles/15221.enabling-disk-cleanup-utility-in-w...
Windows Server 2012 Features on Demand
Then came Windows Server 2012 Features on Demand with the ability to remove any unwanted role/feature and all is well. So far.
And it’s easy too with 3 simple steps :
1) Open an administrative PowerShell command prompt
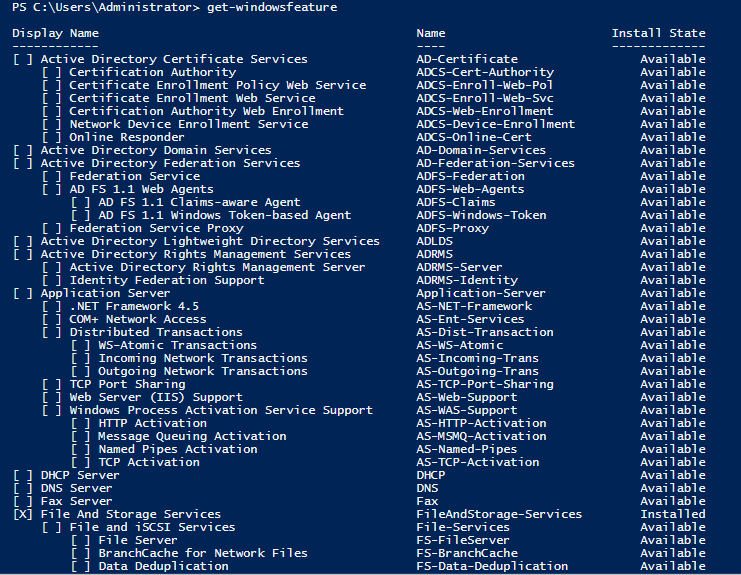
2) Use the Get-WindowsFeature command to find the name of the role/feature
3) To uninstall, run the following command:
Uninstall-WindowsFeature –name <name of role/feature> -remove

Tip : Add the –Whatif switch to the end to see exactly what will be removed without actually removing it.
So why do this? I’ll leave you with three reasons :
1) Decrease the footprint of the base server install
2) Reduce the number of potential patches (and reboots)
3) Increase security compliance by removing features not integral to the role of the server
But don’t worry. We’ll let you add them back if you change your mind. :)
So what happens if you try to reinstall a role or feature that has been completely removed? Well, we alert you that the feature or role is missing and we will automatically attempt to retrieve it from Windows Update (or WSUS), a source location specified by Group Policy, or you can manually specify an alternate source path.
What does this look like in PowerShell?
For starters, when you run the Get-Feature command, it will show the role or feature as Removed:

If you still attempt to add the role or feature via PowerShell, here’s what it looks like:

At this point, it’s obvious we do not have the Group Policy configured with the alternate source location. We can either grant the server external internet access and allow it to get the feature from Windows Update, if possible, or we can specify a source location with our Install-WindowsFeature command by specifying the –Source switch. Here’s an example:
Install-WindowsFeature web-server –source {source location and source file}
Here’s what this looks like in the GUI:

If you click on the Specify an alternate source path option, you are presented with the following:

You can specify a share with the install.wim file, but you also need to specify the index of the image within the WIM file. More on that here in a minute.
If you would like to configure this ahead of time through Group Policy, the policy we policy we configure is Computer Configuration\Administrative Templates\System\Specify settings for optional component installation and component repair

Here’s what the policy looks like when we go to enable and configure it:

Notice the options to Never attempt to download payload from Windows Update or Contact Windows Update directly to download repair content instead of Windows Server Update Services (WSUS) . These options can come in handy depending on the configuration of your environment.
I personally think it’s cool that we can now point to an install.wim file instead of a share with a flat of the install media.
To do so, we specify the WIM parameter along with a share that contains the install.wim file. We also have to specify which image within the install.wim file we wish to use as our source.
For those of you that don’t know, a .wim file is simply a container that contains one or more images. These can be custom images that you’ve created and captured yourself, modified images that have modifications such as injected security updates, or just the base images contained in the default install.wim file pulled out of the Sources directory on the Windows Server 2012 media.
Therefore, the index number we provide could be different depending on the install.wim we are pointing to as our source.
To find out which image you would like to use, run the dism /get-Wiminfo /wimfile:{location of install.wim} to list out the images contained within the install.wim file. Here’s what this looks like for the default install.wim:

Since I’m deploying mainly Windows Server 2012 Standard in my environment, I need to specify an index of 2. The majority of you are probably deploying Windows Server 2012 Standard as well, unless you’re setting up Hyper-V servers, then its likely Datacenter or potentially Server Core, then it’s one of the Server Core editions. However, there are no edition-specific role differences between Standard and Datacenter edition. So really, I could specify an index of 2 or 4 and be just fine.
The end result is that my alternate source file path is as follows:
wim: \\KMS-2012\2012_Source\install.wim:2
Now when reinstalling my role or feature, it uses this source and works like a champ!
Things to keep in mind when using the install.wim as your source:
- As you apply updates to your servers, you want to keep your source install.wim that you are using for re-adding roles and features updated too. So why is this? If you remove a role or feature after it has been updated, it is possible that the update you applied previously that updated that role or feature spanned multiple roles and features and therefore was not removed. When you attempt to re-add the role or feature back using the install.wim source, if it’s not as updated as the server expects, it will fail to re-add it. If it is newer than expected, that’s fine. It just can’t be older than expected.
- When we remove a role or feature, we do delete the files associated with that role when we remove the role, but we don’t uninstall the updates that have already been applied. When the role is enabled again we need files from any updates that have been applied to it.
- It’s ok for the install.wim to be more up to date than the server that you are enabling the role for. The important part is that the install.wim has the files from all the updates that have been applied to the server affecting the role being enabled. Also note that if the install.wim is more up to date than the server, enabling the role will never install new updates directly from the install.wim. To bring the server up to date, new updates need to be applied in the normal way, such as WSUS or Windows Update.
- If you are attempting to install .Net Framework 3.5 on Windows Server 2012, instead of specifying the install.wim, you need to specify the Sources\SxS directory on the DVD or if providing the source, the files in the SXS directory copied from the DVD are just for .Net Framework 3.5. You can host them on a share and supply them through the GUI or through Group Policy just like any other feature.
If all that is too much to keep up with, just use Windows Update. As long as the service is not disabled, blocked at the firewall, or blocked by group policy; if we don’t find what we need in the specified install.wim or on the server, we’ll automatically search Windows Update. It works like a champ. :)
Enjoy!
~ Charity “Will slim base installs be the new wave of the future?” Shelbourne
You must be a registered user to add a comment. If you've already registered, sign in. Otherwise, register and sign in.