- Home
- Microsoft Intune and Configuration Manager
- Configuration Manager Archive
- How to implement a shared SUSDB for Configuration Manager Software Update Points
- Subscribe to RSS Feed
- Mark as New
- Mark as Read
- Bookmark
- Subscribe
- Printer Friendly Page
- Report Inappropriate Content
If you have read the Best Practices for Software Updates in Configuration Manager , you may have noticed that we recommend sharing the SUSDB for Software Update Points (SUPs) off the same Configuration Manager site server. A shared SUSDB setup is becoming increasingly common place, however it can be a bit confusing navigating exactly how to do it properly. This can lead to problems arising from configuration mistakes not-so-happy-little-accidents. To make sure you don’t have any of these problems, here’s some guidance on how to get this all setup properly.
RequirementsThe requirements for a shared SUSDB are the same as for a NLB WSUS 6.X setup. All of the front end WSUS computers that are to share SUSDBs should be running the following:
- The same version of WUSS.
- The same version of Windows
- The same Windows updates installed on the server.
- The same WSUS patches should be installed on all computers that share the same SUSDB.
Also, SQL Server must meet the minimum database requirements . You may use a SQL cluster if you wish, but keep in mind that Windows Internal Database (WiDS) is not supported for sharing the SUSDB.
Lastly, you will need a shared WSUS content directory that you have already created using either a standard network share or Distributed File System (DFS). All of the WSUS computer accounts must have change permissions for the share.
PART I: Installing WSUSYou may install WSUS using this article via PowerShell if you wish, or by using Option 1, Step 1 of the NLB WSUS 6.X article. However, I will be using Server Manager followed by the post installation tasks run via PowerShell. It is also worthwhile to note that when you install WSUS specific patches that you have downloaded files for, you would want to follow the guidance laid out for NLBs where you patch one node at a time.
1. Open Server Manager, click on “Manage” then select “Add roles and features”:

2. Follow the prompts until you get to “Server Roles”, then check “Windows Server Update Services” and click Next.

3. The Add Roles and Features Wizard will then pop up and offer to install any prerequisites needed. Click on “Add Features”, then click “next” to continue to Features. Skip through WSUS heading and get to “Role Services” for WSUS.

4. Uncheck “WID Database”, select “Database”, then click “Next”.

5. Fill in the share that you created as part of the previously mentioned requirements when you get to “Content”. In this case, the share is on the server I am currently installing WSUS on however it does not have to be on one of the WSUS computers. Take note of the author’s taste in music based on the domain name. There will be a pop quiz on it later. Click “Next”.

6. Fill in the SQL server name (\Instance if needed) and click “Check connection”. The wizard will tell you if you successfully connected or not. If it successfully connected, click “Next”. If not, troubleshoot why your computer will not connect to the SQL server.

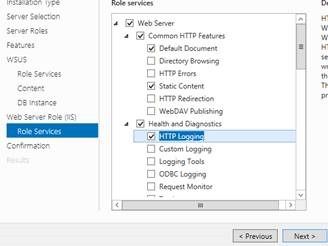
7. Click “Next” to get through the information about IIS, until you get to Web Server Role (IIS) Role Services. At this point, I usually like to add the HTTP logging for IIS since it is not added by default. Other Role Services can be added at this point if needed as well. Note that the default location for IIS logging is c:\inetpub\logs\logfiles and you may want to change this default as well after you complete your install. After deciding if you want IIS logging or not, accept the rest of the default Role Services for IIS.
8. When you get to the Confirmation page, click “Install”, then click “Close” when finished.
9. Now we have to do some post installation tasks. You can do this a few different ways:
Option 1: Open the WSUS console and work through the prompts:

Option 2 : Through Server Manager from the notification:

Option 3 : Via PowerShell, which is my preference:
a) Launch PowerShell using administrator credentials.
b) Change to the C:\Program Files\Update Services\Tools folder.
c) Run the following, filling in the information specific to your environment:
.\Wsusutil.exe postinstall SQL_INSTANCE_NAME=”Server\Instance” CONTENT_DIR=”\\Servername\sharename”

Notes on the post install configuration process
Please note that you need the “.\ “ in front of wsusutil.exe or it will not execute in PowerShell. For the default SQL instance, just type in the server name. You do need the quotes in the above command. It will launch the post install which installs the SUSDB, recreates the website on port 8530 (default) and points to the ContentDir. The post install command will create a log in the <user>\AppData\Local\Temp directory which will be in the form of tmp XXX. tmp. This log may be 0kb for a little while. It will spawn another log called WsusUtilUseCustomWebSite.log. The website log will disappear if all goes well with the website install, then the tmp XXX. log will be written to at that point. The tmp log will show you the tables, stored procedures, views, etc being created/verified in the SUSDB.

10. Do these same steps for any other WSUS computers that will be Software Update Points (SUPs) off the same Configuration Manager Primary Site. You can have up to 4 front end WSUS servers sharing a SUSDB . If you are setting up WSUS to use SSL, additional WSUS configuration is required .
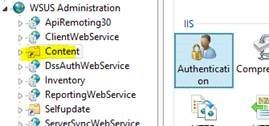
PART II: Verifying the WSUS Settings1. Open IIS and expand it. Right-click the Content vDir and select “Manage Virtual Directory”, then “Advanced Settings”:

2. Under Physical Path, you may (or may not) notice that the path looks a little off. If you do not see \\ in front of your server name, add it then click “Ok”.
This is wrong:

This is right:

3. Open the registry and navigate to HKLM\Software\Microsoft\Update Services\Server\Setup. Check the registry keys below.

- ContentDir: This should be the same as the Content Directory you specified during the post install process.
- IISTargetWebsiteIndex: This is the IIS site ID. Your IIS logs are named after this by default:

- PortNumber: The default port is 8530. 8531 for SSL.
- SQLDatabaseName: This is always “SUSDB”. It is not supported to rename the database.
- SQLServerName: This is the ServerName (and \Instance, if applicable).
- UsingSSL: Set to 0 for false and 1 for true.
4. This is optional, but you can also check the content location from the database. You can see that it automatically adds the \WSUSContent directory at the end of it as IIS did for the vDir.
select LocalContentCacheLocation from tbConfigurationB

1. Decide which SUP you want to install first. Typically I choose the server that is less utilized or that has better specifications as the first SUP to install if my servers are not quite exactly like each other.
2. Install your SUPs like you normally would. I am going to install my SUP role on my remote WSUS computer first, then install the SUP role directly on my primary site server second. Since this is a new computer to my environment, I select “Create Site System Server” from the Home tab under Administration –> Site Configuration –> Servers and Site System Roles, then type in the FQDN of the server and my installation account if needed.

Next set the proxy server and the credentials for it if needed.

Now select the Software Update Point Role and click “Next”:

Select your ports based on what you saw in Part II, Step 3 in the registry:

Configure any additional settings for the proxy, then step through the rest of the wizard to finish installing the role.

You will see the new machine show up under Servers and Site System Roles.

3. Monitor SUPSetup.log on the SUP computer along with WCM and WsyncMgr logs on the site server to see if you have any additional issues.


4. Add the next SUP off the site. Note that you may see that your SUP lists Microsoft Update as its source rather than the upstream WSUS. This is usually an indication that the WSUS configuration is pending, or it’s having issues like the one below. You will see the catalog version update when your computer finishes the first sync with the upstream server.

Issue 1: The WSUS Content Directory is set to the wrong location
One of the most common configuration issues I run across is that the WSUS Content Directory is set to the wrong location for one of the WSUS front end servers. Typically content files for updates are not stored in the WSUS Content Directory when using Configuration Manager to install patches, however it is used for EULA files. A clue that this may be your issue is machines reporting they can’t find a EULA file in the WindowsUpdate.log/etl:
WARNING: Fail to download eula file http://JoyDivision:8530/Content/AE/C324C69722CB5F82E63CE9C6D73CFBF8675309AE.txt with error 0x80244019
To resolve this, first verify the steps from Part II above for the computer you are attempting to get the text file from. Usually you will see that something does not match. It’s important to know that the registry will not show the directory “\WSUSContent” directory at the end of the path, unlike SQL and the IIS virtual directory for content. In this example, all of my settings seem to be pointing to D: on this WSUS front end server rather than the share name \\2012R24GB .


We already know what the problem is, but there are a few other symptoms that point to this being the issue as well. For example, I can’t browse to the URL of txt file above and IE notes it is 404’d:

If I right-click on the Content virtual directory in IIS from the front end WSUS and select “Explore”, I see that the directory is empty (not always though):

I can see that the file is in the share:

TIP: WSUS files places the files in the directory that matches the last two places of the file name. In this case it would be AE.
Now that we know what the problem is, let’s fix it! Run WSUSutil postinstall from PowerShell to set the correct location (see part I, step 3 above):

Verify all of the items from IIS, the registry as well as SQL to ensure they are set correctly.
Next, run a WSUSutil reset to verify and re-download any missing files:

Verify that the reset is running from C:\Program Files\Update Services\Logfiles\SoftwareDistribution.log on the front end WSUS computer. You will see a notification event for it typically followed by a reporting event that Content Sync started:


Issue 2: Some front end WSUS computers cannot access the shared content directory
Another fairly common problem is when some of the front end WSUS computers are unable to access the shared content directory for some reason. Normally you will see some sort of 401 error ( 401.3’s mostly ) in the IIS logs when trying to get a content file. You will also see errors from the Windows Update Agent in windowsupdate.log.
A typical Windows Update error on a client will look something like this:
WARNING: WinHttp: SendRequestUsingProxy failed for http://JoyDivision:8530/Content/AE/C324C69722CB5F82E63CE9C6D73CFBF8675309AE.txt error 0x800710dd
Here is a typical IIS error logged at the same time:
10.10.10.5 HEAD /Content/ AE/C324C69722CB5F82E63CE9C6D73CFBF8675309AE.txt 8530 - 10.10.10.221 Windows-Update-Agent - 401 3 5 281
Frequently the resolution for this is to change the pass-through authentication settings on the Content VDir in IIS. Check out the diagram for how this works.
To do this, first highlight the Content vDir for WSUS in IIS then double click “Authentication”:
Next, click on Anonymous Authentication and select “Edit”:

Change this from IUSER to Application Pool Identity and click “OK”. Keep an eye on the IIS logs for any errors when accessing content to help determine if this resolves the problem.

Note the WSUSPool’s identity:

Tips for troubleshooting other permission problems
1. Verify permissions listed here .
2. Use a check file for testing and troubleshooting. To do this, create an empty text file in the \WSUSContent folder and call it ContentFolderAclsCheck.txt, then restart the WSUS Service. Now run wsusutil checkhealth and check the application event log to assure no 10012 errors for the content directory. Verify that the contentfolderaclscheck.txt is no longer there. the CheckHealth parameter will process the file and remove it if permissions are working correctly.
Part V: Performance Tips
1. I like to just go ahead and modify the WSUS Application Pool’s memory limit for recycling since I know approximately what the memory usage is during peak scanning times in my lab.
Appcmd can be used to determine the PID of the process running WSUS AppPool. To do this, from an elevated Command Prompt, change to the Windows\System32\inetsrv folder amd run appcmd.exe list wp to get a list of Application Pools and their PIDS. You can see here that my WSUS isn’t very busy right now since I just built it and have no clients scanning against it:

2. Right after I finish my first sync, I like to go ahead and schedule WSUS Maintenance and run it for a few different reasons:
a. Primarily, I run this directly after my first sync to go ahead and decline superseded updates that I know I will not be deploying so that my clients will scan faster and my WSUS computers do not consume resources for items I don’t need. The WSUS will sync these in initially since they are in the catalog .
b. Since I just got a fair amount of updates imported, I might as well reindex the SUSDB while I am looking at it.
c. I also like to test my scheduled tasks so I am confident they will kick off on schedule.
I hope this information helps, and if you are interested in taking this to the next step and using NLB for your SUP, take a look at my buddy Cameron’s article here.
As always, thanks to The Scripting Guy for the scripts and to my colleague Vinay Pamnani for his valuable input.
Meghan Stewart
, Support Escalation Engineer
Microsoft Enterprise Cloud Group