Turn on suggestions
Auto-suggest helps you quickly narrow down your search results by suggesting possible matches as you type.
- Home
- Windows Server
- Ask the Directory Services Team
- USMT Custom XML the Free and Easy Way
USMT Custom XML the Free and Easy Way
- Subscribe to RSS Feed
- Mark as New
- Mark as Read
- Bookmark
- Subscribe
- Printer Friendly Page
- Report Inappropriate Content
By
Published
Apr 04 2019 03:25 PM
837
Views
Apr 04 2019
03:25 PM
Apr 04 2019
03:25 PM
First published on TechNet on Feb 10, 2010
Ned here again. XML is used to configure all aspects of USMT 4.0 migration and is especially important when customizing. Unfortunately most IT staffers are not familiar with XML – why should they be? It’s barely used within Windows and is mainly an applications-specific file store. Maybe you noticed that group policy ADMX files are XML – did you care, since you were using the GP editor to make changes?
Unfortunately, there’s no USMT XML editor. What’s more, XML follows programming conventions– tags must be closed; nesting must be complete; rules are case-sensitive. And any mistake in the XML will cause the migration to fail or skip crucial steps.
XML, like any programming file format, has rules. This means that there are tools that can examine that file and see if the rules are being broken – programmers are not super human. One such tool is Visual Studio 2008 Express . It has an excellent suite of XML authoring and validation options – and it’s free :).
Let’s come up with a scenario that requires custom XML, create our file, and then validate it.
End users love wallpaper. I mean they love it , in a manner usually reserved for grandkids, puppies, and their first car. So when you find that USMT doesn’t migrate wallpaper from XP to Windows 7, you know they won’t be pleased.
After some Internet exploration , you find all the wallpaper settings from XP and the default wallpaper locations are made up of a few registry settings and folders. You have examined our various references, including:
Now you want to bang out a custom XML file. Most folks are not familiar with VS2008 so I’ll go through this step-by step.
Let’s create some intentional mistakes to show how Visual Studio can help:
See how much easier this is than using Notepad? :) The right tool for the job makes all the difference and didn’t cost you a dime. Take a few more of the examples included in Exclude Files and Settings and Include Files and Settings , paste them into some new XML files in your project, and start tinkering. Repetition breeds familiarity. Everything above also works with Visual Studio 2008 Professional of course.
Save your Wallpaper.XML to the USMT folder and fire up scanstate in a test environment with /i:wallpaper.xml . Your users can now have their old wallpapers migrated free of charge. I’m sure they will thank you. Riiiiiiight .
Update October 29 2010: If using Visual Studio Express 2010, make sure you click "Tools --> Settings --> Expert Settings" in order to see the XML menu and other feateures described above. We buried a lot in this version...
Until next time.
Ned “bliss.bmp” Pyle
Ned here again. XML is used to configure all aspects of USMT 4.0 migration and is especially important when customizing. Unfortunately most IT staffers are not familiar with XML – why should they be? It’s barely used within Windows and is mainly an applications-specific file store. Maybe you noticed that group policy ADMX files are XML – did you care, since you were using the GP editor to make changes?
Unfortunately, there’s no USMT XML editor. What’s more, XML follows programming conventions– tags must be closed; nesting must be complete; rules are case-sensitive. And any mistake in the XML will cause the migration to fail or skip crucial steps.
XML, like any programming file format, has rules. This means that there are tools that can examine that file and see if the rules are being broken – programmers are not super human. One such tool is Visual Studio 2008 Express . It has an excellent suite of XML authoring and validation options – and it’s free :).
Let’s come up with a scenario that requires custom XML, create our file, and then validate it.
The Scenario
End users love wallpaper. I mean they love it , in a manner usually reserved for grandkids, puppies, and their first car. So when you find that USMT doesn’t migrate wallpaper from XP to Windows 7, you know they won’t be pleased.
After some Internet exploration , you find all the wallpaper settings from XP and the default wallpaper locations are made up of a few registry settings and folders. You have examined our various references, including:
Now you want to bang out a custom XML file. Most folks are not familiar with VS2008 so I’ll go through this step-by step.
Authoring
1. Download and install Visual Studio 2008 Express Edition (.Net) , then start it up.

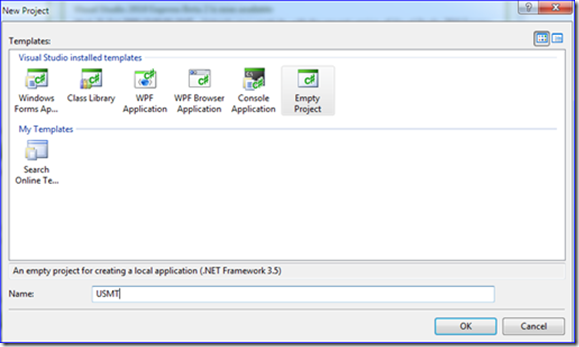
2. Choose File , New Project , and select “Empty Project”. Call it USMT.
3. In your new project, select Add then New Item .

Select XML file and give it a name like “wallpaper.xml”, then add it.

Click File menu, then Save All . Save your project and files somewhere.
4. Paste in the following sample that migrates wallpaper and background settings. It’s wrapped for readability:
<migration urlid=" http://www.microsoft.com/migration/externalUserDocs" >
<!-- This component migrates wallpaper settings -->
<component type="System" context="User">
<displayName>Wallpapers</displayName>
<role role="Settings">
<rules>
<include>
<objectSet>
<pattern type="Registry">HKCU\Control Panel\Desktop [Pattern]</pattern>
<pattern type="Registry">HKCU\Control Panel\Desktop [PatternUpgrade]</pattern>
<pattern type="Registry">HKCU\Control Panel\Desktop [TileWallpaper]</pattern>
<pattern type="Registry">HKCU\Control Panel\Desktop [WallPaper]</pattern>
<pattern type="Registry">HKCU\Control Panel\Desktop [WallpaperStyle]</pattern>
<pattern type="Registry">HKCU\Software\Microsoft\Windows\CurrentVersion\Themes [SetupVersion]</pattern>
<pattern type="Registry">HKCU\Software\Microsoft\Internet Explorer\Desktop\General [BackupWallpaper]</pattern>
<pattern type="Registry">HKCU\Software\Microsoft\Internet Explorer\Desktop\General [TileWallpaper]</pattern>
<pattern type="Registry">HKCU\Software\Microsoft\Internet Explorer\Desktop\General [Wallpaper]</pattern>
<pattern type="Registry">HKCU\Software\Microsoft\Internet Explorer\Desktop\General [WallpaperFileTime]</pattern>
<pattern type="Registry">HKCU\Software\Microsoft\Internet Explorer\Desktop\General [WallpaperLocalFileTime]</pattern>
<pattern type="Registry">HKCU\Software\Microsoft\Internet Explorer\Desktop\General [WallpaperStyle]</pattern>
<content filter="MigXmlHelper.ExtractSingleFile(NULL, NULL)">
<objectSet>
<pattern type="Registry">HKCU\Control Panel\Desktop [WallPaper]</pattern>
<pattern type="Registry">HKCU\Software\Microsoft\Internet Explorer\Desktop\General [BackupWallpaper]</pattern>
<pattern type="Registry">HKCU\Software\Microsoft\Internet Explorer\Desktop\General [Wallpaper]</pattern>
</objectSet>
</content>
</objectSet>
</include>
</rules>
</role>
</component>
<!-- This component migrates wallpaper files -->
<component type="Documents" context="System">
<displayName>Move JPG and BMP</displayName>
<role role="Data">
<rules>
<include>
<objectSet>
<pattern type="File"> %windir% [*.bmp]</pattern>
<pattern type="File"> %windir%\web\wallpaper [*.jpg]</pattern>
<pattern type="File"> %windir%\web\wallpaper [*.bmp]</pattern>
</objectSet>
</include>
</rules>
</role>
</component>
</migration>
It will now look much better, which is one important advantage of using VS 2008 to work with USMT XML: many mistakes can be avoided just by the visual cues of colored letters and proper formatting.

5. Click the XML menu and choose Schemas… (note that if you don’t select an XML document tab, the menu won’t appear).

Add in the MIGXML.XSD from your USMT folder. This file defines the schema of USMT XML and will allow Visual Studio to point out further errors.

6. Open the View menu and select Error List :

Now you will see all syntax errors in your XML file in real time, both with an underline squiggle, a la MS Word, as well as in the error window below. The sample I gave to paste in is (of course!) perfection, so you have no errors yet.
Validation
Let’s create some intentional mistakes to show how Visual Studio can help:
- Change <component type="System" context="User"> to <component type="System" context=" u ser"> . Note how the lower-case “user” is now underlined and the error list shows “The ‘context’ attribute is invalid.” XML tags are case-sensitive and a lower case user no longer matches the schema defined name of “User”, so an error is raised. Change it back.
- Change <component type="System" context="User"> to <component type="System" context="SystemAndUser"> . Since the real value must be “UserAndSystem”, the context attribute is invalid. Change it back.
- Change any <include> tag to <include . The next line will show an underline and “Expecting ‘>’” will appear with a line number. Change it back.
- Delete any </include> tag. Now you will see an error “Tag was not closed” and “Expecting end tag </include>”. Change it back.
See how much easier this is than using Notepad? :) The right tool for the job makes all the difference and didn’t cost you a dime. Take a few more of the examples included in Exclude Files and Settings and Include Files and Settings , paste them into some new XML files in your project, and start tinkering. Repetition breeds familiarity. Everything above also works with Visual Studio 2008 Professional of course.
Save your Wallpaper.XML to the USMT folder and fire up scanstate in a test environment with /i:wallpaper.xml . Your users can now have their old wallpapers migrated free of charge. I’m sure they will thank you. Riiiiiiight .
Update October 29 2010: If using Visual Studio Express 2010, make sure you click "Tools --> Settings --> Expert Settings" in order to see the XML menu and other feateures described above. We buried a lot in this version...
Until next time.
Ned “bliss.bmp” Pyle
0
Likes
You must be a registered user to add a comment. If you've already registered, sign in. Otherwise, register and sign in.