- Home
- Windows Server
- Ask The Performance Team
- An Introduction to the Windows System State Analyzer
- Subscribe to RSS Feed
- Mark as New
- Mark as Read
- Bookmark
- Subscribe
- Printer Friendly Page
- Report Inappropriate Content
There often arises a need to figure out what may have changed on a system, either due to a specific issue or even to compare the difference between two systems. Today I would like to introduce you to the Windows System State Analyzer utility. Unless you are a developer or tester, you probably have never heard of this tool, as it is part of the Windows 2008 R2 Logo Software Certification and Windows 2008 R2 Logo Program Software Certification toolkits.
The basic functionality of the System State Analyzer tool is to allow you to compare two snapshots taken at different points in time. This allows you to compare the state of a machine both before and after an application install for instance. Today I will give you a run-through of what the tool looks like while doing a compare of a system both before and after installing a software package, in this case Virtual PC 2007. The initial UI will look something like this:

As you can see, the interface is divided into two panes, each of which is for a separate snapshot that you wish to compare. You start by naming the first snapshot. By default, you are given several default name instances such as Post Install, Pre Configuration or Custom.
The Tools – Options menu is where you can choose what you wish to include in the snapshot for comparison. You can compare drives, registry keys, services or drivers.

Once you click OK and come back to the main window, you are all set to begin the first baseline snapshot. This snapshot may take some time to complete depending on which options you have chosen and the amount of data on the drives. By default, it creates a snapshot as a .BIN file under C:\Users\Public\Documents.
Once the first snapshot was done, I installed Virtual PC 2007 and let it complete. This time, I choose the section on the right side, named it Post Install and took the second snapshot. Once this is done, I clicked Compare and the comparison was done. It gave me the option to view the Detailed Report, which is saved as an .HTML file. For now, let’s take a look at the Quick Comparison tab:

Looking at the Services section, we can see service state changes as well as any new services that might have been added during the installation. The drivers section looks like this:

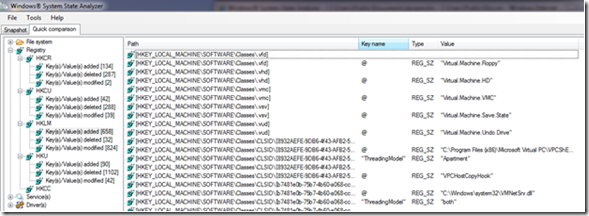
As you can see, two new drivers were added to the system as part of the Virtual PC 2007 install. Likewise, the Registry section shows any registry changes made between the snapshots:
And the Files section also:

Below is a quick peek at the Detailed Report; you can see the change summary and details filtered based on file extension and various other file properties:

I am sure you can imagine scenarios in which this tool may come in handy. If anything undesirable happens after any system state change, you now have the ability to see what may be related to your issue. You can download the tool at the following locations:
· Server Logo Program Software Certification Tool x86: http://go.microsoft.com/fwlink/?LinkID=140110
· Server Logo Program Software Certification Tool x64: http://go.microsoft.com/fwlink/?LinkID=140109
Note: You must have the .NET Framework 2.0 installed for Windows System State Analyzer to work correctly.
I hope this information comes in handy, and thank you for your time.
Sumesh P.
| Share this post : |
|
|
|

|

|

|

|

|
<br/>
You must be a registered user to add a comment. If you've already registered, sign in. Otherwise, register and sign in.